


Overview
Nova Terra, Dominion Ghost, specializes in leading a small strike force of highly trained units with access to a tool for every possible scenario. Backed by the most advanced Terran technology, Nova controls the battlefield with the speed and power of a nuclear explosion. She takes the field personally as a versatile hero unit that can switch between Stealth and Assault Mode at a moment’s notice, with access to a myriad of powerful abilities such as Sabotage Drone, Tac Nuke Strike and Penetrating Blast. Her Griffin top-bar allows her to call upon a variety of supportive abilities that can change the tide of battle in an instant, albeit at a cost in minerals. Though Nova has a lower supply cap than other commanders, each of her army units has greatly enhanced health, damage, abilities, and a measure of resistance to crowd-control effects, allowing her to sweep across the battlefield with deadly efficiency and precision.
Strengths
Strong Pushing Capability: With access to a multitude of damaging AoE abilities, Nova can easily stand up to both enemy bases and attack waves. With her long-ranged Liberators, Siege Tanks and Nova’s own Sabotage Drone, Nova is able to lay siege to enemy bases at minimal risk to her own forces. When forced to engage in close quarters, Ravens and Defensive Drones are highly effective at keeping Nova’s expensive units alive through even the harshest battles — and if things get too hot to handle, she can flee in an instant with Tactical Airlift.
Powerful Wave Clear: Between Nova’s burst damage, Griffin Airstrike, and the long range of her units, she has the freedom to clear waves without even engaging them, allowing her to dispatch every wave losslessly when microed well. In the late game, you can easily assist your ally by clearing a strong wave with a use of Griffin Airstrike, so long as you have a mineral bank stockpiled.
Versatile Army Units: Every one of Nova’s army units possesses enhanced attributes and powerful upgrades. This allows them to be highly durable, especially when supported by Ravens and Defensive Drones, and to be able to snowball effectively into the late game while providing devastating firepower on the battlefield. It is worth giving a special mention to the Liberators, Siege Tanks, and Ravens — these units are highly effective in both defensive and offensive situations, having access to some of the most powerful abilities in Co-op, however, a measure of active micro is required to get the most out of them.
Weaknesses
Difficult to Recover from Mistakes: Every one of Nova’s units is expensive and nigh irreplaceable. Production cooldowns mean that it is impossible to mass only one or two types of units, unless you have a Protoss ally actively Chrono Boosting your production structures. As such, any losses suffered can be difficult to replace, potentially forcing you to turn to units that may not be effective on that particular map or against a particular enemy composition. This becomes extremely important against dangerous enemy units such as Protoss Reavers or Zerg Scourge, which tend to require specific units to overcome. As such, great care must be taken to preserve key units such as Siege Tanks and Liberators.

Suggested Unit Compositions
Nova’s structures produce units via a cooldown system, with up to five charges building up over time and units being instantly deployed to any visible part of the map. Due to the nature of this system, it is not likely that you will be able to spend your resources optimally on only one or two unit types — a mixed group of units is the standard in a typical Nova army composition. Because of this interaction, it is wise to adapt your army composition according to the threats that you are facing and the resources you have at hand.
While the below compositions list units that will perform well against specific enemy compositions in various combinations, they are not strict guidelines to follow and we recommend experimenting in order to get a better understanding of each unit’s strengths and weaknesses so that you may be able to better adapt to various situations.
It is important to note that Ravens, Liberators, Siege Tanks, and Banshees are not typical “A-Move” army units — active micro is required if you intend to get the most out of these units. While every player’s micro capability is different, it is recommended to get at least one of the aforementioned units and actively micro them along with Nova herself during engagements. More experienced players can aim to use up to three of these micro-intensive unit types in their army.
Against ground compositions & on Infested maps
![[image loading]](http://www.teamliquid.net/staff/Chimaron/Guides/Nova/Units_Comp1.jpg)
Viable Units: Marine, Marauder, Liberator, Siege Tank, Raven
Viable Units: Marine, Marauder, Liberator, Siege Tank, Raven
These units are effective at countering heavy ground compositions such as Terran Mech, Zerg Ground, and Protoss Robo-Reaver. These enemy compositions typically do not come with strong anti-air units, which enables Liberators in Defender Mode to eliminate dangerous enemy ground units from afar without fear of retaliation. At the same time, Siege Tanks can provide quick bursts of AoE damage with their Spider Mines and sustained splash damage in Siege Mode, eliminating many enemy front-line units and thus allowing Liberators to focus on the tougher units. You should also try to use Ravens to drop Railgun Turrets in front of your ground units to soak up damage effectively. Marines and Marauders further add to your damage output as mineral-heavy unit options.
Dead of Night and Miner Evacuation require you to defend against an endless stream of Infested, which are numerous and mostly ground-based. Deploy Siege Tanks to deal sustained splash damage from range alongside Liberators in Defender Mode to supplement them with high single-target damage against tougher units such as Aberrations. The free Railgun Turrets spawned by Ravens serve as meat-shields for your army, while the Bio-Mechanical Repair Drones keep your army in healthy condition. Invest your excess minerals into Marines, Marauders, and/or Spider Mines in order to protect your expensive Siege Tanks from damage. While it can be tempting to deploy Ghosts for their bonus damage against light enemies, their excellent burst damage is not as effective for sustained engagements and other units may offer better value for the hefty resource investment.
Against air compositions
![[image loading]](http://www.teamliquid.net/staff/Chimaron/Guides/Nova/Units_Comp2.jpg)
Viable Units: Marine, Goliath, Ghost, Liberator, Raven
Viable Units: Marine, Goliath, Ghost, Liberator, Raven
These units are useful for neutralizing the various enemy air compositions. Goliaths provide effective crowd control against mechanical air units, keeping them locked down so long as they are being attacked. However, Goliaths can provide neither stuns nor effective DPS against the biological air units found in the Zerg air composition (Zerglings followed by Mutalisks), though they can still be deployed as a resource dump later in the game. The majority of your damage will be dealt by the Liberator’s splash attack in Fighter Mode and the Raven’s Predator Missiles, which are very effective against clumped-up air units. While Ghosts do not possess any extraordinary attack damage and their Snipes are not able to target Protoss and Terran air units, they can still be situationally useful for their EMP. The Snipe ability is able to burst down the airborne Hybrid Nemeses quickly, which Liberators struggle against. Additionally, the Ghost’s EMP Round ability is effective against Protoss units and energy-based spellcasters such as Battlecruisers and Hybrid Dominators. Finally, Nova’s Marines make for an excellent mineral unit option to supplement your army, providing strong single-target damage.
Against the Zerg Swarmy composition
![[image loading]](http://www.teamliquid.net/staff/Chimaron/Guides/Nova/Units_Comp3.jpg)
Viable Units: Marine, Marauder, Ghost, Siege Tank, Liberator
Viable Units: Marine, Marauder, Ghost, Siege Tank, Liberator
The Zerg Swarmy composition (Zerglings followed by Banelings, Vipers and Scourge) comes with a large number of low-HP enemy units, and these Banelings and Scourge may destroy your expensive units easily if they are not dealt with quickly. While Banelings and Zerglings are best handled by Nova’s Penetrating Blast, she may be rendered impotent by the Disabling Clouds of enemy Vipers if you do not pay close attention — Vipers will only cast this on groups of units, so you can avoid this by moving Nova separately from your primary army. It is worth keeping in mind that Spider Mines can still be instantly deployed by Siege Tanks in order to quickly take out groups of Banelings, even when under Disabling Clouds, thus shielding your army very effectively. The aerial splash damage of Liberators is also effective against Mutalisks and Scourge, but you should be mindful not to leave them in Defender Mode when enemy Scourge are nearby. While Ravens can easily die to Scourge, you may still build them provided that they are well-shielded by your Liberators. You may also opt to omit all air units in your army, so that there will not be any target available for enemy Scourge. Ghosts are an excellent late game option due to their exceptional supply efficiency and burst damage, while Marines and Marauders can be deployed with your excess minerals.

General Tips
- As each use of Nova’s unit squads has a long production cooldown of five minutes, it is recommended that you build the Factory and Starport as soon as possible, concurrently with or right after your expansion’s Command Center and dropping your first squad of Marines, which should be used for clearing the Rocks or the units guarding the expansion. You can also politely request a Protoss ally to Chrono Boost one or more of these production structures if possible.
- Learning when to switch Nova’s Mode can benefit you greatly. When Nova spawns at 4 minutes into the game, it can be useful to target a nearby enemy encampment with Sabotage Drone before switching to Assault Mode and clearing the first attack wave with it. Against ground-heavy enemy compositions, try to have Nova spend the downtime between waves in Stealth Mode deploying Sabotage Drones and Sniping threats, which also allows her to switch to Assault Mode later to deal bonus damage to the incoming wave of enemies.
- As Nova has access to cheap unit and hero upgrades as well as the ability to call down squads of units instantly, it can be useful to plan around which units you intend to use and get their upgrades ahead of time.
- However, you can consider skipping all upgrades in the Ghost Academy except the valuable Ghost Visor, which provides Nova with detection and ability to see enemy units as red markers within 20 radius in the fog of war. Increased HP regeneration rate (Caduceus Reactor) does not have much benefit on Nova, who already enjoys a fast healing rate. Operational Efficiency and Infernal Projectiles boost the Stealth and Assault Modes respectively, but these upgrades require a larger resource investment (100 minerals and 100 gas for each). The former can be worth getting against air units that can be killed with a single cast of Snipe, such as Banshees and Liberators. On the other hand, the latter can be relevant for Infested maps with considerable numbers of light ground units, but this is often unnecessary in other situations as Penetrating Blast is already effective without the upgrade.
- It is often unimportant to research the armor upgrades for Nova’s army, which leaves you with more resources for her powerful gas-heavy units. With good use of the Defensive Drones and various burst-damage abilities, it is possible to prevent her army units from dying, even without any armor upgrades. While Nova’s army is heavily reliant on shields provided by Defensive Drones for damage mitigation, these shields do not benefit from armor upgrades. As such, you only need to build one each of Engineering Bay and Armory in order to unlock your tech and weapon upgrades.
- Stray enemies can be handled by deploying a squad of units such as Marines, instead of Tactical Airlifting back your entire army. To handle an enemy Ghost attempting to nuke your base, you can deploy a Raven and one-shot the Ghost with its Predator Missile. If you really need to, you can always kill Nova with your army and respawn her wherever she is needed.
- It is likely that you will have an excess of minerals from the mid game and onward. Spending these minerals often comes down to a choice between fields of Spider Mines deployed by Siege Tanks and liberal usage of the Griffin Airstrike — Spider Mines are more cost-effective when engaging with your main army or camping enemy spawn points, while Griffin Airstrike is best used away from your army to take out multiple enemy units at once, and against air compositions.
- While a Defensive Drone costs 100 minerals, even a single Elite Marine costs 150 minerals. Don’t be afraid to use Defensive Drones liberally to keep your units alive. If you’re ever faced with the decision of picking which units to rescue, remember that Nova can be instantly respawned, but your units are locked behind a long cooldown.
Calldown and Unit Overview
Calldowns
Summons a static Defensive Drone that automatically casts a shield on any nearby friendly units actively taking damage. This shield absorbs up to 200 damage, lasts for 30 seconds, and can be re-cast by the Drone every two seconds, up to over 40 casts before its energy is depleted. Each Defensive Drone costs 100 minerals, lasts for 60 seconds and has a cooldown of 60 seconds. You can store up to 5 Defensive Drones at once.
In most situations, one Defensive Drone will be sufficient for keeping Nova’s army alive within its AoE, but you can call in a few more Defensive Drones in more dangerous situations, allowing more units to be shielded at the same time. These Drones are very useful for keeping indispensable, low-HP, and ranged units alive, hence allied commanders such as Raynor and Kerrigan will very much appreciate Defensive Drones protecting their relatively feeble armies. You can also manually cast the shield on your units before leaving the radius of the Defensive Drone after initial use in order to not waste its remaining energy. Alternatively, cast it preemptively on Nova to protect her against the Hybrid Dominator’s Plasma Blast.
Note that the Defensive Drone is airborne and can be targeted by anti-air attacks, so air units like Liberators and Ravens are useful for shielding the vulnerable Drones from the enemy’s dedicated anti-air units by virtue of their higher target priority.
 Calls in the Griffin to strafe a large area in a line, dealing 500 damage to all enemies within the AoE after a brief delay. Has an initial cooldown of 2 minutes, subsequent cooldown of 30 seconds, and costs 1000 minerals per use (reduced up to 700 with Griffin Airstrike Cost mastery). As this costs a significant amount of minerals that can possibly go into building up your army, you are advised to use this powerful ability only when you can kill a large number of enemy units with it, or when you have a large surplus of minerals stocked up.
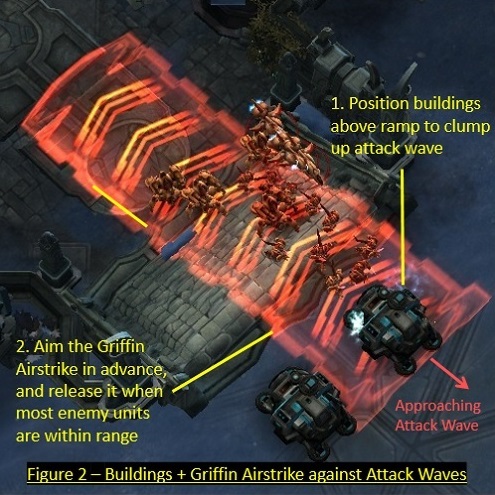 This is effective for breaching a heavily fortified enemy base before moving in with your army, but vision is required in order to position it in the center of the base — you can use a Sabotage Drone or Holo Decoy to gain vision. Refer to Figure 1.
 You can also use it against powerful attack waves, especially in the absence of your army. You will need to observe the mini-map carefully and time the Griffin Airstrike in advance in order to execute it effectively. In the absence of friendly units, you can leave some structures or Spider Mines for Griffin Airstrike vision. Refer to Figure 2.
Instantly transports all friendly units in the target area to another location, provided that you have vision of it. Has a cooldown of 2 minutes and a cost of 200 minerals.
Note that the first cast of Tactical Airlift loads all units into the Griffin, and the second cast unloads them onto another location. As such, you can choose to load the units first before taking some time to decide on a suitable location to unload them. However, be wary that there is a grace period of 20 seconds before the units get unloaded onto the original location.
This is Nova’s primary option for mobility, and can also be used to great effect in aiding a slow-moving ally’s army. Furthermore, you can use this ability to get your army out of tight spots, like when they are completely neutralized by an enemy Viper’s Disabling Cloud. It can be useful to send air units or SCVs to strategic locations to provide vision prior to using Tactical Airlift.
Instantly revives Nova at a target location, bypassing the default 90 seconds that she has to spent recovering in Stasis. Has a cost of 500 minerals, which is reduced by 5 minerals per second that she spends in Stasis.
It may be wise to reduce the mineral cost of this ability by reviving Nova only when her combat presence is needed. Note that she can be teleported to any location on the map with vision when Instant Regeneration is used, hence she can be redeployed to deal with stray enemy units if necessary. If Instant Regeneration is not used, Nova will automatically revive in your main base after 90 seconds, and it is therefore better to use Instant Regeneration a few seconds prior to her automatic revival in order to transport her to your army’s location instead of having to run back.
It may be wise to reduce the mineral cost of this ability by reviving Nova only when her combat presence is needed. Note that she can be teleported to any location on the map with vision when Instant Regeneration is used, hence she can be redeployed to deal with stray enemy units if necessary. If Instant Regeneration is not used, Nova will automatically revive in your main base after 90 seconds, and it is therefore better to use Instant Regeneration a few seconds prior to her automatic revival in order to transport her to your army’s location instead of having to run back.
Nova
20.00 DPS
Stealth Mode grants Nova permanent invisibility and greater attack range. Her abilities in this Mode are also highly effective for weakening enemy bases, and for dealing with air units. Upon switching to Stealth Mode, Nova’s energy is restored. She is also supposed to receive temporary invulnerability for 5 seconds, but this feature is currently bugged.
Stealth Mode grants Nova permanent invisibility and greater attack range. Her abilities in this Mode are also highly effective for weakening enemy bases, and for dealing with air units. Upon switching to Stealth Mode, Nova’s energy is restored. She is also supposed to receive temporary invulnerability for 5 seconds, but this feature is currently bugged.
Snipe deals 200 damage to a single enemy at the cost of 50 energy. With no cooldown, this makes for a great way to take out high priority targets or to weaken enemy base defenders before moving in with your army. The Operational Efficiency upgrade is available at the Ghost Academy, and will cause Snipe to refund 50% of its energy cost when it is used to kill an enemy unit. This upgrade can be useful at times, especially against specific air units, allowing Nova to consecutively Snipe multiple dangerous low HP units, such as Banshees and Liberators.
Deploys an undetectable Sabotage Drone which flies to a target location, and then explodes for 200 damage (+200 to structures) in the AoE 10 seconds after being deployed. Has a cooldown of 45 seconds and cost of 100 energy. This powerful ability allows you to wipe out smaller enemy encampments, or for larger bases to be significantly weakened before moving in with your army. While flying to its target location, the Sabotage Drone provides vision and can be manually controlled to fine-tune its final location. Thus, you can move Nova ahead to weaken nearby enemy camps with Sabotage Drone while your army is assaulting the objectives. Against attack waves, it can be difficult to position the Sabotage Drone due to the long delay before its activation, though you can cast it just ahead of your army’s location and then switch to Assault Mode a few seconds before engaging the enemy wave. Sabotage Drone is also extremely useful in providing vision for Nova’s other abilities. Whenever the Sabotage Drone is off cooldown, aim to use it before Snipe.
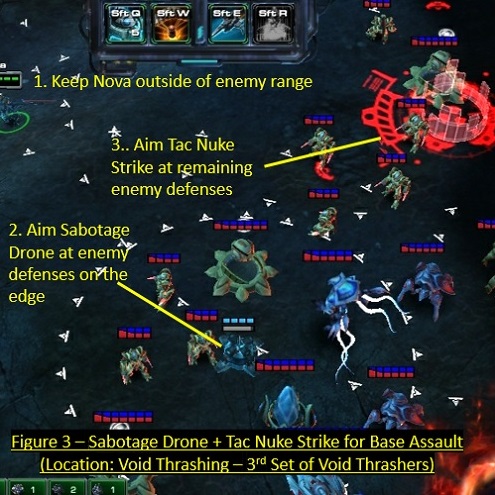 Calls down a very powerful Nuclear Strike at the target location, dealing 600 damage in a large radius to all enemy units and structures after 5 seconds. Has an initial cooldown of 10 minutes and subsequent cooldown of 7 minutes. This long cooldown means that you will often have access to one or two Nuclear Strikes only, so use it wisely to break into larger enemy encampments. Try to aim it right at the center of the enemy base instead of at the edge — this will require vision to pull off effectively without endangering Nova, and Sabotage Drone can be useful for this purpose, but try to aim both abilities at different areas for maximum damage. Refer to Figure 3.
10.00 / 20.00 (vs light) DPS
Assault Mode is particularly effective during the early game when attack waves typically consist of ground units. While Stealth Mode excels in base assault, Assault Mode is excellent for dealing with most enemy ground attack waves, and can be useful for tanking damage for the rest of your army. Upon switching to Assault Mode, Nova’s energy is restored, and she gains a temporary buff that doubles both her attack and spell damage for 5 seconds, making it worthwhile to fire off her Penetrating Blasts immediately upon switching.
Assault Mode is particularly effective during the early game when attack waves typically consist of ground units. While Stealth Mode excels in base assault, Assault Mode is excellent for dealing with most enemy ground attack waves, and can be useful for tanking damage for the rest of your army. Upon switching to Assault Mode, Nova’s energy is restored, and she gains a temporary buff that doubles both her attack and spell damage for 5 seconds, making it worthwhile to fire off her Penetrating Blasts immediately upon switching.
Deals 50 (100 vs light) damage in a wide arc at a cost of 50 energy and no cooldown. This is Nova’s primary means of dealing damage in Assault Mode, allowing her to clear out most enemy ground units with ease during the early game and on Infested maps. With the Infernal Projectiles upgrade, the range of Penetrating Blast is increased by 2. However, this upgrade is often unnecessary save on Infested maps since the original range is sufficient for dealing with most enemy ground units, and the ability does not scale well into the late game where you will face more armored and tougher units.
Teleports Nova to a nearby target location and grants her a temporary shield, absorbing up to 200 damage and lasting 8 seconds. This ability regains a charge every 8 seconds and stores a maximum of 3 charges. Coupled with Nova’s faster movement speed in Assault mode, this can be used to quickly move across the map and intercept enemy waves. If you time your usage of Blink efficiently by using it only when the shield expires or is depleted, Nova can effectively tank for your army throughout the early and mid game while simultaneously positioning herself for casts of Penetrating Blast. The duration of the shield is the same as the cooldown of each cast of Blink, so careful use of Blink makes Nova nearly unkillable.
66.67 DPS
Deploys a 2000 HP holographic duplicate of Nova that automatically attacks enemy ground units for 60 seconds. The Holo Decoy comes with a high-damage melee attack and a dash ability that deals 100 damage to enemy ground units in a line. However, its damage output is inconsistent as it spends more time dashing around distracting the enemies rather than actually attacking them. As such, the Holo Decoy is best used ahead of your army to tank and distract for your army units, rather than for sheer damage. When assaulting a base, it is useful for drawing the enemy units together for some massive AoE damage from the Griffin Airstrike or Tac Nuke Strike.
Deploys a 2000 HP holographic duplicate of Nova that automatically attacks enemy ground units for 60 seconds. The Holo Decoy comes with a high-damage melee attack and a dash ability that deals 100 damage to enemy ground units in a line. However, its damage output is inconsistent as it spends more time dashing around distracting the enemies rather than actually attacking them. As such, the Holo Decoy is best used ahead of your army to tank and distract for your army units, rather than for sheer damage. When assaulting a base, it is useful for drawing the enemy units together for some massive AoE damage from the Griffin Airstrike or Tac Nuke Strike.
Units and Structures
Without Super Stimpack: 12.03 DPS
With Super Stimpack: 18.05 DPS
Recommended Purpose: General all-around core unit
Nova’s general purpose unit. Marines are a highly effective mineral option, useful for their high damage output against all targets and their decent range. As compared to Nova’s other units, these Marines are more fragile and vulnerable to AoE effects, so be sure to protect them with Defensive Drones in order to keep them alive. The Super Stimpack upgrade is crucial to the Marines’ damage output and self-sustain and should be prioritized if you intend to build these as the core of your army.
11.50 / 23.00 (vs armored) DPS
Recommended Purpose: Anti-ground support for Marines
Compared to Marines, Marauders are beefier and make for a stronger option against armored ground enemies. As such, they may be used as a mineral-heavy unit option in combination/replacement of Marines against dangerous anti-ground units such as Protoss Reavers and Terran Siege Tanks. However, it should be noted that Marines have far higher impact due to their superior DPS and ability to hit air units, so try to prioritize their deployment unless you have difficulty keeping them alive. Suppression Shells add a slow effect to the Marauder’s attacks, while Magrail Munitions provide a secondary attack that deals 45 damage every 30 seconds. Both upgrades lack impact, but you can consider researching them if you intend to use Marauders in any significant numbers.
11.50 / 23.00 (vs light) DPS
Recommended Purpose: Anti-biological, Anti-Hybrid, Late-game
Expensive, cloaked support units that provide high anti-biological burst damage with their autocast Snipe ability — firing three shots of 170/85/85 damage to biological units every 30 seconds when upgraded with the important Triple Tap upgrade. As such, Ghosts are highly effective at instantly killing high priority biological units, which can be commonly found in various Zerg compositions, protecting your army from suffering any harm by rapidly taking out multiple enemies. This can also be useful for eliminating Hybrid as soon as they appear. Additionally, their researchable EMP Round deals 100 shield damage to Protoss and Hybrid units, while depleting all energy from enemy spellcasters in the target AoE. This allows a small squad of Ghosts to be very effective counters to specific threats, especially Hybrid Dominators and Battlecruisers, which may otherwise cause significant damage to your army with their spells. While most of Nova’s other units are more resource efficient (especially gas), these specialist units can be worth deploying in the late-game due to their high supply efficiency.
Hellion Mode: 5.52/ 16.56 (vs light) DPS
Hellbat Mode: 15.53 / 34.50 (vs light) DPS
Recommended Purpose: Anti-Infested structures on Dead of Night
While intended to be durable frontliners for countering swarms of melee units, Hellbats lack the durability required for such a role. In Hellbat Mode, these units are somewhat tanky, but it is difficult to keep them alive due to their short attack range, causing them to run rampant far from the rest of your army. While the Hellion Mode provides them with higher mobility and range, they lack sufficient DPS to be effective. They suffer mostly from a lack of synergy with the rest of Nova’s army and abilities, doubly so when they tend to engage far ahead of other units with longer range. As such, they often require separate Defensive Drones in order to stay alive, which is much less practical compared to using one or two to shield the rest of Nova’s units. A possible use is as a mineral dump option, should the charges on other units be on cooldown, especially after a disastrous engagement. Otherwise, your minerals are much better spent on Marines, Marauders, Spider Mines, and Griffin Airstrikes.
Vs air: 18.40 / 36.80 (vs armored) DPS
Vs ground: 20.70 DPS
Recommended Purpose: Anti-air, especially against Terran and Protoss
Nova’s go-to anti-air unit. When upgraded with Lockdown Missiles, Goliaths gain the ability to stun non-heroic mechanical units for 3 seconds with their air attacks, thus completely nullifying some of the most dangerous enemies in the game. An advanced tactic involves selecting a group of Goliaths to target a dangerous air unit such as a Battlecruiser, and then deselecting one Goliath from your control group at a time to target the next enemy unit, and so forth — this allows you to finely control which enemy air units you wish to keep stunned, rather than having your Goliaths focus-firing only a single unit at a time. On top of this, their bonus DPS against armored air units makes them valuable against many mission objectives that can be targeted by air attacks. However, it is to be noted that Lockdown Missiles are unable to stun Hybrid Nemeses and Zerg biological units. It is also worth noting that they are fairly ineffective against many ground compositions due to their lackluster DPS against ground units.
Tank Mode: 27.64 / 44.23 (vs armored) DPS
Siege Mode: 20.70 / 28.75 (vs armored) DPS
Recommended Purpose: Anti-ground, Holding positions with splash damage, Camping spawn points
Siege Tanks are among the strongest defensive units in the game. When deployed in Siege Mode, they are able to unleash massive splash damage to enemy ground units from a long range. If you are planning to deploy them mostly in defensive situations, it is highly recommended to equip them with the Graduating Range upgrade, which gradually boosts their attack range the longer they are deployed, up to +5 for a maximum of 18 range after 15 seconds. However, this is much further than that of their vision range, so you may want to have other units act as spotters for your Siege Tanks, using units and abilities such as Liberators, the Sabotage Drone, or the Raven’s Railgun Turrets.
They are equally impressive in Tank Mode, forming part of a mobile army that can quickly obliterate enemy ground units with a quick burst of Spider Mines. When upgraded, each Siege Tank can store up to three charges of Spider Mines, and each charge instantly deploys three Spider Mines at once at a cost of 50 minerals. These are extremely effective when used in battle against enemy ground units, or when laid directly on enemy spawn points. Using Rapid Fire allows you to deploy the Spider Mines even faster.
Fighter Mode: 16.61 DPS (vs air)
Defender Mode: 89.84 DPS (vs ground)
Recommended Purpose: Anti-ground, Anti-air, Pushing into enemy bases, Single-target ground defense
Liberators are among the most effective assault units in the game, though they come at a premium price. When deployed in the immobile Defender Mode, they are able to lay siege to enemy ground units and structures (with the Raid Artillery upgrade) from a great distance, gaining access to the highest anti-ground DPS out of any unit in Co-op. This attack is especially powerful against high-HP mission objectives or for sieging enemy bases from afar, but it comes with intensive micro requirement, as you constantly need to transform the Liberators. The Smart Servos and Raid Artillery upgrades allow them to transform four times faster and to attack structures, respectively, and both are extremely useful if you intend to deploy these units. Whenever possible, try to spread out their Defender Mode’s liberation zones — otherwise they may be wasting their high-damage shots on the same units due to projectile travel time. As Siege Tanks and Liberators are both extremely gas-heavy units, you can prioritize getting the former if you have to defend against dangerous attack waves or the latter for more effective base assault. Liberators also complement Siege Tanks very well in defensive situations, as the latter can be weak against high-HP targets such as Hybrids.
In the mobile Fighter Mode, Liberators are able to deal splash damage to clumped-up enemy air units. While this attack is not as powerful as the ground variant, Liberators in sufficient numbers can clear out most types of air units in enemy air compositions with one or two volleys. However, they are weak against high-HP air units, such as Hybrid Nemeses and Battlecruisers, so make sure to supplement your anti-air force with Marines and Goliaths if possible. When assaulting an enemy base, it is often more effective to deploy them into Defender Mode, relying on your other units or Nova’s Snipe ability to kill the isolated air units.
33.12 DPS
Recommended Purpose: Anti-ground, Clearing attack waves
An anti-ground specialist. The primary reason for building Banshees is for their Rocket Barrage ability, which deals 150 damage to enemy ground units in a targeted AoE. This allows them to one-shot certain enemy ground units, most commonly found in the Zerg Roach composition. However, against other enemy compositions, it requires more than one Rocket Barrage to kill the tougher units such as Siege Tanks and Immortals. Thus, its effectiveness is more limited. The 60 second cooldown on Rocket Barrage is also prohibitively long, resulting in Banshees performing poorly in sustained engagements and during base assaults. The Advanced Cloaking Field provides permanent cloaking to the Banshees, but enemy detection is usually in abundance. As Nova’s army already contains powerful anti-ground specialists in the form of Siege Tanks, Liberators, and Ravens, the role of the Banshee is greatly diminished. Specifically, the Banshee is often overshadowed by the Siege Tank in its role.
Recommended Purpose: All-around core caster
These are powerful spellcaster units that come with detection and at a relatively cheap cost. When the Enhanced Manufacturing upgrade is researched, each Raven can store up to three charges of each ability instead of one, providing reliable access to their powerful abilities. Making good use of these abilities can be extremely beneficial in many situations. As Ravens come with a long production cooldown, you should micro them carefully to keep them alive, especially against dedicated enemy air units such as Vikings and Scourge. It can be useful to include Liberators in your composition to act as a shield for these vulnerable units.
Bio-Mechanical Repair Drones are automatically deployed to heal both biological and mechanical units in your army whenever they take damage. With the Covert Triage upgrade, the healing rate is increased by 25% and the healed unit is cloaked by the Repair Drone. You can also use the Ravens to follow and heal your ally’s army, but do note that you have to manually cast the Repair Drones in this case. While Defensive Drones and Combat Unit Life Regeneration mastery are effective in keeping your units alive, this ability grants your army even greater defensive resilience.
Ravens can also use the Predator Missile ability on enemy units, dealing 100 damage (+35 vs shields) to all enemies in the area of impact after a brief delay. This ability is especially effective against clumped-up air units. Due to the casting delay between launch and impact, the Predator Missile may not always explode where you intended, so you may want to plan around this by launching them at tougher enemy targets right at the start of engagement.
Railgun Turrets can be deployed at selected locations, each lasting for 60 seconds. While they can hit multiple enemy units/structures with their piercing attacks, this is insignificant in most situations, but they can be used as building or objective cleanup on maps like Dead of Night. On the other hand, these free structures are very effective at soaking up damage when placed in front of your expensive ranged units at the start of engagements. This works well against enemy ground units and for baiting out certain dangerous enemy spells. However, enemy air units will often ignore the Railgun Turrets and go straight for your army units — in this case, you are advised to use Predator Missiles first.
15.00 DPS
As opposed to those spawned by Ravens with limited timed life, permanent Railgun Turrets can also be built with SCVs. Even though they are salvageable and able to deal piercing damage, they are often not needed due to a lack of DPS and Nova having access to a large number of more effective mineral dumps. In a defensive situation, Liberators and Siege Tanks provide far greater damage and attack range than these structures.
27.91 DPS
The standard Terran Missile Turret. Due to Griffin Airstrike being the preferred method of dealing with enemy air waves, it is rare that you need to depend on these defensive structures. You can still build them on Void Launch, which allows you to intercept the large numbers of enemy air units without moving your army, though they should not be built ahead of your army units. Against cloaked Ghosts attempting to nuke your base, a combination of one Missile Turret and one Railgun Turret makes for a standard defensive measure at each entrance to your base.
In-depth
Build Order
- 14 Refinery
- 15 Refinery
- 18 Command Center (Beside Rocks)
- 19 Barracks
- 22 Marines (break gas Rocks first, build Refineries thereafter, followed by breaking the main Rock)
- Continue SCV production off both Command Centers until both bases are fully saturated
- Relocate Command Center once the main Rock is down
Masteries
Power Set 1:
- Nuke and Holo Decoy Cooldown (-1s to -30s)
- Griffin Airstrike Cost (-10 minerals to -300 minerals)
Power Set 2
- Nova Attack Speed (+1% to +30%)
- Combat Unit Attack Speed (+0.5% to +15%)
Power Set 3:
- Nova Energy Regeneration (+1% to +30%)
- Unit Life Regeneration (+0.2 to +6)
Synergies
Raynor
Defensive Drone has great synergy with Raynor’s bio army as its main issue is survivability. Tactical Airlift can also ferry Raynor’s units across the map instantly. Raynor can help give vision for Nova’s powerful abilities. Medics provide another layer of survivability to Nova’s already robust units, and can be helpful during the leveling process before attaining sufficient mastery points for Unit Life Regeneration.Swann
Nova's Defensive Drones can protect Swann's expensive units and allow him to be more aggressive in his push. Extra gas from Swann helps Nova to get her expensive units out earlier, especially her Liberators and Siege Tanks.Zagara
Nova’s Defensive Drones can increase the survivability of Zagara’s otherwise fragile units, though they are best used on less disposable units such as Aberrations and Zagara the hero. Also, Zagara’s high burst damage provided by her Banelings and Scourge allows Nova’s army units to easily follow up and clear the base and objectives.Vorazun
Since Nova has access to several cloaked units and her Raven’s Bio-Mechanical Repair Drone can be upgraded to cloak the units they are healing, a good percentage of Nova’s units will benefit from Vorazun’s cloaking advantages. Black Hole works very well in combination with many of Nova’s AoE abilities and attacks, such as the Predator Missiles from Ravens and Liberators’ anti-air attacks. Nova will also appreciate the Chrono Boost on her cooldown-limited production structures, while Vorazun’s air units will appreciate the healing provided by the Ravens.Karax
Chrono Boost, Chrono Field, and Chrono Wave all significantly reduce Nova’s production cooldowns, allowing her far more freedom in choosing her preferred army composition. Karax’s Energizers provide a great damage boost to Nova’s army units. Also, a defense-based Karax can possibly spare one gas geyser for Nova, who appreciates the extra resources. Tactical Airlift can quickly relocate Karax’s relatively immobile army. Try to coordinate the use of Griffin Airstrike with Karax’s Spear of Adun abilities to avoid wasting minerals or energy.Abathur
While Abathur is highly efficient at pushing into fortified enemy bases, he lacks a strong single-target damage option against objectives with high HP, such as Trains on Oblivion Express and Void Shards on Rifts to Korhal. These are targets that Nova’s Liberators excel against, as well as her Siege Tank’s Spider Mines in some situations. Abathur’s army provides an excellent meat shield for Nova’s relatively fragile but lethal army.Alarak
Nova’s Defensive Drones can help to keep Alarak’s expensive units alive, and she can provide his relatively immobile army with timely uses of Tactical Airlift. Also, Alarak’s Ascendant army lacks anti-structure damage, which is well covered by Nova’s Liberators. Alarak’s Havocs provide powerful damage and range buffs for Nova’s army, and his Chrono Boost can be used to reduce the production cooldowns of Nova’s units as well.Stukov
Nova’s Defensive Drones can greatly increase the survivability of Stukov’s uprooted Infested Bunkers, especially when used for assaulting bases. Tactical Airlift is also very useful for relocating Stukov’s army quickly, but will not work on rooted Infested Bunkers. Stukov can spare Nova a few of his vespene geysers in some cases.Fenix
Nova provides Fenix’s units with much-needed healing via her Ravens, as well as covering for Fenix during the early-game while his army ramps up. On the other hand, Fenix’s Chrono Boost is very valuable to Nova by reducing the production cooldowns of her units. Fenix’s Arbiter suit can be used to cloak both armies to great effect if Nova focuses on Sniping the enemy detection.Dehaka
During the early game, Nova’s Defensive Drone can be very valuable for keeping Dehaka’s hero unit alive, allowing him to be more aggressive than usual. Nova’s Ravens can be used to heal Dehaka’s units that would otherwise take longer to restore with only Dehaka’s passive healing aura. While Dehaka’s hero unit can Deep Tunnel to any part of the map with vision, Tactical Airlift provides his army units with additional mobility. Additionally, Dehaka’s hero unit tanks very well for Nova’s ranged army, allowing them to deal great damage while staying out of harm’s way. Nova appreciates the vision granted by Dehaka’s Greater Primal Wurm ability, which allows her Griffin Airstrike and Tactical Airlift to be used with ease.Han & Horner
Nova’s Defensive Drones and Ravens are very effective at keeping Han & Horner’s air units and Galleons alive. Tactical Airlift can also be used to relocate Mira’s units and Galleons quickly. Nova appreciates the vision granted by Han & Horner’s Strike Fighters, which allows her Griffin Airstrike and Tactical Airlift to be used with ease.Map-Specific Tips
Chain of Ascension
- Once Nova spawns, you can use her Sabotage Drone to weaken the enemy base guarding your expansion before switching to Assault Mode to clear the first enemy wave headed for your base as well as the wave headed for Ji’nara. The first enemy encampment blocking Ji’nara’s path has only ground units, making Nova’s Assault Mode effective against it.
- Take out the static defenses at the first hybrid spawn area with a Sabotage Drone before triggering the first set of Hybrids to spawn. Liberators and Marines should be enough to handle this spawn with the support of Defensive Drones and Nova’s abilities.
- The second attack wave headed for your main base comes with high-tier units. Use your units to gain vision of the wave, then unleash a Griffin Airstrike upon them. Alternatively, you can use Spider Mines if you have Siege Tanks in your army.
- Sabotage Drones, Griffin Airstrikes and Tac Nuke Strikes are effective ways of taking out the two heavily-fortified enemy bases blocking Ji’nara’s path. Liberators and Siege Tanks can also lay siege to these bases from a distance.
- A Tac Nuke Strike or Griffin Airstrike can take out most of the enemy units at each Hybrid spawn easily. Alternatively, you can use Siege Tanks to deploy Spider Mines if you have sufficient time to camp these spots before the Hybrids spawn.
- Due to the long cooldown of Tactical Airlift, it can be a good idea to use Nova to guard Ji’nara against the attack waves headed for her, while the rest of your army handle the objectives and clear enemy bases.
- Marines and Goliaths deal good damage against the Slayn Elementals, but they can be disabled by the Cocoons if you are not careful. Try to keep Nova separate from the rest of your army, so that you can use her Penetrating Blast to destroy any Cocoons. Griffin Airstrike can be used as a last resort to clear the Cocoons should your entire army be disabled.
Lock & Load
- Nova’s Sabotage Drone can be used to take out the enemy defenses at the nearest three Celestial Locks easily, while the remaining units can be cleared using Snipe or Penetrating Blast.
- Sabotage Drones, Griffin Airstrikes, and Tac Nuke Strikes are effective ways of taking out the two heavily-fortified enemy bases guarding the northern and eastern Celestial Locks. Liberators and Siege Tanks can also lay siege to these bases from a distance.
- To counter the enemy units attempting to recapture the Celestial Locks, build a combination of Missile Turrets and Spider Mines. Doing so will also grant you vision to cast Griffin Airstrike on the attack waves or Tactical Airlift on your army in order to defend.
- Liberators can easily take out the Xel’naga Construct with the support of a Defensive Drone. Clear the enemy guards with a Griffin Airstrike.
Malwarfare
- A squad of Marines or Marauders is sufficient for taking the expansion early. Micro them so that they take turns absorbing the damage from enemy defenders, or simply support them with a Defensive Drone.
- Try to tech up to the Starport Tech Lab and obtain the Raid Artillery upgrade as soon as possible, as it is needed to allow your Defender Mode Liberators to attack the Suppression Towers. One squad each of Marines, Marauders, and Liberators is necessary for defeating the first Suppression Tower without Aurana’s Transport taking damage.
- There will be multiple attack waves heading for Aurana’s Transport, usually just before and after each Suppression Tower spawn. For the first two Security Terminals, these are mostly tier-one and tier-two units, so Nova’s Assault Mode will be especially useful for clearing them with Penetrating Blast, while the rest of your army assault the Suppression Towers. Ravens can also be useful for repelling these attack waves. For the last two Security Terminals, you may leave a solo Assault Mode Nova to defend Aurana’s Transport by using her as a spotter for Griffin Airstrike.
- Watch out for the Suppression Towers AoE attacks, especially at the third and fourth Security Terminals, which can slow your army units significantly and cause heavy damage to them. You can use Liberators to lay siege to the Suppression Towers from afar and then move your other army units in to engage the Suppression Towers from a different angle. This helps in diverting the attention of the Suppression Towers, preventing your stationary Liberators from being targeted as aggressively.
- You can choose to delay completing the first Data Core bonus objective in order to allow you to spend more resources on building up your army instead. Upon uploading the first AI, three enemy waves will head for this Data Core. They consist of only ground-based tier one units, so you can deploy a squad of Siege Tanks and their Spider Mines at this location prior to uploading the first AI. Alternatively, Assault Mode Nova is also a viable option for this defensive role.
- It may be useful to deploy Spider Mines around Aurana’s Transport and at possible enemy wave spawn locations if you have minerals to spare. Try to stockpile minerals for the third and fourth Security Terminals, which will come with much tougher attack waves, thus allowing you to use these minerals effectively on Griffin Airstrikes or Spider Mines.
Miner Evacuation
- A squad of Marines supported by Defensive Drones can help you to take your expansion alongside a pre-built Command Center before the first Evacuation Ship launches. Use two SCVs to build the Refineries while you are defending the first Evacuation Ship.
- Siege Tanks are very powerful defensive units on this map with their long-ranged splash attacks. Deploy Spider Mines near them in order to obliterate any Aberrations that get near.
- While Siege Tanks excel at dealing AoE damage, Liberators can be a great complement with their high single-target damage against Hybrid Behemoths and Aberrations, but be sure to spread out their liberation zones to cover different angles of approach. A combination of at least four Siege Tanks and four Liberators is an ideal defense for the last few Evacuation Ships.
- Nova’s Assault Mode is useful for killing the hordes of Infested units on this map, especially for the first two Evacuation Ships. Thereafter, you can consider switching to Stealth Mode if you have Siege Tanks available to provide splash damage. This helps protect your army against the large number of incoming units, and allows you to rapidly Snipe Infested Banshees and Aberrations when upgraded with Nova’s Operational Efficiency. Goliaths will not be necessary for anti-air if you are diligently Sniping the Infested Banshees.
- As you finish launching each Evacuation Ship, you can use Tactical Airlift to move your entire army to the next Evacuation Ship. Use a Raven to scout for the next Evacuation Ship in advance — you can even launch it with a Railgun Turret a few seconds before you cast Tactical Airlift.
- The occasional attack waves that head for your expansion can be defeated with Griffin Airstrike, or by Tactical Airlifting your army over to defend after the lift-off of an Evacuation Ship. You can also use a few Siege Tanks to deploy Spider Mines at your expansion before sending them to join the rest of your army.
- Blightbringer can be easily defeated with sufficient Spider Mines from your Siege Tanks — for best results, use four or more Siege Tanks. On the other hand, you are well-advised to avoid engaging the extremely dangerous Eradicators with any ground units. Defeat them with your Liberators instead, using a Defensive Drone for support.
Mist Opportunites
- Siege Tanks are very useful to have on this map due to their ability to deploy Spider Mines at enemy spawn locations. This weakens attack waves greatly or eliminates some waves entirely. By the time the last wave of Harvesting Bots spawn, it’s possible to have cleared the entire enemy base, allowing you to trap the attack wave spawns with impunity. This is useful even against enemy air compositions, as they are often accompanied by ground units and Hybrids.
- Tactical Airlift is very useful for teleporting you or your ally’s army from place to place to catch unexpected attack waves — with a little pre-planning, you can retain vision around the map with structures or Spider Mines so that you can Tactical Airlift to anywhere.
- Attack waves spawn from multiple directions and head for the Harvesting Bots, and your army may not be able to cover them all in time. Griffin Airstrike can be used to take out split attack waves, especially if you are not proficient at splitting your army.
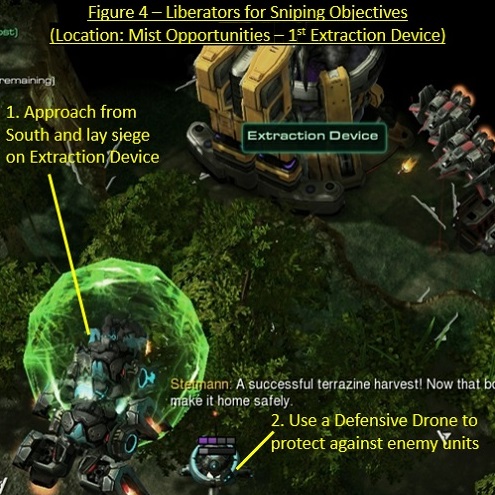 Stealth Mode Nova is useful for weakening the enemy bases blocking the path to the first Extraction Device bonus objective by using Sabotage Drone and Snipe, before moving in with your army. The units guarding the second Extraction Device should be taken out with a Tac Nuke Strike or Griffin Airstrike if possible.
 - Alternatively, you can use Liberators to destroy the first Extraction Device without clearing the enemy encampments by deploying them in Defender Mode in the dead zone behind the structure. Some enemy units may attack them, but a Defensive Drone will be enough to keep them alive long enough to destroy the Extraction Device. Refer to Figure 4.
Oblivion Express
- Liberators, Marines, and Marauders can provide good damage against Trains. Be sure to kill any air units with the Liberators in Fighter Mode, before switching to Defender Mode to attack the remaining ground units and the Train.
- Siege Tanks are excellent defensive units on this map. Sieging them up between the top and bottom tracks allow them to attack the Trains and escorts arriving from either direction. You can also use them in Tank Mode for greater mobility and single-target damage against Trains. Their Spider Mines can be deployed to cause significant damage against Trains and their escorts.
- The bonus objective Trains can be effortlessly taken out by preplaced Spider Mines, but be careful when faced with enemy Terran Ghosts who may nuke your minefields.
- Deploying Spider Mines at the top of each ramp into your bases can clear the stray Hybrid Destroyers that spawn as the Trains are damaged. They can also be used in combination with Missile Turrets to defend against enemy Ghosts attempting to nuke your bases, and this can be more resource efficient than building Railgun Turrets, though you may have to replenish the Spider Mines from time to time.
- Griffin Airstrike and Tac Nuke Strike are highly efficient options to clear the enemy Train escorts starting from the third Train, especially against air compositions. The attack waves move in a very predictable manner and spawn from the same location every game, so you can plan your Griffin Airstrikes easily. Should you use these, you may want to refrain from sieging up your Siege Tanks as their splash damage becomes somewhat redundant and their Tank Mode has better single target DPS.
- It is better to assault the front end of the Train instead of the tail end, so that your army can stand still and deal damage. To that end, you can use Tactical Airlift to quickly relocate your entire army to the front of the Train after you’ve destroyed the first of the double Trains.
Part and Parcel
- Assault Mode Nova is very useful for destroying the Parcels with Penetrating Blast and picking up Parts with Blink. Aim to destroy multiple Parcels with one or two Penetrating Blasts, although the beefier Parcels may have to be handled by your army units. Upgrading Nova’s Infernal Projectiles for the enhanced Penetrating Blast range may be useful for this.
- After dealing with the first attack wave, head for your expansion and begin clearing it. There will be multiple Parcels at this location that can buy you additional time for the mission objective.
- The few Parcels in your main base can be efficiently cleared by an SCV, so that Nova is free to clear the nearby bases as soon as she spawns. Use the SCV to “A” click on each Parcel, as right-clicking does not destroy the Parcel due to a buggy interaction.
- Along with the Parcels at the expansion, you can opt to clear the Parcels either to the west or south of the expansion — that’ll provide sufficient Parts for the Balius to start the first Hybrid Experiment objective. Clearing the western enemy bases is preferable, as it provides easy access to the first Train bonus objective as well as clearing the path for the Balius.
Against enemy attack waves headed for your bases, you can use Tactical Airlift to teleport your army back, or defend against them with a Griffin Airstrike plus deploying a few units to clean up any survivors. - While Liberators are not very useful for clearing Parcels and collecting Parts, they provide powerful attacks against the bonus objective Trains and the Hybrid mission objectives. However, you will need to constantly relocate your Liberator’s liberation zones against the Hybrid Experiments that can Blink across the battlefield.
- It is useful to reserve a Griffin Airstrike for instantly clearing the enemy units that spawn while assaulting each Hybrid Experiment. Also, you can deploy Spider Mines from Siege Tanks for bursting down the Hybrid Experiments if you have sufficient minerals stockpiled, especially for the final one.
Rifts to Korhal
- The first attack wave spawns very early. You can still use Nova’s usual build order, but deploy your Marines in your main base to handle the attack wave first before sending them to clear out the expansion Rocks. Support them with a Defensive Drone if necessary.
- Liberators are very useful on this map for their ability to lay siege to enemy bases from afar and for taking down Void Shards quickly. Use your Sabotage Drone, Tac Nuke Strike, and Griffin Airstrike abilities to weaken the enemy base defenses.
- Marines and Goliaths offer good damage output against the Pirate Ships. Be ready to dodge the Pirate Ship’s devastating charge attack — if endangered, you can use Tactical Airlift to save your army just before impact.
- When progressing from the third to fourth set of Void Shards, you can use Tactical Airlift to move your army across the map using vision granted by one of your air units. This will allow you to save valuable time.
- An alternative approach is to fly your Liberators around the edge of each base and focus on sniping the Void Shards from afar while carefully avoiding enemy units. Use Defensive Drones to protect your Liberators and Griffin Airstrikes to clear enemy units attacking them, adding Banshees later on with your spare gas. This method allows you to skip having to clear several enemy bases that would otherwise block your path.
Scythe of Amon
- You will likely have to wait for Nova to spawn before attempting to clear the first Void Sliver at the expansion alongside a squad of Marines — Nova’s Assault Mode is great for eliminating the enemy opposition at this stage of the game. Build your second Command Center in your main base and relocate it to the expansion once the surrounding enemy units have been cleared out. You can send SCVs to construct the expansion Refineries even while the Void Sliver is under attack.
- Once the enemy units guarding the first Void Sliver have been dealt with, you can send Nova to weaken nearby enemy bases with Snipe and Sabotage Drone, even while your Marines finish the Void Sliver.
- The first Warp Prism bonus objective sets off at 7:00 and can be difficult to escort, especially if you clear the Void Sliver at the expansion first. You need not need to take down the Void Sliver en-route to the first bonus objective area, but the enemy units guarding this Void Sliver should be cleared. A Griffin Airstrike is your best option to clear most of the base defences at the first bonus objective if you are pressed for time.
- Enemy attack waves arrive regularly from either the north or west. With the exception of the first wave, the subsequent attack waves are escorted by Hybrids, and it will therefore be impossible to clear them using solely Griffin Airstrikes, which can still be used in support of a friendly army — otherwise, you are best advised to Tactical Airlift your army back in defense of your base.
- Liberators in Defender Mode are very good at taking down Void Slivers quickly. Supplement your army with Goliaths in order to disable Protoss and Terran air units commonly found guarding the later Void Slivers. There are a lot of air units on this map, so aim to have as many anti-air units in your army as possible.
- Using a Tac Nuke Strike or Griffin Airstrike is highly recommended when you attack each Void Sliver beyond the first two. Have your Liberators siege the enemy base from range and then unleash either of these abilities on the onrushing units, targeting the Void Rifts at the same time if possible.
- Position your Liberators separately from the rest of your army while assaulting the Void Slivers, so that the Liberators will not get targeted by the Void Sliver’s AoE blue circle of death. During combat, try to actively hunt down the Death Grip Crystals — they can be Sniped by Nova as they are not classed as structures.
- Assault Mode Nova may prove too fragile in combat with the more difficult Void Slivers. Instead you may want to rely on her Stealth Mode, which is especially useful for Sniping multiple enemy air units when upgraded with Operational Efficiency. Spend your Defensive Drones and Griffin Airstrikes liberally if you have difficulties keeping your units alive.
Temple of the Past
- Defensive Drones, Tactical Airlift, and Griffin Airstrike are useful abilities for supporting your ally’s army, especially when they are engaging the enemy separately from your own army.
- Siege Tanks can quickly obliterate enemy ground units and Hybrids with Spider Mines. Try to deploy them at the attack wave spawn location of each lane as you clear the structures, and they can also provide valuable vision for your Griffin Airstrike and Tactical Airlift.
- You can simply leave a pair of Liberators in Defender Mode against any Void Thrasher on this map, and they will survive long enough to kill the Void Thrasher, even without the support of a Defensive Drone. This allows the rest of your army to deal with other attack waves, but be sure to leave the Liberators close to each Void Thrasher, so that they will attack the Liberators instead of the Temple.
- The Liberators can also be used to assault each Zenith Stone on their own.
- The splash damage from the Liberator’s anti-air attacks and Raven’s Predator Missiles are useful for clearing the enemy transport vessels arriving from the north-eastern island before they can unload the units. You can also use Griffin Airstrike if you have minerals to spare.
- If you have spare minerals, you can build additional Engineering Bays at the top of each ramp. These are tanky structures that can be used to hold up the enemy attack waves, enabling you to easily hit them all with Griffin Airstrike.
The Vermillion Problem
- It is possible to take the expansion with a squad of Marines before Nova spawns. Protect them with Defensive Drones if need be, but take heed to place the Drones out of range of enemy static defenses.
- It can be useful to incorporate a squad of Ghosts in your army for their EMP Rounds against Hybrid Dominators, which are commonly found on this map and can easily one-shot Nova with their Plasma Blast.
- The Xenon Crystal spawn locations and attack wave patterns tend to be somewhat unpredictable, making it difficult to handle them simultaneously. If you are proficient at splitting your army, you can possibly split them into two groups. Use the first group to roam around the expansion island, defending the base against enemy attack waves and retrieving the Xenon Crystals that spawn on the low ground after each lava surge. This group might also consist of a solo Assault Mode Nova or a group of Siege Tanks and their Spider Mines if you are faced with an enemy ground composition, or a group of Liberators against air compositions. Your second group would then consist mostly of easily microed units like Marines and Goliaths, and should be tasked with clearing enemy bases.
- Soften up heavily fortified enemy bases by using your Sabotage Drone, Griffin Airstrike, and/or Tac Nuke Strike abilities before moving in with your army.
Void Launch
- The first enemy attack wave arrives at your main base before Nova spawns. You may want to position your Barracks at the main entrance to draw the attention of the enemy units if you do not wish to divert your Marines away from clearing the Rocks.
- Marines and Goliaths should form your main anti-air force for taking out the Shuttles and their airborne escorts, and you may want to supplement them with Liberators and Ravens if necessary. With the exception of the final Shuttle wave, this group of units should be sufficient for handling the Shuttle waves on their own, which allows you to form another group of units dedicated to handling the more dangerous attack waves and for clearing out enemy bases.
- Build Missile Turrets at each Warp Conduit. This provides you with the vision you need to Tactical Airlift your army over to deal with incoming Shuttles or attack waves if need be.
- Siege Tanks are useful for camping the two spawn locations with Spider Mines. This will destroy most enemy ground units as soon as they spawn in, allowing your army to clean up the remnants much more easily.
- If you are able to clear the enemy main base, it will be useful to secure a third base for yourself, providing you with additional minerals for Spider Mines and Missile Turrets around each Shuttle Launch Bay, and more gas for your main army units. However, a fourth base is not recommended as you do not have the luxury of expendable supply to invest in SCVs.
Void Thrashing
- After the first Void Thrasher, look to soften each base up with Sabotage Drones, Griffin Airstrikes, and/or the Tac Nuke Strike before moving in with your army. Holo Decoy is best used for the last set of Void Thrashers to draw in the scattered enemy units, before using a powerful ability like the Tac Nuke Strike or Griffin Airstrike.
- Try to use Sabotage Drone as often as possible. Nova is best used for her abilities rather than auto-attacks, so you may want to use her to weaken another base while your army units are fighting the Void Thrashers.
- Once the second set of Void Thrashers has been cleared, you can Tactical Airlift your entire army to the third set of Void Thrashers. The expansion base of either player is a prime destination for Tactical Airlift should you wish to move from one side of the map to the other.
- Nova’s biological units work very well on this short-duration map due to the low ramp-up time required to get them going, especially Marines. Goliaths are also useful for their stun against Protoss and Terran air units, as well as Liberators for their sheer damage output against Void Thrashers.
Replay Pack
These solo speedrun replays showcase the effective use of various Nova units on different maps.- Chain of Ascension 100%: Marine/Goliath/Siege Tank/Liberator/Raven
- Chain of Ascension any%: Marine/Marauder/Goliath/Liberator/Raven
- Dead of Night: Marine/Marauder/Ghost/Hellbat/Liberator/Banshee
- Malwarfare 100%: Marauder/Goliath/Ghost/Siege Tank/Liberator
- Malwarfare any%: Marauder/Goliath/Ghost/Liberator
- Mist Opportunities: Marine/Marauder/Goliath: Siege Tank/Liberator
- Miner Evacuation: Marine/Marauder/Siege Tank/Liberator
- Orbital Express 100%: Marine/Marauder/Siege Tank/Liberator
- Orbital Express any%: Siege Tank/Liberator/Raven
- Rifts to Korhal 100%: Marine/Marauder/Goliath/Liberator/Raven
- Rifts to Korhal any%: Liberator/Banshee/Raven
- Scythe of Amon: Marine/Marauder/Goliath/Liberator/Raven
- Temple of the Past: Marine/Siege Tank/Liberator
- Vermillion Problem 100%: Marine/Marauder/Goliath/Liberator
- Vermillion Problem any%: Marine/Marauder/Liberator/Raven
- Void Launch: Marine/Goliath/Liberator
- Void Thrashing 100%: Marine/Marauder/Goliath/Liberator/Raven
- Void Thrashing any%: Marine/Marauder/Ghost
![[image loading]](http://wiki.teamliquid.net/starcraft/images2/7/73/Replay_Icon14.png)
Other Commander Guides


Writers: Raincamp
Graphics: Jester, Kat, v1
Editors: Aron, Dr_Orgo, Raincamp, ReturnOf, Yuriprime
Graphics: Jester, Kat, v1
Editors: Aron, Dr_Orgo, Raincamp, ReturnOf, Yuriprime

 What a bargain!