


Overview
Abathur, Swarm Evolution Master, is a commander who specializes in upgrading and evolving Zerg strains. By harvesting the Biomass of his fallen enemies, he seeks to create a highly efficient Zerg army spearheaded by his fearsome Ultimate Evolutions. Once on the field, these monstrous juggernauts dwarf even the most powerful units in the game. His units also gain health, energy regeneration, attack speed, and life leech with each point of Biomass gathered, compounding their effectiveness as the game drags on and granting Abathur the potentially strongest late-game army out of any commander. However, effective use of this commander requires a lot of knowledge and practice in order to get the most out of his Toxic Nests and Ultimate Evolutions.
[Last Updated: December 22th, 2019]
Strengths
Pushing Ability: Between his Ultimate Evolutions, Toxic Nests, and the Viper’s crowd control abilities, Abathur has a series of powerful tools at his disposal that allow him to push through heavily-fortified bases. At the peak of his power, it is rare that any enemy base or army can stand in his way.
Durability: When reinforced with 100 Biomass, each of Abathur’s units can possess up to 400% of its original HP, as well as restore 100% of its weapon damage dealt as life. When paired with the healing abilities provided by Swarm Queens and Mend, Abathur’s entire army becomes almost indestructible even when pitted against the strongest of enemies. With good micro, you can possibly go the entire game without losing a single unit.
Global Presence: Intelligent placement of Toxic Nests allows you to clear almost every ground unit from attack waves. This coupled with the Brutalisk’s Deep Tunnel ability on a 10s cooldown—usable anywhere on the map even without vision—allows you to intercept every enemy attack wave effortlessly even while the rest of your army is pushing objectives.
Resource Independence: Abathur’s units depend more immediately upon access to Biomass than upon how much supply he can field. In many cases, Abathur is better off with a small group of highly Biomass-fed units than on a larger group of weaker units. For this reason, Abathur can afford to go without expanding at all, which can be a strength on certain mutators or a boon to some allies.
Weaknesses
Dependence on Biomass: Abathur is almost completely dependent on Biomass in order to snowball. In the early game, fast generation of Biomass is essential for Abathur to evolve his six Ultimate Evolutions as soon as possible. Thereafter, his core army units are highly dependent on Biomass in order to attain greater survivability and damage output. While a helpful ally can assist Abathur in generating extra Biomass from enemy units, this important resource can just as easily be denied by an ignorant ally.
Suggested Unit Compositions
As all units are viable under certain circumstances, it is difficult to list every possible combination of units. As such, only the most commonly used compositions are listed. It is assumed that the six Ultimate Evolutions are evolved as quickly as possible in each of the listed compositions unless otherwise stated. Additionally, up to two Vipers and up to eight Devourers can be added onto any composition as situational unit choices that can effectively counter dangerous ground and air units, respectively—it is highly recommended to add them to your army as according to the ground or air prevalence of the enemy composition.
![[image loading]](/staff/Chimaron/Guides/Abathur/Unit_Comp1.jpg)
Mutalisk + Swarm Queen:
In this composition, Mutalisks are the primary damage dealers and they form part of an extremely potent late-game army that excels against all ground and air units, especially when laden with Biomass. However, they are extremely squishy and vulnerable when sent into battle without Biomass. As such, you should place emphasis on keeping these precious units alive. Up to eight Swarm Queens are added primarily for healing the Ultimate Evolutions, but you should consider getting as few Swarm Queens as is necessary to keep your army alive, so as to not deprive gas and Biomass from your Mutalisks.
![[image loading]](/staff/Chimaron/Guides/Abathur/Unit_Comp2.jpg)
Devourer + Swarm Queen:
Devourers excel against air units and air-targetable objectives, and as such this composition is effective on maps featuring air-targetable objectives and large numbers of capital ships, such as the Void Shards on Rifts to Korhal or Void Slivers on Scythe of Amon. Swarm Queens add anti-ground DPS to your army, and are important for healing your Ultimate Evolutions. It is worth noting that this composition does not by any means excel in damage against ground units and structures—use it only for specific purposes.
![[image loading]](/staff/Chimaron/Guides/Abathur/Unit_Comp3.jpg)
Guardian + Swarm Queen:
While Mutalisks outperform Guardians in most situations, Guardians can still be effective when defending against large numbers of ground units, most commonly found on Dead of Night and Miner Evacuation, where the superior range of Guardians allow them to attack constantly without the need for movement. Up to eight Swarm Queens are added to keep the Brutalisks alive as they will have to absorb large amounts of damage.
Niche Compositions
![[image loading]](/staff/Chimaron/Guides/Abathur/Unit_Comp4.jpg)
Ravager + Swarm Queen:
Ravagers are cheap and do not depend on Biomass for their Corrosive Bile ability. This makes them effective in situations where you face a shortage of Biomass or gas. Additionally, they fare well against the Zerg Swarmy composition which comes with large numbers of Scourge that are a threat to any air unit. However, this composition does not snowball effectively into the late game, as the massive size of the Ravagers decreases their DPS-density. Swarm Queens should be added to enhance the survivability of your Ultimate Evolutions and Ravagers.
![[image loading]](/staff/Chimaron/Guides/Abathur/Unit_Comp5.jpg)
Mass Swarm Host:
Swarm Hosts have excellent DPS and can prevent the enemy from advancing by flooding them with high-HP targets, but only when laden with Biomass. They are easy to mass, and the Deep Tunnel ability allows them to teleport to any part of the map with vision, which can be granted by clever placement of Toxic Nests, Creep Tumors or Deep Tunneling Brutalisks who, unlike Swarm Hosts, do not require vision. Spawned Locusts have short life spans, short range, and are erratic in their targeting behavior—they will often waste time moving around rather than attacking the nearest enemy. It is thus difficult to use this composition for assaulting enemy bases or moving objectives such as Trains unless you intend to control all the Locusts manually. In practice, Swarm Hosts are found to only be optimal on Temple of the Past, but they are also a good choice on certain mutations, as they can bring you victory through attrition.
General Tips
- Biomass increases a unit’s health by 300%, attack speed by 100%, energy regeneration by 500%, and grants 100% life leech. Ravagers and Swarm Hosts additionally have their cooldowns reduced by up to 50%, and Roaches receive up to 5 additional armor.
- Evolve your first Brutalisk or Leviathan as quickly as possible; otherwise, you will be very dependent on your ally to cover for your early game weaknesses. More details can be found in the Toxic Nest Luring section. There are different advantages to evolving a Brutalisk or a Leviathan first—this is further discussed in the Units section.
- Use your first Ultimate Evolution to aggressively push into other camps, possibly by kiting enemy units to Toxic Nests in order to gain additional Biomass. This allows you to evolve your six Ultimate Evolutions as quickly as possible, which should be a priority. Once this has been achieved, you will be able to power through the early and mid game easily. In most situations, you can depend on your initial Ultimate Evolution as your only combat unit for quite a while before spawning additional units which you can then evolve to Ultimate Evolutions.
- Hotkey your group of Leviathans. Have them move ahead to the next location and start clearing base defenses with the help of Toxic Nests while the rest of your army clears the objective targets and structures in the previous area. The Leviathans are highly survivable as they are safe from anti-ground attacks. From time to time, move the most wounded Leviathan back so that each of them takes turn to tank with its Symbiote Shell. It can be useful to right-click move your Leviathans instead of A-move to allow them to attack base defenses more aggressively.
- Assign your Brutalisks to another hotkey and control them separately. While they are not as strong as Leviathans when it comes to assaulting bases, their Deep Tunnel ability is invaluable—use them to pick off stray units from attack waves that walked through your fields of Toxic Nests, and then Deep Tunnel them back. Let each of your Brutalisks take turns to tank the damage with their Symbiote Shell in order to increase their survivability.
- As your ally may not be aware of how Toxic Nests work, you can potentially negate the possibility of your ally killing the attack wave ahead of your Toxic Nests by spawning them much further forwards—at spawn locations if possible.
- Quickly morphing dying Mutalisks into Guardians or Devourers can often save their lives, as the Cocoons have lower target priority.
- Units have their Ultimate Evolution button on autocast by default. If you have highly valuable units with high Biomass (typically Vipers and Devourers), you may want to turn autocast off so that they do not automatically evolve if your current Ultimate Evolutions die. If you see your Ultimate Evolutions getting dangerously low on health, don’t be afraid to let them die—just make a few cheap units like Roaches and Mutalisks to gather Biomass in preparation for the loss.
- Each point of Biomass benefits your units differently, and it can be beneficial to have certain units collect Biomass ahead of others. Keep your strategy for the game in mind, and make sure that your key units receive the most Biomass.
Suggested priority of Biomass allocation from highest to lowest: Swarm Host, Mutalisk, Devourer, Guardian, Viper, Ravager, Swarm Queen, Roach.![[image loading]](https://tl.net/staff/Chimaron/Guides/Abathur/LuringUpdate/Biomass_order.jpg)
Calldown and Unit Overview
Calldowns
20s (up to 14s with mastery) cooldown. You begin with an initial 5 charges at the start of each game, and can store up to 5 charges (35 with full mastery). Toxic Nests function as Abathur’s minefields, and are completely undetectable by the enemy, although not invulnerable—area damage can destroy them. Should any ground enemy come near, they will explode for 125 (up to 200 with mastery) damage to all ground enemies within a 1.5 range radius. By default they will be triggered by any ground enemy unit, but you can disable their autocast and manually detonate them to achieve greater results. Furthermore, enemies damaged by Toxic Nests will drop 50% additional Biomass on death and have their attack- and movement speeds slowed by 75% for 2s. This makes them essential for generating additional Biomass for your army. Each Toxic Nest takes 15s (down to 6s with Structure Morph and Evolution Rate mastery) to morph and is vulnerable to attacks while morphing. Toxic Nests have a 50% chance to respawn, unless killed during their initial morph time. Once morphed, they will generate Creep in an area around them, which is a feature that can be useful for spreading Creep for your Spine- and Spore Crawlers in the early game. You should not use Toxic Nests as a primary means of spreading Creep, but they can be useful to grant your Swarm Queens a source of Creep on which they can use their Creep Tumor ability. Toxic Nests are greatly enhanced by Abathur’s masteries, and their effects are further elaborated upon in the Masteries section. Also, refer to the Toxic Nest Luring section for tips on placing Toxic Nests.
120s cooldown. Begins with an initial 3 charges at the start of the game, and can store up to 3 charges. Each charge instantly heals all friendly units and structures on the map for 100 health, plus an additional 50 (up to 200 with mastery) health regenerated over the next 10s (up to 40s with mastery).
Use it to keep your army alive, especially the early Roach or Mutalisk that you intend to evolve into an Ultimate Evolution, as well as to assist your ally. As the healing amount is a flat number, it helps a lot with keeping low-HP units alive, but it is of limited use to your Ultimate Evolutions. Instead, pull the heavily-wounded Ultimate Evolutions back while using Swarm Queens to heal them.
Use it to keep your army alive, especially the early Roach or Mutalisk that you intend to evolve into an Ultimate Evolution, as well as to assist your ally. As the healing amount is a flat number, it helps a lot with keeping low-HP units alive, but it is of limited use to your Ultimate Evolutions. Instead, pull the heavily-wounded Ultimate Evolutions back while using Swarm Queens to heal them.
Units and Buildings
Vs Air: 25.00 DPS
Vs Ground(Frontal Cleave): 20.00 DPS
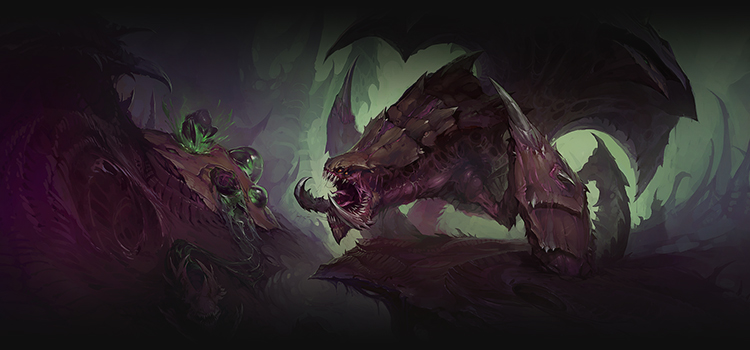
An Ultimate Evolution that evolves from any ground unit with 100 Biomass collected. You are limited to a maximum of 3 Brutalisks at any time. Preferably, they should be evolved from Roaches, which are the cheapest ground units available to Abathur. As each Brutalisk comes with 1500 HP and 2 base armor, they make for incredibly tanky units that function as a shield for your ground units. Make sure to support them with Swarm Queens to keep them healthy. Brutalisks also provide superior mobility to Abathur, having access to a Deep Tunnel ability with only a 10s cooldown, which allows them to teleport to any part of the map even without vision. In combination with well-placed Toxic Nests, this will allow you to handle attack waves in most situations without having to divert the attention of your primary army. Notably, Brutalisks perform very well on Infested maps by providing a solid ground presence and splash damage with their anti-ground attacks, which function as a large frontal cleave—very useful against clumped-up Infested units.
Vs Air: 24.00 (40.00 vs massive) DPS
Vs Ground: 33.33 DPS
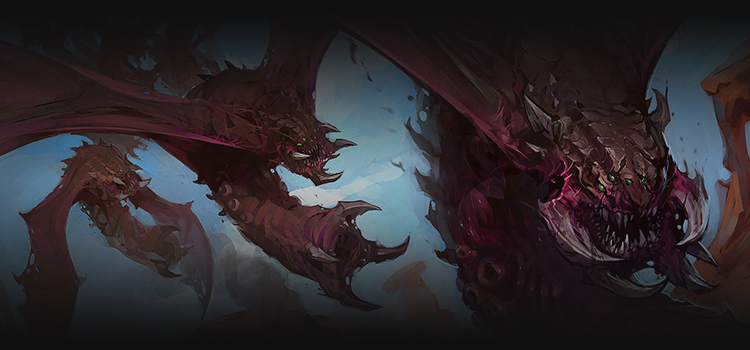
An Ultimate Evolution that evolves from any air unit with 100 Biomass collected. You are limited to a maximum of 3 Leviathans at any time. Preferably, they should be evolved from Mutalisks, which are the cheapest air units available to Abathur. Each Leviathan comes with 1000 HP and 2 base armor, and though they have a smaller health pool than a Brutalisk, each Leviathan proves to be much more survivable due to its immunity to anti-ground attacks. As such, they will make up your primary pushing force, while Brutalisks handle safer tasks like destroying objectives or cleaning up stragglers. However, a Mutalisk requires additional tech as compared to a Roach, so you will have to plan carefully on how many Brutalisks you wish to make before the Leviathans. Leviathans also lack the Brutalisks’ Deep Tunnel, meaning their mobility is limited and thus require smarter routing for maximum effectiveness. Leviathans can attack with both of its weapons while moving.
20.00 DPS (40.00 with mastery)
A creature that permanently attaches itself to a larger host—either a Brutalisk or Leviathan, granting them two additional autocast abilities. The first ability is the Shell, which provides the Ultimate Evolution with a 200 HP shield (400 HP with full mastery), lasting 8 seconds and providing a taunt effect on nearby enemies when initially triggered. With a cooldown of 20s, this ability can mitigate significant incoming damage if you actively micro your Ultimate Evolutions to take turns tanking incoming damage. Next, the Stab ability equips its host with an additional attack that deals 20 damage every 1s (increased to 40 damage with Symbiote Ability Improvement mastery for a total of 40 DPS) to the nearest enemy within a range of 6. The Symbiote attacks its target automatically even while its host is moving—this enables Ultimate Evolutions to kite enemies while dealing significant amounts of damage at the same time, making it highly beneficial to micro these units separately from your army. While the basic attacks of the Ultimate Evolutions are somewhat unimpressive, the DPS provided by the Symbiote Stab ability more than makes up for it, especially when you have significant mastery points available. Interestingly, the attack range of Symbiote Stab is out-ranged by that of the anti-air attacks of the Ultimate Evolutions, meaning that the Symbiote will be left out of Stab range if you simply A-move your Brutalisks against air-targetable objectives such as Void Thrashers.
Vs Air: 9.00 DPS
Vs Ground: 8.00 (12.00 vs armored) DPS
Provides healing support for your army via the Rapid Transfusion ability, which defaults to auto-cast. While most of Abathur’s army units can be kept alive by the well-timed use of Mend, this may not be sufficient to keep the high-HP Ultimate Evolutions alive without the support of Swarm Queens. In addition, they can place Creep Tumors on existing Creep, which can be initialized by a Toxic Nest. You can quickly spread Creep with a group of Swarm Queens which can be useful for maps that require you to move ground units between certain areas quickly, such as on Temple of the Past or Mist Opportunities. It is worth noting that Biomass increases energy regeneration significantly, which benefits Swarm Queens especially. Additionally, the Bio-Mechanical Transfusion upgrade is very handy, as it improves the healing rate of Rapid Transfusion by 40% and allows mechanical units/buildings to be healed as well. Conversely, it is unnecessary to research the Incubation Chamber upgrade that allows you to morph two Swarm Queens at once unless you intend to morph a significant number of these units.
8.00 (12.00 vs light) DPS
A durable unit lacking in damage output. As such, it does not benefit much from Biomass compared to more expensive units. Being a short-ranged unit, Roaches have a tendency to collect Biomass ahead of more deserving units, so it is best not to morph an excessive number of Roaches, or even any at all beyond your initial three used for evolving Brutalisks. With Vile Strain unlocked, Roaches will slow enemies attack and movement speeds by 75% with every attack, but this effect is often redundant in actual battles due to the superior crowd control offered by the Viper’s Disabling Cloud ability. Against large numbers of light units or structures, such as on Dead of Night or Miner Evacuation, Roaches can be effective when upgraded with Hydriodic Bile, giving them bonus damage vs light. Other upgrades can be situationally useful if you plan on using Roaches in large numbers; otherwise, they should be skipped. It is often a choice between the static Spine/Spore Crawlers and the mobile Roaches as a mineral dump, depending on whether defensive or offensive strength is needed.
Roaches gain additional armor with Biomass, up to +5. Additionally, their Adaptive Plating research provides an additional +6 armor while the Roach is under 50% health. This makes a Biomass-fed Roach incredibly tanky against smaller attacks. Given enough time, a single Roach can single handedly destroy small armies. However, this isn’t a particularly useful benefit compared to the alternative uses of Biomass.
10.00 DPS
An artillery unit evolved from the Roach whose effectiveness is heavily dependent on player micro. With research completed, its Corrosive Bile ability deals 80 damage to enemies in a small radius, on a 10s cooldown (down to 5s with Biomass). Damage dealt with Corrosive Bile will return life to the Ravager via Biotic Leech, which makes it able to heal up on demand. This ability makes a smaller team of Ravagers extremely resource-efficient, and can be used to both poke at a stronger enemy force and brawl with tighter groups of enemies. While the Ravager does not have an anti-air attack, its Corrosive Bile is able to damage both air and ground targets. It is possible to skip detection entirely by relying on this ability to take out cloaked enemies. If you are massing Ravagers, it can be useful to have their ability on Rapid-Fire, allowing you to bombard a large area quickly—instructions on how to set up Rapid-Fire are available online. Although Ravagers are not the fastest or most aggressive unit type in Abathur’s arsenal, they are sturdy and resource efficient, are not cursed with the armored tag, and are easy to mass in numbers. However, they tend to clog up the ground with their massive size, preventing any units at the back from engaging. You can stutter-step to mitigate this weakness, but be aware that no other ground army takes up as much space on the ground as a force of Ravagers. Large groups of Ravagers can be situationally good when faced with a shortage of Biomass and/or resources.
16.67 DPS
Releases 2 Locusts, which last 12s, every 15s (down to 7.5 with Biomass). At 100 Biomass, both the HP of the Swarm Host and that of its Locusts are quadrupled, while the Spawn Locusts cooldown and Locust’s attack cooldown are halved. This results in a 4x DPS increase at full Biomass, as compared to Abathur’s other units whose DPS are only doubled. As such, Biomass is highly effective on these units, transforming them into fearsome assault units capable of spawning entire armies of Locusts. However, Swarm Hosts are an impractical choice in most games and their effective DPS is much lower due to the short duration and attack range of the Locusts, which also have a tendency of being blocked by other Locusts, which waste time moving around rather than attacking the closest target. At the same time, the Locusts provide an extremely tanky, free damage sponge that can provide sustainable defense and offence in situations that other units would find troublesome. They can perform the job that Stukov’s Bunkers or Stetmann’s Infestors do in halting an enemy in place with a flood of free units, but with greater effectiveness, though this requires that sufficient Swarm Hosts are at full Biomass.
Researching the Deep Tunnel ability is extremely useful, as it allows your Swarm Hosts to teleport to any visible part of the map every 30s (cooldown unchanged by Biomass) on a 2 second cast time, which is useful for gathering any dropped Biomass or intercepting enemy attack waves. The Pressurized Glands upgrade allows the Locusts to attack air units as well and should be researched if necessary.
5.92 (11.84 vs armored) DPS
Including 5 bounces: 14.47 (26.97 vs armored) DPS
A core offensive unit of Abathur’s army, the highly-mobile Mutalisk provides the most formidable deathball in Abathur’s arsenal, equally capable against air or ground enemies. Biomass is especially valuable on the Mutalisk, massively enhancing its survivability and already high DPS. Try to use Mutalisks to collect Biomass ahead of other units. When the Sundering Glaive and Vicious Glaive upgrades are researched, the Mutalisk gains a devastating attack that overwhelms most clumped-up armies easily, especially against armored units. Rapid Regeneration allows your Mutalisks to heal up while out of combat, but this is optional when Mend, Biotic Leech and the Swarm Queen’s Rapid Transfusion already provide ample ways of regaining lost health. Bear in mind that Mutalisks are extremely fragile when forced into combat without Biomass, and when facing anti-air or anti-light foes such as Scourge, Phoenixes, Thors, High Templar and Hybrid Dominators.
In order to avoid losing the expensive Mutalisks, you can rally newly-spawned Mutalisks to collect Biomass before adding them to your army. This way, the Biomass-filled Mutalisks in your combat army will be able to survive well on their own, at the expense of some DPS since there will always be a flock of Mutalisks without Biomass that are not yet combat-worthy. The alternative is to spread the Biomass more evenly across your Mutalisks and have them join combat even before they reach maximum Biomass—however, you will need to pay more attention in order to keep these Mutalisks alive, possibly by using the Ultimate Evolutions to tank, Vipers to disable enemy defenses, using Mend reactively, and actively pulling back your Mutalisks should they run into danger.
15.00 DPS
A long-ranged anti-ground siege unit morphed from the Mutalisk. Guardians are generally less effective than a flock of well-microed Mutalisks, having lower anti-ground DPS by most metrics and lacking in anti-air capabilities, as well as being stuck with a slow-firing weapon that is prone to overkill. However, they can make up for it with their long range and high survivability. Having a base range of 9, they are able to outrange most enemy units and will often be shielded by other units in your army. They can also be upgraded to a range of 12, but this upgrade is not essential as Guardians already possess great range. It is rare that any Guardian is endangered, making it an effective anti-ground unit for newer players and a good choice in any situation where it is hard to keep Mutalisks alive. Due to their superior range, Guardians are also highly viable when defending against constant streams of non-armored ground units, particularly on Miner Evacuation and Dead of Night. They are also useful on maps with less Biomass, such as on The Vermillion Problem. It is possible to use Mutalisks to collect Biomass first before morphing them into Guardians. In most situations, it is often a decision between Mutalisks and Guardians as your anti-ground unit of choice, but it is recommended for more experienced players to learn to deal with the shortcomings of Mutalisks, which are more efficient in both DPS and utility when able to be kept alive.
10.00 (15.00 vs armored) DPS
A powerful anti-air unit morphed from the Mutalisk, becoming a true menace when upgraded with the Corrosive Spray research, which enables its attacks to deal splash damage in a small radius, which renders the Devourer itself extremely durable when fighting multiple enemies, due to Biotic Leech. Against enemy air compositions, Devourers often prove to be the single most powerful anti-air option available to any commander, with just 6 Biomass-fed Devourers being capable of bringing down practically any amount of enemy air units. If you are not facing enemy air compositions however, it is unnecessary to add Devourers to your army if you already have Ultimate Evolutions and/or Mutalisks, as their anti-air capabilities are more than enough to deal with stray air units. The Corrosive Spray upgrade may be skipped if you are primarily using Devourers to assault enemy bases, where air units typically do not clump up. As a bonus, Devourers are equipped with the Corrosive Acid autocast ability. Each cast of Corrosive Acid reduces armor by 3 and attack speed by 16.66% of all enemy units within a small radius, with a cooldown of 45s and a maximum of 3 stacks. Even if no anti-air is needed, it may still be useful to add a few Devourers to augment the Mutalisks’ DPS, which benefit particularly from armor reductions. This can be particularly useful against objectives such as Trains.
6.67 (10.00 vs massive) DPS
A flying spellcaster with unparalleled crowd control abilities. The Viper provides both target isolation and nullification of enemy ground forces. Its Disabling Cloud ability (75 energy, 10s duration) renders affected enemies incapable of any retaliation by disabling both their autoattack and spellcasting ability as well as slowing them by 50%, thus allowing your army to trample even the most heavily defended bases with impunity. Its Abduct (25 energy) can be used to single out high priority targets to be focus-fired, dragged into Toxic Nests, or simply stunned. The nature of their abilities and high resource costs mean that you rarely need to morph more than two Vipers in a standard game. Skilled use of these units can render your army invincible, but strategies involving them are not the swiftest road to victory. However, they can be critical to success in mutations.
A typical base push with two Vipers supporting your army will involve casting several Disabling Clouds to cover enemy static defenses, as well as anywhere enemy units clump up. This is followed up by using Abduct on high-priority backline units such as Carriers or Siege Tanks, placing them in the midst of your army. This will render all enemy forces either harmless or dead within moments of engagement.
The Viper’s third ability, Parasitic Bomb (125 energy), deals 90 damage over 10s to an air target and any other nearby air units. This damage stacks, and can be significant if several casts are comboed such as by using Consume.
Vipers can cast Consumption (10s cooldown) on your own units to replenish lost energy. This converts up to 75 HP from the target into 150 energy for the Viper, but the Viper will never drain more energy than it needs. Consumption is best used on backline units with readily available access to healing, such as Overlords, Swarm Queens and Guardians. Ultimate Evolutions are untargetable by Consumption. Damage dealt by Consumption can kill the target.
The Virulent Microbes upgrade adds +4 range to all Viper abilities, allowing Vipers to use their abilities at a greater stand-off range. It is recommended that you research this low-cost upgrade (50 minerals, 50 gas) as soon as possible to enhance their survivability. Conversely, Paralytic Barbs, which increases the Abduct stun duration from 1s to 6s, can be skipped due to abducted targets dying within seconds anyway.
The standard Zerg detection unit, morphed from an Overlord. Can be upgraded to increase its movement speed, but this upgrade can be omitted unless you are facing a composition with invisible units. Group one to two Overseers with your Vipers and have these vulnerable units follow a high-HP air unit, such as a Leviathan or Guardian. Oversight mode provides 50% additional sight radius at the expense of mobility.
13.51 (16.22 vs armored) DPS
The basic Zerg anti-ground defensive structure. Spine Crawlers are your most efficient means of breaking expansion Rocks at the start of the game and can be relocated to assault early objectives after this job is done. Both Mend and Swarm Queens can be used to heal these structures, so do not be afraid to use an early Mend to keep them alive when threatened. You can also Uproot a heavily-wounded Spine Crawler and move it out of harm's way. As Abathur is likely to build up a bank of excess minerals, morphing defensive structures at strategic choke points can be a good way of spending these spare resources.
17.44 DPS
The anti-air variant of the Spine Crawler, coming with higher DPS and a lower resource cost. As such, it is more cost-effective to use Spore Crawlers against air-targetable objectives with high HP, such as Void Shards on Rifts to Korhal. Also, it can be useful to add some Spore Crawlers to your defense, as the combination of a few Spine Crawlers and Toxic Nests already decimates ground units. More importantly, uprooted Spore Crawlers are your best way of kiting enemy units into your Toxic Nests during the early game—just be sure that the Spore Crawler has enough creep to move around on.
When built, Nydus Networks are able to spawn additional Nydus Worms anywhere on the map you have vision, each at a cost of 100 minerals and 100 gas as well as a construction time of 20 seconds. This allows ground units to travel freely between any of the Nydus Networks and Worms, and can be useful if you are mostly using ground units, such as Swarm Queens and Ravagers, but these take a long time to fully unload due to their large physical sizes. Most of the time, the Nydus Network is not worth morphing as you already have Deep Tunneling Brutalisks that can reinforce anywhere on the map. If you have Kerrigan as your ally, your Nydus Networks will be replaced by the more powerful Omega Networks, which spawns Omega Worms instantly at no cost, but under most circumstances these are still of very limited use to Abathur.
In-depth
Toxic Nest Luring
1. Collecting Biomass
- Each slain enemy drops 2.5 Biomass per supply—3.75 if they have been damaged by a Toxic Nest at any point. Up to a maximum of 100 Biomass can be collected per unit and each point provides +3% health, +1% attack speed, +1% life leech and +5% energy regeneration. This makes it extremely important that you gather as much Biomass as possible on the right types of units, especially in the early game.
- Rally your morphing Eggs to dropped Biomass. You can queue up unit orders even from rally by using the “Shift” command, so that the unit will be able to collect any Biomass along a path set by you once they spawn.
- For queued move commands, you should avoid shift-clicking on the Biomass and rather have the units queued to move past the Biomass. This will avoid a situation where the unit will pause to attack nearby enemies before resuming collection.
- While working towards evolving any Ultimate Evolution, it is advisable to gather the Biomass on one unit at a time, instead of en-masse with a group of units. It is preferable to have one Brutalisk to three Roaches with high Biomass.
- Watch out for base defenses that can threaten your collecting unit. Losing your first Roach or Mutalisk is a massive setback, as it weakens your early game significantly.
2. Nest Placement
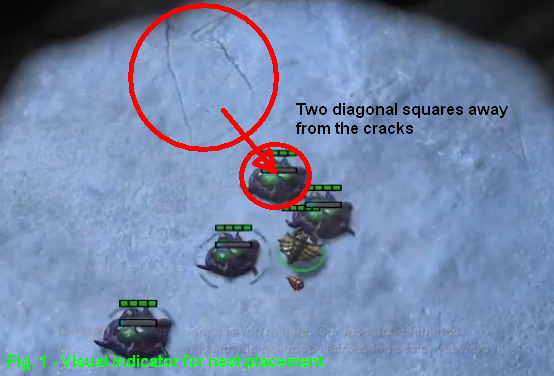 In any Ultimate Evolution rush, you should send out a Drone to the nesting spot immediately as the game begins, and lay nests at the proper location as soon as possible. The location may vary depending on the map and the enemy race, so it is highly recommended to take the time to examine replays to determine the best locations. It is also recommended to develop ways to consistently place Toxic Nests just outside the enemy’s aggro range, such as using visual indicators (see Fig. 1). If you place the Nests too far away, you risk losing enemy aggro, since they will abandon the chase after a certain distance.
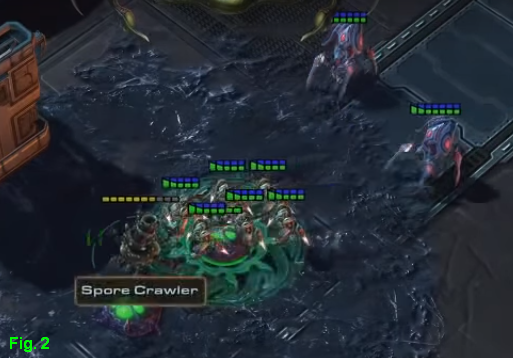
 - You will need a minimum of two Toxic Nests in most cases. Enemy encampments will have units of different attack ranges, meaning some units will start chasing your initial Spore Crawler before the others and thus will reach your Nests before the others, as shown in Fig. 2 where the ranged Stalkers are always behind the melee Zealots. A similar thing also happens when units have different movement speeds, such as with Zerglings and Roaches). You will need one Nest for each “wave” of units chasing the Spore Crawler.
- Because you are likely to put very few points into Toxic Nest cooldown mastery, the Nests become a valuable resource that needs to be managed efficiently. This means killing as many units as possible with as few Nests as possible. As seen in Fig. 2, the Toxic Nests should be manually detonated so that they do not trigger upon the frontmost enemy unit coming into range. Rather, you should wait until the enemy group is completely on top of the Nest to destroy the entire group at once. Using control groups for Nests is recommended, and in the case you do not have enough control groups, you should also make sure to turn enemy selection off so that you do not accidentally select an enemy unit instead of the Nest.
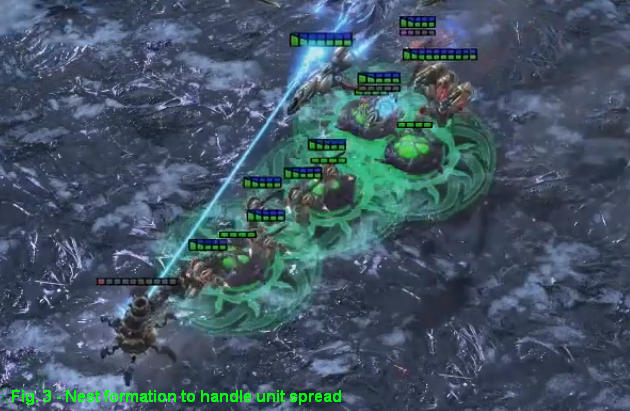
- Sometimes, you can place Toxic Nests in a formation. As different enemies have different attack ranges and different movement speeds, you can spawn a line of Nests that will hit every type of enemy. When you draw aggro from all of them, depending on their initial placement, they will tend to spread out linearly while chasing the Spore Crawler (See Fig. 3). In particular, slow units like Immortals will cause faster units to spread in a line as the faster units push past. If you can predict such movement, you can line up multiple Toxic Nests to destroy all of them at once without having to do any fancy maneuvers with the Spore Crawler to bunch up the enemies.
3. Luring Techniques
- It’s recommended to move the Spore Crawler from the side and loop around, instead of going directly through the center of an encampment. This helps avoiding getting surrounded by melee units. If a Spore Crawler gets surrounded, it is dead; if a Roach gets surrounded, you can try to salvage the situation by burrowing the Roach, assuming there are no detectors.
- Do not be overly greedy when luring, and do not stop moving the Spore Crawler or Roach. Units are generally faster than the Spore Crawler, so they will be able to get plenty of shots beyond the initial shots taken during the approach. In general, only get far enough into enemy encampments to draw fire from the ranged units positioned directly behind the frontmost units.
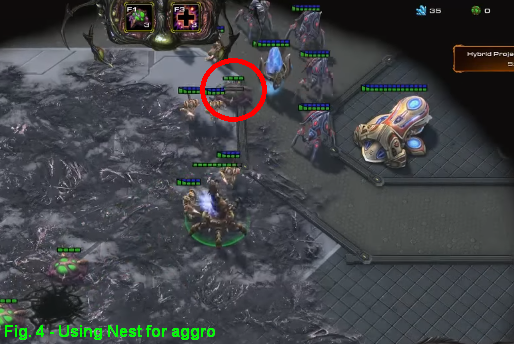 A safer way to pull units from deeper within enemy territory is to place a Toxic Nest down among the enemy units. This will draw aggro from enemy units that are out of aggro range of the Spore Crawler. Their AI will cause them to search for nearby targets that are providing vision for the Toxic Nest, which should be the Spore Crawler. As shown in Fig. 4, there are two Stalkers and one Zealot that have not noticed the Spore Crawler, but with the Toxic Nest placed near them, they will try to attack the Spore Crawler that provided the vision. Keep in mind that the enemy units have a certain search radius—if you place the Nest too far away from the Spore Crawler, the enemy units will simply kill the Nest and remain where they were. This technique is very important for luring high-health, high-supply units like Immortals, Thors, and even Hybrids, which tend to be placed far behind the front lines.
 - Locusts can significantly hinder luring efforts. Due to Abathur’s level 13 ability, all enemy units have a chance to spawn Locusts upon death. Because the Locusts have a higher target priority due to their ability to attack the chasing ground units, the enemies being lured will attack the Locusts. Once the Locusts are killed, the enemy units will only continue chasing the Spore Crawler if it is within their aggro range. Otherwise, they will return to their original location, ignoring the Spore Crawler even if you bring it back within aggro range while they are returning. This applies to Roaches, Brutalisks, or any unit you might be using for luring and usually messes up the luring of the ranged enemy units that are following behind the faster Melee units that you kill first. You should always be prepared for a Locust spawning and react depending on how many spawn. If one spawns, the Locust is likely to die almost immediately, so you should move the Spore Crawler closer to the enemies to retain aggro once the Locust dies. If multiple Locusts spawn, quickly select them and move them back before they are all killed.
- You usually have time to complete two luring cycles with the Spore Crawler before the first Roach arrives at the scene. At this point the Roach can take over further luring if there still isn’t enough Biomass for the first Brutalisk, and it should have an easier time surviving due to the Biomass that the Spore Crawler gathered. Just be careful not to let the Roach attack anything, since its attacks leave a slow effect on the target, causing the affected enemy to lag behind the rest.
4. Brutalisk Luring
- With the first Brutalisk, you are able to lure units from more fortified areas. Because the Brutalisk can tank more damage, it is able to more easily pull the high-health, high-supply units from deep within fortified areas. Not only will this bring in more Biomass, it will also weaken the areas that are highly fortified and intended for the end of the game. However, be warned that one Brutalisk is not able to properly fight encampments alone without taking heavy damage or even dying and should be relying on luring until at least a second Ultimate Evolution is available.
 With the Brutalisk, you can still choose to spawn Toxic Nests near an encampment, wait for them to finish arming, and then manually detonate them after luring enemies onto them. However, a faster method involves placing Toxic Nests right behind the Brutalisk as it enters enemy territory, only to then lure enemies onto the Nests right as they finish arming so that they auto-detonate immediately, as seen in Fig. 5. This applies to both freshly-spawned Nests and respawning Nests. Brutalisks have a higher targeting priority, so the vulnerable Nests will be safe.
- With multiple Brutalisks, you can simply attack into enemy encampments and lay Nests right underneath some high-health enemies such as Hybrids, but this is only recommended as a means to take enemies out more quickly during actual assaults and not as a luring method. Be careful not to put the Nests too far away from your units, as enemies out of vision range will likely destroy the arming Nests.
- The Locust problem is even worse with Brutalisks, since their Symbiotes cannot be turned off and will constantly attack any enemy within range while luring. This means there is always a danger of spawning a single Locust that will be killed and ruin the aggro for many enemy units, made even worse as enemy units are likely spread as a result of chasing. Consider having the Brutalisk pause every so often to make sure all the chasing units catch up before resuming the luring.
5. Spawn Camping
- Spawn Camping attack waves with preplaced Toxic Nests is a good way to produce a large supply of extra Biomass later on, while also providing easy defense without sacrificing mobility. On Temple of the Past, this is the only real way to rack up Biomass effectively. Learning spawn locations as well as learning how to seize those locations as quickly as possible can greatly boost Abathur’s Biomass-hungry army.
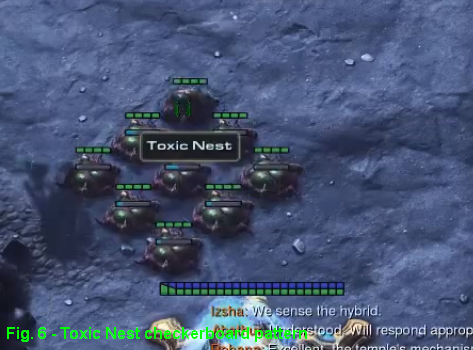 The most efficient pattern for spawning Nests at spawn points is in a checkerboard pattern, in terms of the ratio between coverage and damage density (See Fig. 6). This configuration has enough overlapping Nest explosions to kill even Hybrids, while covering enough area for late game attack waves. It additionally conserves enough Nests to cover multiple spawn points.
- Brutalisks can use their Deep Tunnel to access spawn points deep within enemy territory, even before you are ready to actually assault the area. They will need to draw enemy fire while the Nests finish arming, and can then Deep Tunnel to safety.
- Depending on how much you will be spawn camping, you will need to put more mastery points into Toxic Nest Cooldown mastery. Outside of mutations, 20 points is the maximum you should need, such as for Temple of the Past, but it depends on how efficient and accurate you are. You should also take into account the RNG involved with Nest respawning.
6. Execution
- It can be difficult to learn the nuances of every map and to perfectly implement Abathur's strategies for Toxic Nest Luring. However, by studying and learning from this video, a dedicated player can significantly increase their early game Abathur play.
Build Order
These build orders assume about 20 points put into the Structure Morph Speed mastery, with the Temple of the Past build order being the exception. Varying the mastery by +/-5 points shouldn’t affect the build order by any significant margin. Build orders are followed while doing Toxic Nest luring, so it will take some practice to be able to multitask effectively while executing the build orders.
Basic Build: 3 Brutalisks -> 3 Leviathans
This is a standard build which gives a faster ramp-up of power for pushing into all but the heaviest of defenses. Use this when there are plenty of areas with weak anti-armor defenses that the Brutalisks can assault before the Leviathans are needed, or if you need the Brutalisks’ superior mobility.
- 12 Save all initial minerals for a quick Roach Warren
- 12 Send one Drone directly towards the first luring area
- 12 Roach Warren
- 11 Spore Crawler
- 10 Roach
- 14 Overlord
- 14 Roach
- 19 2x Extractor
- 18 Roach
- 20 Lair
- 20 Spire
- 19 Overlord
- 19 Mutalisk
- 21 Mutalisk
- 23 Mutalisk
2 Brutalisks -> 3 Leviathans
This is a common build, providing enough early power to gather Biomass from deeper encampments while also getting 3 Leviathans out in time for when proper pushing is needed.
- 12 Save all initial minerals for a quick Roach Warren
- 12 Send one Drone directly towards the first luring area
- 12 Roach Warren
- 11 Spore Crawler
- 10 Roach
- 14 Overlord
- 14 2x Extractor
- 14 Roach
- 19 Lair
- 19 Overlord
- 19 Spire
- 18 Mutalisk
- 20 Mutalisk
- 22 Mutalisk
- 24 Roach
1 Brutalisk -> 3 Leviathans
This build order is not very standard but is useful when Leviathans’ pushing power is needed quickly due to mutators or other factors that hinder Brutalisks. Going 0 Brutalisk -> 3 Leviathans is not recommended because the initial Spore Crawler is typically only enough to get one Leviathan, which cannot farm Biomass as effectively. The single Brutalisk’s job is to Toxic Nest lure as much as it can so that you morph Leviathans one after the other. After the 3 Leviathans, you may add 2 more Roaches if you see some use for Brutalisks, or you may expand to build a modest army to help the Leviathans.
- 12 Save all initial minerals for a quick Roach Warren
- 12 Send one Drone directly towards the first luring area
- 12 Roach Warren
- 11 Spore Crawler
- 10 Roach
- 14 Overlord
- 14 2x Extractor
- 16 Lair
- 16 Spire
- 15 Mutalisk
- 17 Mutalisk
- 20 Mutalisk
- 22 Overlord
- 22 2x Roach OR 1x Spine Crawler + Deep Tunnel Brutalisk at expansion
Economic Ultimate Evolutions
This build is meant for supplementing Ultimate Evolutions with an army for late game power, particularly for mutations. It emphasizes rushing Brutalisks while slightly delaying Leviathans in favor of economy. Use Brutalisks and Toxic Nests to hold off the enemy until the Leviathans are out and army production begins.
- 12 Save all initial minerals for a quick Roach Warren
- 12 Send one Drone directly towards the first luring area
- 12 Send Overlord to expansion, spawn Toxic Nest by Rocks
- 11 Roach Warren
- 10 Spore Crawler
- 14 Roach
- 14 Overlord
- 17 Roach
- 18 Spine Crawlers at expansion Rocks
- 18 Overlord
- 20 Roach
- 20 2x Extractor
- Tech up towards Mutalisks as gas income allows
Temple of the Past
Note that this assumes little to no points in Structure Morph Speed mastery. You cannot Toxic Nest lure to rush Brutalisks on this map, because all the enemies aside from the handful guarding the bonus objectives come from attack waves. Therefore, the goal is to invest into economy while making sure to get Roaches/Mutalisks to the Biomass as soon as the next bunch of 100 is available.
- 12 Send Overlord down one lane for spawn point vision
- 13 Overlord, rally down another lane
- 20 2x Extractor
- 21 Roach Warren
- 21 Overlord, rally down final lane
- 22 x3 Roach once Overload hatches, rally to Rocks blocking the center lane
- 28 Evolution Chamber
- 28 Overlord
- 30 Lair
- 30 +1 Missile Attack
- 32 Overlord
- 32 Spire
- From here, morph Spine Crawlers at the expansion to work on your economy. Once the Spire completes, you should have enough gas for three Mutalisks, and enough for +1 Air Attack upgrade shortly after. It is also recommended to build some Spore Crawlers near the first Void Thrasher’s spawn point.
Masteries
Power Set 1:
- Toxic Nest Damage (+2% to +60%)
- Mend Healing Duration (+10% to +300%)
Power Set 2
- Symbiote Ability Improvement: (+3.33% to +99.99%)
- Double Biomass Chance (+1% to +30%)
Power Set 3:
- Toxic Nest Maximum Charges and Cooldown (+1 to +30; -1% to -30%)
- Structure Morph and Evolution Rate: (-2% to -60%)
Dealing with Mutators
Abathur is rarely the absolute best at dealing with any particular mutation or mutator, but he has such a versatile set of tools that he is the only commander so far who has been able to solo every non-Polarity, non-Wheel of Misfortune mutation to date. Players who learn to use Abathur effectively can expect to be able to deal with practically any mutation without having to branch out to other commanders.
“Dodge-This” Mutators
- These include Blizzard, Fireworks, Going Nuclear, Lava Burst, Orbital Strike, Scorched Earth, Self Destruction, Temporal Field, Time Warp, and Twister.
- Damage from these mutators add up fairly quickly, especially on the Ultimate Evolutions, whose large size means they will likely be unable to move out of the way in time. Brutalisks have an easier time evading than Leviathans, so you may consider skipping Leviathans depending on the mutator, such as Going Nuclear.
- Mutalisks provide good, consistent DPS while being mobile enough to evade the mutators but can be costly if you do not pay attention. However, if they are hit and killed, it’ll set you back significantly.
- For mutators that are activated by enemy units, such as Fireworks, you can use Swarm Hosts to push, since the free Locusts are very disposable and can even tank the mutators very well at max Biomass.
- These include Avenger, Barrier, Hardened Will, Inspiration, Just Die, Life Leech, Long Range, Power Overwhelming, Speed Freaks, Transmutation, and We Move Unseen.
- Abathur’s army, especially with Ultimate Evolutions leading the charge with Queen and Viper support, can easily fight against mutator-buffed enemies head-on. On offensive maps, where the enemy density can be controlled with careful pulling, you may not even have to take special measures. Otherwise, just spawn more Queens than usual to make up for the buffed enemies.
- Against ground compositions, spawn-camping with Toxic Nests can essentially nullify the mutators.
- Just Die is probably the most dangerous of the bunch, since it slows down Toxic Nest luring and wastes a lot of Toxic Nests in general, giving Abathur a hit to his early game snowballing.
- Swarm Hosts can very safely win in a battle of attrition against buffed enemies and are recommended for mutations on defensive maps.
- These include Black Death, Concussive Attacks, Diffusion, Double Edged, Fear, and Moment of Silence.
- Full Biomass units are highly resilient against these mutators, even outright nullifying some of them thanks to the way life leech interacts with them, such as Black Death and Double Edged.
- Do not evolve Ultimate Evolutions against Black Death, since Ultimate Evolutions do not have the 100% lifesteal that 100-Biomass units receive. If you do evolve some by forgetting to disable auto-evolve, Brutalisks can at least be of limited use if you store them in a Nydus Worm when they are not needed, or you can just store three of them inside the Worm indefinitely so that you do not have to worry about accidentally morphing ground units for the rest of the game.
- Swarm Hosts, as usual, are very safe against these mutators and are highly recommended for longer, defensive games.
- These include Aggressive Deployment, Mag-nificent, Minesweeper, Outbreak, Propagators, Void Reanimators, and Void Rifts.
- Brutalisks essentially hard-counter a lot of these mutators thanks to their Deep Tunnel ability allowing them to respond on-demand and then return right back to working on the objective. They are by far the best option available to any commander for dealing with Void Rifts, since the first Brutalisk can be obtained before or shortly after the first set spawns in. Leviathans are strong enough to continue pushing on their own while the Brutalisks maintain map control.
- Abathur usually has plenty of minerals to spare, so he can easily afford static defense to deal with any trickle that gets past the Brutalisks.
- Swarm Hosts can deal with Mag-nificent and Minesweeper very well, but if time is an issue, Ultimate Evolutions can deal with them—Brutalisks can trigger Mag-mines and tunnel away to safety, while Leviathans can deal with Minesweeper out of range.
- These include Microtransactions, Mineral Shields, and Slim Pickings.
- Abathur has never relied too much on his economy, even sacrificing economy for the sake of rushing out Ultimate Evolutions. Abathur is the commander that is least affected by economic mutators due to the sheer value his Ultimate Evolutions bring to the table.
- If you do end up making an army, it should probably consist of Swarm Hosts, which will give the best returns in a battle of attrition—which is important for dealing with economic mutators.
- Afraid of the Dark and Shortsighted: Vision is not as important for Brutalisks, but Leviathans might suffer. You should keep them together so the Leviathans benefit from the Brutalisks’ vision. For defensive situations, Abathur should be able to afford laying down some Hatcheries at the front lines for the base vision that Town Centers provide.
- Fatal Attraction: Symbiotes do not get stunned by this mutator, meaning the Ultimate Evolutions are not completely helpless, but it does mean that you cannot retreat from battle until every enemy is dead. Swarm Hosts are a safe option for whittling away at the enemy from a safe distance.
- Heroes From the Storm: Ultimate Evolutions can handle most of the Heroes fairly easily, provided the Heroes aren’t buffed by other mutators or are too great in numbers. Kerrigan, however, is quite troublesome due to her 200-damage auto attack, as well as Nova with her spammable Snipe. Unless you kill them quickly, you are likely to lose an Ultimate Evolution or two. You should aim to build up a force of Swarm Hosts, whose Locusts distract and tank the Heroes very well.
- Kill Bots: Evolution Chambers provide a total of 7 kills (Chamber + 6 Broodlings) for the cost of 75 minerals and a Drone. Given that Abathur has plenty of minerals to spare, this is his best option for feeding the Bots. Later on, you can make Swarm Hosts for the free Locusts, but take care not to feed Biomass to the Swarm Hosts since the Locusts already have a lot of health that the bots must go through.
- Laser Drill: Brutalisks can Deep Tunnel to the Laser Drill’s location to take it down, but keep in mind that the Drill is designed to be effective against high-health targets. A Swarm Host push will also minimize the Drill’s efficiency.
- Missile Command: Dump minerals into Spore Crawlers, and have some 100-Biomass Queens to keep structures healed. Symbiotes bypass Point-Defense Drones and can be useful if you need to snipe Nukes with Brutalisks. Ultimate Evolutions are hardy enough such that Abathur can dedicate quite a lot of his resources into missile defense and still be able to complete the objectives.
- Polarity: Abathur is particularly weak to Polarity because the partner requirement nullifies early Toxic Nest luring and thus heavily delays his Ultimate Evolutions. It is recommended to focus on economy early on while waiting for the partner to be ready to move out.
Synergies
Raynor
Mend tends to help Raynor’s mech more than his bio compositions. Medics help heal Abathur’s units—especially Brutalisks, which Abathur’s Queens can be slow to heal. Raynor also can provide good cleanup with his superior DPS, which Abathur tends to lack, while Abathur’s tanky units provide cover.Swann
Abathur greatly appreciates Swann's Vespene Harvesters in order to be able to mass his powerful gas-intensive Spire units. Abathur's high-HP units also make for perfect tanks for Swann's relatively fragile units.Zagara
While these two have little direct synergy, Zagara’s strong early game helps to cover for Abathur before he can ramp up his army, and her aggression provides more Biomass for his first few Brutalisks & Leviathans in the case that Abathur cannot get his Ultimate Evolutions early. Later on Abathur’s late game power makes up for Zagara’s plateau in army strength.Vorazun
Toxic Nests can be spawned inside a Black Hole cast by Vorazun, offering the potential for a massive Biomass pay-off from enemies caught within the effect. Brutalisks and Devourers benefit greatly from the Black Hole as well due to their splash damage. Abathur can also provide healing for Vorazun’s army. Dark Pylons can Recall Leviathans, easing their mobility weakness.Karax
As a commander with great base-pushing abilities, Abathur is able to provide much-needed offensive prowess for Karax. Otherwise, they do not have much synergy, and Karax should take care not to shoot down early enemies that Abathur may be luring towards Toxic Nests.Alarak
Alarak can push entire enemy waves into Abathur’s Toxic Nests for a massive Biomass pay-off. Abathur can heal Alarak’s units, but this is of limited usefulness to Alarak. Abathur’s early presence with Ultimate Evolutions makes it easier for Alarak to build up his Ascendants in safety.Nova
While Abathur is highly efficient at pushing into fortified enemy bases, he lacks a strong single-target damage option against objectives with high HP, such as Trains on Oblivion Express and Void Shards on Rifts to Korhal. These are targets that Nova’s Liberators excel against, as well as her Siege Tank’s Spider Mines in some situations. Abathur’s army provides an excellent meat shield for Nova’s relatively fragile but lethal army.Stukov
Mend can help to keep Stukov’s expensive Infested Bunkers and mechanical units alive. Additionally, well-placed Toxic Nests can thin out dangerous units before they reach the Infested Bunkers. Abathur’s Vipers can serve as very effective crowd control support for Stukov’s Infested. Toxic Nests allow for quick placement of creep when needed by Stukov.Fenix
Fenix’s Arbiter Suit can place an entire enemy wave under Stasis, allowing Abathur to bombard the area with Toxic Nests, though this takes coordination. Abathur’s army will appreciate the Recall ability provided by Fenix’s Cybros Arbiter, and the Cybros Arbiter will appreciate Abathur’s Brutalisks for their ability to Deep Tunnel to anywhere on the map, even through the fog of war. In addition, Abathur’s healing and crowd control abilities go a long way towards keeping Fenix's army alive.Dehaka
A cooperative Dehaka player can use their hero unit to lure enemy units into Toxic Nests early in the game, benefitting both Abathur and Dehaka greatly with Biomass and Essence. However, this can easily backfire if there is a lack of coordination between them, as Dehaka can easily deprive Abathur of the extra Biomass gained from units that would otherwise walk into Abathur’s Toxic Nests.Maximizing Synergy with Toxic Nests
Dehaka’s strong early game hero allows him to easily power up both commanders. Dehaka should push out as soon as his hero unit spawns, luring pre-placed enemy units to follow him. While the enemy units are busy following Dehaka around in circles, Abathur can place Toxic Nests directly underneath them. The enemy units will ignore the Nests and continue to chase Dehaka. When the Toxic Nests finish deploying, they will instantly kill the units, giving Abathur his much-needed Biomass and granting Dehaka Essence. Here is a video demonstration of this strategy.
Han & Horner
Ultimate Evolutions are excellent tanks, and pair well with the damage output of Reapers. Devourers and their armor reduction ability can substantially increase the damage dealt by Reapers, though this is largely only worth the resource investment when you are facing air targets. The combination of Toxic Nests and Mag Mines provides an excellent defense, though this comes with a measure of overlap. Abathur’s healing capabilities can also be somewhat helpful to Han and Horner.Tychus
Tychus’ aggressive early game can allow Abathur to swiftly evolve several Ultimate Evolutions, especially if Tychus is careful to work together with Abathur and his Toxic Nests rather than killing everything on his own. Abathur’s Swarm Hosts and Spore/Spine Crawlers can cover for Tychus’ lack of effective static defense on certain maps. Abathur’s Brutalisks can Deep Tunnel to any part of the map, and Tychus can swiftly follow behind with his Medivacs, providing a deadly strike force that can reach anywhere on the map within seconds, and Abathur’s Toxic Nests provide reliable vision over large areas for Tychus to split off to at will. Both Nikara and Rattlesnake are very effective healers for Abathur’s Ultimate Evolutions, and can keep them in fighting shape with no issue.Zeratul
Toxic Nests can protect both armies from attack waves. Swarm Queens and Mend provide staying power for Zeratul’s expensive units. Brutalisks are great at running interference for Zeratul’s ranged army, letting him deal his damage safely. Zeratul’s mobility lets him intercept attack waves that Abathur’s Brutalisks would struggle with on their own, allowing Abathur’s less-mobile army to stay on offense. Brutalisks can Deep Tunnel to anywhere on the map alongside Zeratul’s Void Seeker, giving them powerful offensive options.Map-Specific Tips
Replay Pack
Note that these replays are produced by experienced players after significant practice. Many of them involve not expanding or producing Swarm Queens and/or Vipers in order to clear the map faster. Many do not build armies beyond whatever Roaches/Mutalisks that resources allow. We do not recommend this for the vast majority of players and have provided the following recommendations on which compositions to use on which map:- Mutalisk/Swarm Queen: Chain of Ascension, Malwarfare
- Mutalisk/Swarm Queen/Roach: Dead of Night
- Devourer/Swarm Queen/Roach: Scythe of Amon(100%)
- Guardian/Swarm Queen/Roach: The Vermillion Problem, Dead of Night
- Mutalisk/Roach: Lock & Load(100%), Oblivion Express, Rifts to Korhal(100%), Mist Opportunities
- Mass Swarm Host: Temple of the Past, defensive mutations
- Mass Devourer: Rifts to Korhal(any%), Scythe of Amon(any%), Void Launch
- Mass Mutalisk: Void Launch, Miner Evacuation(100%)
- Swarm Queen/Roach: Void Thrashing
- Ultimate Evolution Only: Any offense-oriented map
![[image loading]](http://wiki.teamliquid.net/starcraft/images2/7/73/Replay_Icon14.png)
Other Commander Guides


Writers: LilArrin, monk, Raincamp, Yuriprime
Graphics: Jester, Kat, v1
Editors: Aron, MemeMastodon, Raincamp
Graphics: Jester, Kat, v1
Editors: Aron, MemeMastodon, Raincamp


