
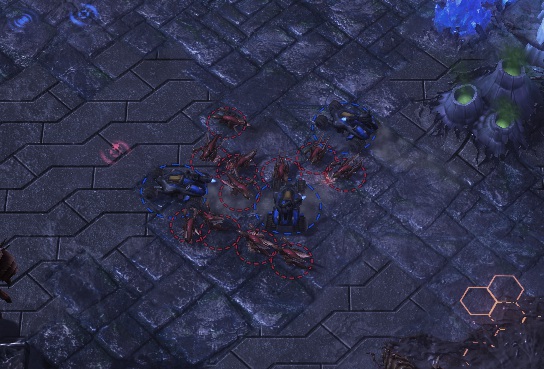
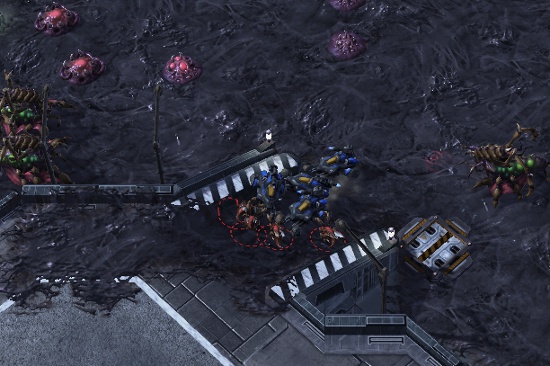
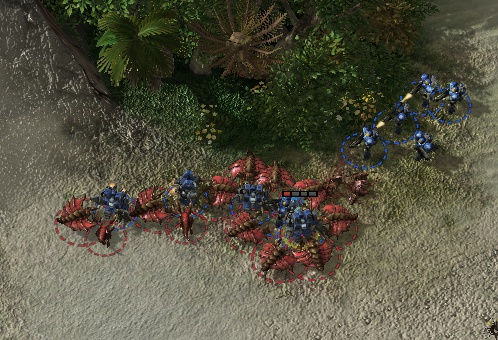
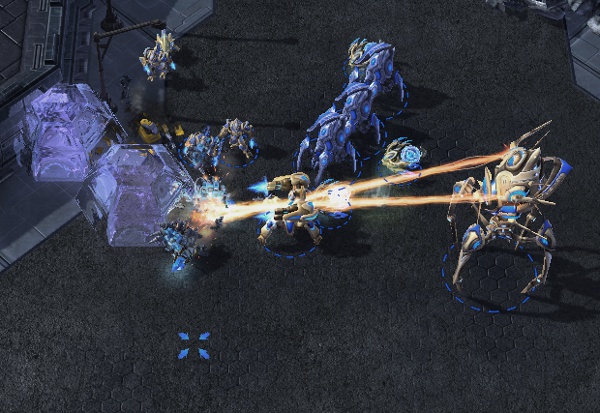
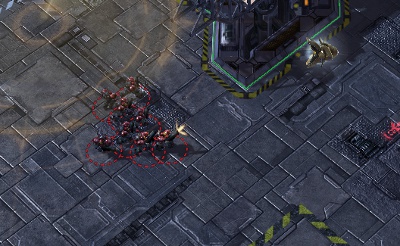
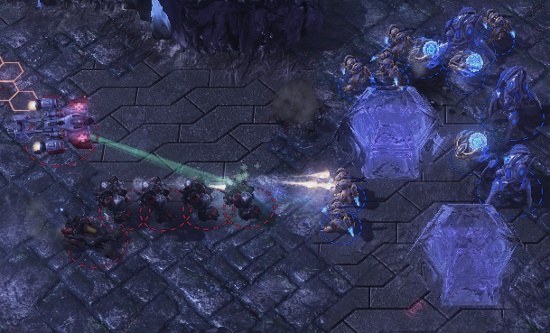
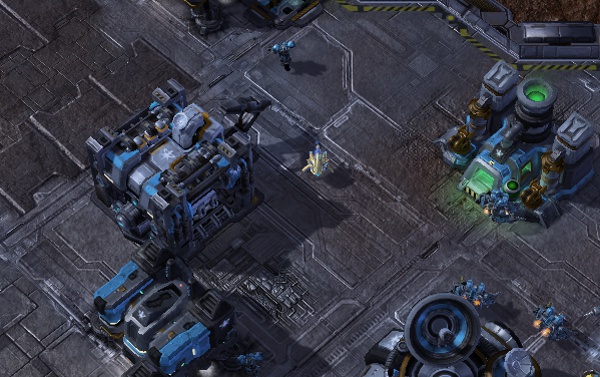
Life spawned at 2 o'clock on Daybreak with Keen at 7 o'clock. Keen started the series with the one reliable cheese left to Terrans, proxy 11/11, making two barracks near Life's third base. Life did not scout the normal proxy spot, but pulled 11 drones to defend the incoming rush. Life was fishing for Keen to make an error in his attach or trying to stall the attack so that he could get Zerglings. Fortunately for Life, Keen let his SCVs get ahead of his marines, which led to both groups being picked off piecemeal by the frenzied drones.
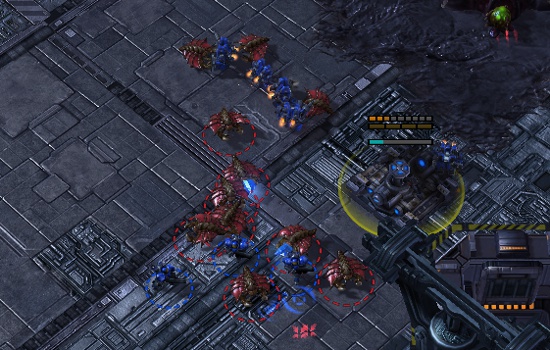
Life surrounds Keen's marines without scv support.
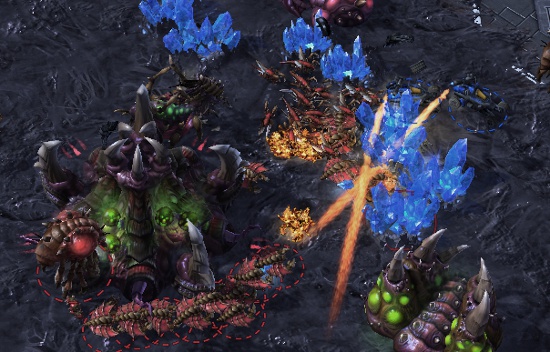
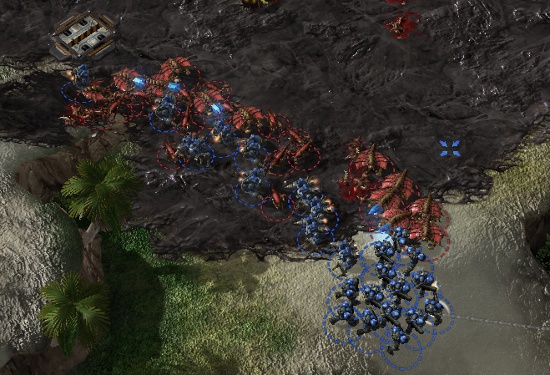
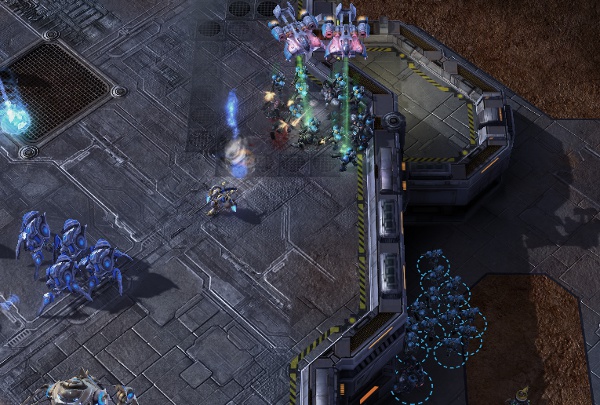
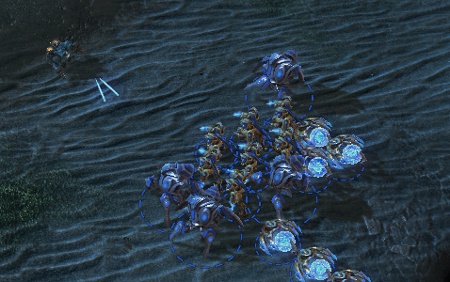
After the rush was cleared up, neither side had netted an advantage. Both players had similar worker counts, albeit smaller than what they would normally have at this time, and neither player had an economic nor tech edge. Keen declared his intention to be aggressive in the first match by gearing up for a second attack off of one base. After holding off Life's counter attack with a barracks-factory wall, Keen added a starport and prepared for drop play. He also relanded his proxy barracks and began building marines - indicating his intention of doing an elevator strategy. After the failure of the proxy 11/11, the normal response would have been to double expand. Keen's choice of a hellion/marine elevator would have been a poor choice pre-patch and was certainly a foolish one post-queen buff, which relied on Life not scouting and blindly assuming Keen would double expand. Unfortunately for Keen, Life did scout the incoming elevator strategy and despite Keen getting extremely lucky landing his entire force without being seen, he was still repelled without much trouble.
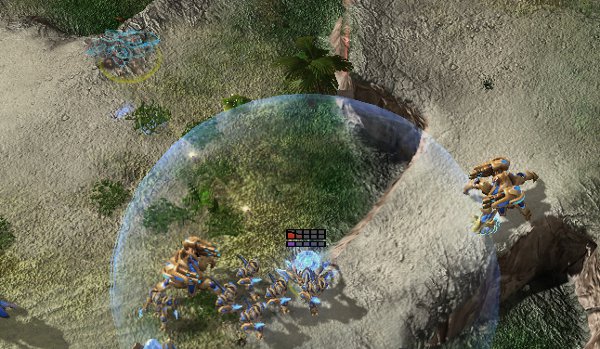
Keen's elevator is handily dealt with by lings, banelings, and queens on creep.
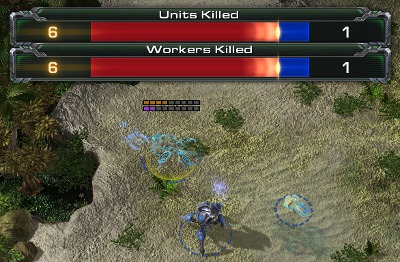
Unlike the 11/11, this second attack did not do enough damage for Keen. As the attack started, Keen only had one orbital and 22 SCVs to Life's two hatch and 43 drones. With such an economic disadvantage, Keen needed to pick up at least 16 drone kills as well as neutralizing any threat of a counter attack. Keen was only able to kill a measly 6 drones and part of Life's army - significantly less than he needed to. After this attack Keen was left with no significant tech advantage (no banshees or tanks, Life had a lair) and a severe worker deficit.
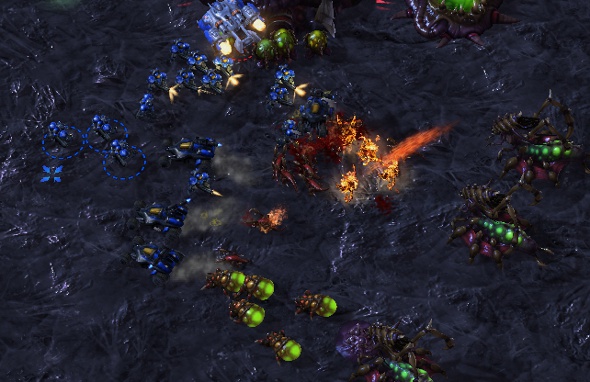
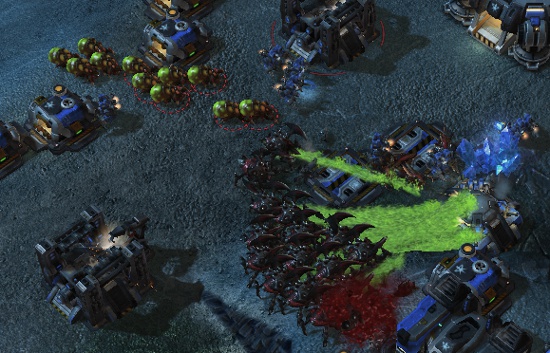
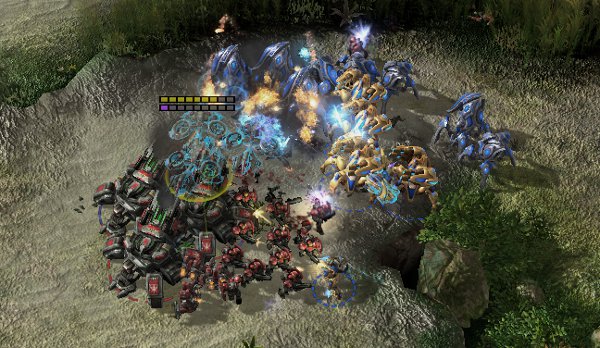
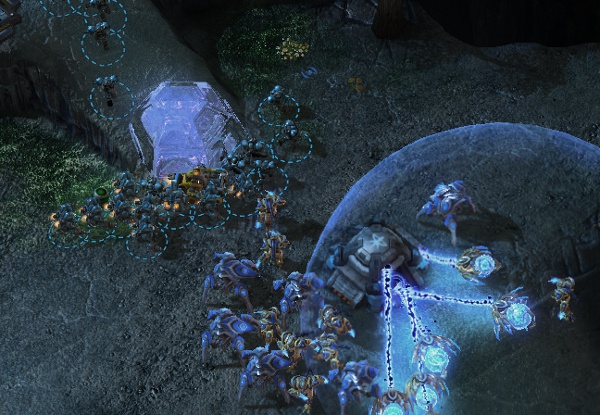
After this failure, Keen tried to rectify his poor position by transitioning into a two base marine/tank/medivac timing push, a build more suited to close air Metalopolis than Daybreak. But because of how far behind he was there was still plenty of time for Life to solidify and expand on his lead. Life's took his third and kept powering drones, which increased his lead to a point where he could have done almost anything and still won. Anticipating that Ken had taken a third, Life sent a force of ling/infestor into Keen's empty third base - and upon seeing this swooped around into Keen's natural. The awkward position worked into Life's favor, and traded rather well after he caught Keen's marines off guard and clumped.
Life's unexpected aggression pays off as Keen's army is not fully split.
With no third base, and Life's economy spiraling out of control, Keen had to make a big play to stand any chance of coming back. At first he tried to push across the map with his formidable army, but infestors were able to slowly chip away at the Terran army with successive fungals. As more marines covered in green goo popped open, Keen realized that a push across the ground would never work. Somewhat defeated, Keen retreats back and decided to take his third. In his predicament the decision to take a third was arguably a misstep. At this point in the game he is so far behind that he really needed to commit to something, if he were looking to try and play a longer game he should have double expanded and not tried to slow push across the map. Seeing as he did push across the map, he should have committed to aggression via drops to distract Life while pushing across the map.
With his third building, Keen went for a doom drop which luckily went through a blind corridor and landed safely in the main. The big doom drop was a nice decision, although doing so after taking his third is a bit peculiar. But while Keen's medivacs were en route to Life's main, Life had prepared a massive attack to crash through Keen's natural. With the vast majority of Keen's forces in a medivac, whatever units that were left in his natural offered no resistance against the might of the swarm. while clearing up the drop after sacrificing his main.
Keen had no choice but to try and make his doom drop work. Since Life had few units at his base, Keen was able to clear out most of Life's main. However reinforcing infestors made short work of Keen's army as it clumped up to attack Life's natural. With no army, and no base, the game was lost.
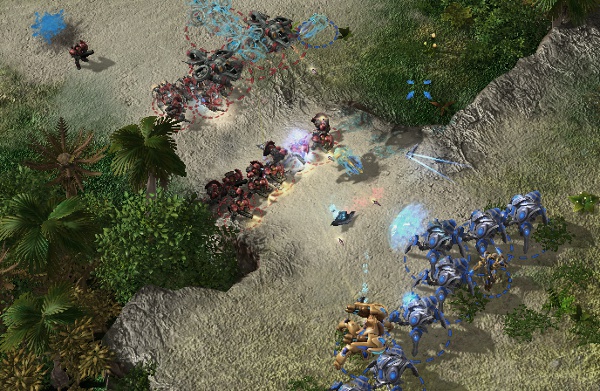
Keen's slim chance at a base trade victory vanishes when
two infestors catch his marines clumped up.
Life 1-0 Keen
This game was decided at the 10 minute mark when Keen was unable to do sufficient damage with his elevator strategy to remain in the game. Life got a little bit lucky at the beginning and was able to survive Keen's 11/11 without any serious impairment, and defended Keen's subsequent attacks superbly. Once he obtained an advantage, he never let it slip away by playing a perfect mix of greed to build his advantage and aggression to keep Keen honest.
Unlike the previous game, game 2 started out with Keen @7 electing to go with the safest TvZ opening: rax CC into reactor hellion. Life on the other hand had a very clear game plan in mind - he was going to go for his two hatch muta build. As this is a build which relies on the element of surprise, Life showed no gases to Keen's SCV scout but once the SCV had run home he immediately added two gases and got a lair with his first 100 gas.
Keen added his starport and tech lab and begun to build banshees. The hellion/banshee build that Keen used in this game is the safest against normal allins, getting two gases before supply depot after command center, which leads to fast units but a late third command center. Meanwhile, his hellions showed up to Life's natural and saw no third, no spines, no evolution chambers, and a group of slow zerglings that got speed midway through the battle. The timing could not have been more fortuitous for Life, as Keen judged he could pick off the slow lings, only to have them gain speed mid-battle and slaughter the hellions.
Life's ling speed arrives just in time and Keen's crucial hellions die
Unfortunately, Keen was not prescient enough to realize the muta/ling allin was Life's choice until his banshee showed up to the Zerg main. Although in his defense, with the gas timings he scouted if Life had only grabbed one gas and got speed then speed would have finished at the same time as it did in this game. With that said, the lack of units and third definitely warranted a scan to see what was up.
ssib...
Consequently, Keen was completely unprepared for Life's mutalisks. To add insult to injury, the losses of his hellions meant that Life was able to launch a successful speedling attack on Keen's natural. While only killing a few SCVs, the important thing is that it distracted Keen from getting his engineering bay down quicker and killed off all of Keens marines, further reducing his marine count for when the Mutalisks would hit.
From here the rest of the game was straight forward for Life. He rallied his mutalisks straight to Keens natural and begun destroying everything - following the SCV train as it retreated back into the main. Life rallied more lings and more mutalisks into Keens base and it wasn't long before Keen tapped out.
Keen has nowhere near the unit count to hold.
Life 2-0 Keen
Keen had every opportunity to react properly to Life's build. If he had done his research on Life he would have known that the mutalisk build was a possibility. Moreover, if he had read the speedling timing, missing third and lack of units correctly he should have been able to deduce that Life was going to quick mutalisks. In any case, he didn't and that sealed his fate. Life once again masterfully concealed his intention of using this build, and once again it pays dividends.
Once again Keen @ 9 chose to open with an aggressive build, this time an archaic reactor hellion into command center opening with a followup drop, counting on Life not drone scouting. Luckily for him, Life @ 3 did not actually drone scout, however, he did elect to acquire very early ling speed. Keen's hellion runby failed miserably as Life's speedlings successfully blocked their advance into the main and allowed his queens to slowly kill off the hellions. Life's defense is a reminder of why this build is now considered outdated!
Too easy
Keen managed three drone kills, far too few to justify the investment of four hellions. Rather than be deterred, Keen tried recover the deficit through dropping four more hellions into Life's main. The followup drop in the main actually killed some drones, 8 in total, but overall Keen's build had not done the 15+ drone damage it needed to pay for itself. As a result, the drop actually put Keen further behind than before. With all 8 hellions lost for nothing, Keen retained no initiative, which let Life drone freely and focus on his phenomenal creep spread.
Keen's hellion gimmick is not very effective.
While the worker difference was momentarily similar, Life shot ahead once the game settled down and Keen transitioned into a 3 cc, 2 ebay, marine/tank/medivac army. But after investing so much into hellions and drops all his infrastructure was significantly slowed. Even in normal games on Metropolis the Zerg can safely drone to saturate 4 bases, and with Life's healthy lead this game, he had an easy time rushing hive and getting his econ perfect. Life had an iron grip on controlling the map with creep everywhere and a highly mobile infestor/zergling army able to shut down any initiative Keen might try.
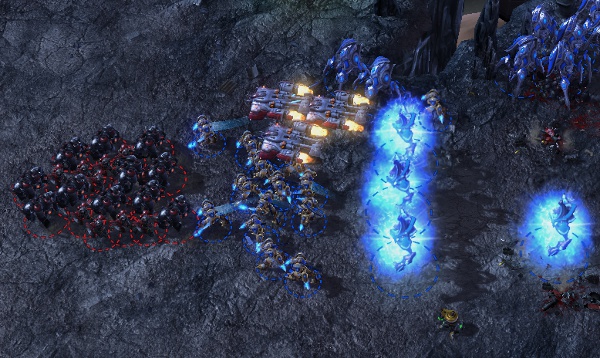
At 12 minutes Keen tried to take his third base, but Life's control over the map made this difficult. Immediately the attempt was spotted by a scouting zergling and it wasn't long until Life has ordered his ling/infestor army to lay siege to the base. But a good wall and tank positioning meant that Keen was successfully able to deflect Life's attack. Rather than using his monster economy to try and deny the third base, Life decided to be patient and wait for his tech and economic lead to pay off while denying any attempt at moving out from Keen using infestors.
![[image loading]](http://www.teamliquid.net/staff/Plexa/TSL4/Ro4/kl8.jpg)
Keen's opening meant that he couldn't stop this
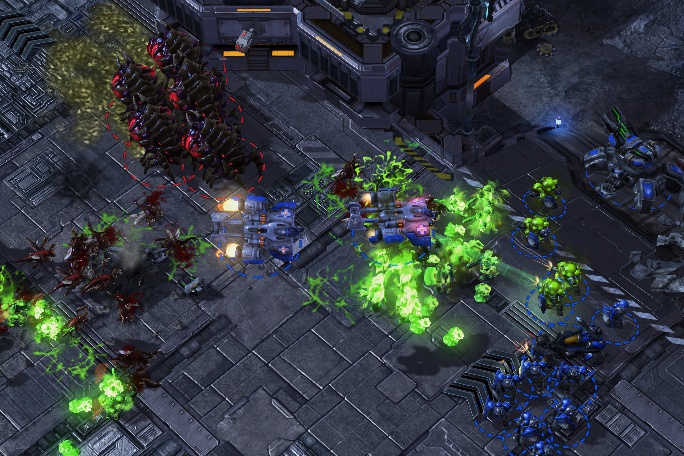
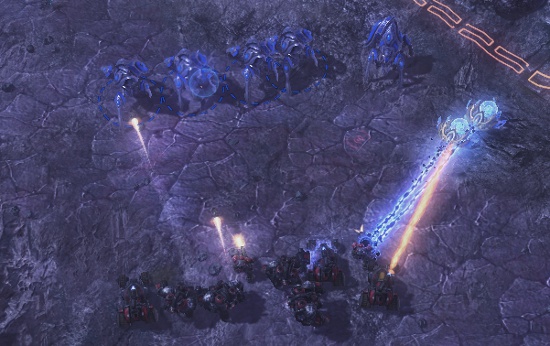
Keen could not move out onto the map until he was nearly maxed, and even then it was slow going as he methodically began taking out creep. Life's laxadaisical overlord spread gave Keen some options with small drops, but they were easily dealt with as he had no push threat due to creep. Before Keen could reach the watch tower, Life engaged with ultra/infestor and swatted the Terran army back home.
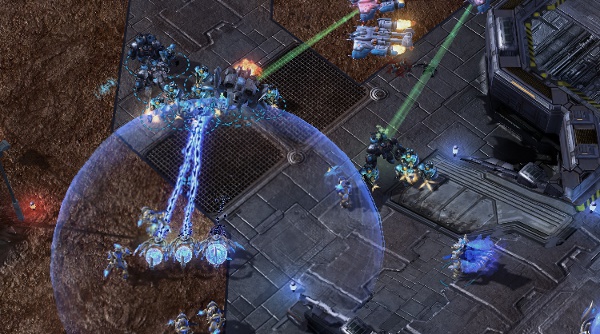
Keen retreated momentarily and began plotting his next move. He realized that Life was weak to drops in this game, so sent out a 5 medivac drop straight for Lifes main. When the drop arrived Life was halfway across the map about to lay siege to Keen's main. However, he decided to turn around and defend the drop. Life couldn't get back in time and Keen razed most of Lifes main. This netted him an important victory as not only did he slow the Zerg juggernaut, he also bought time for his fourth base to get up. While he was still at a disadvantage, Keen was slowly but surely bringing himself back into the game.
Keen finally starts to make headway
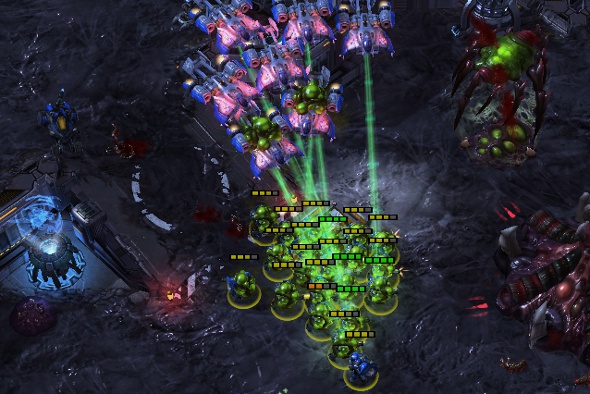
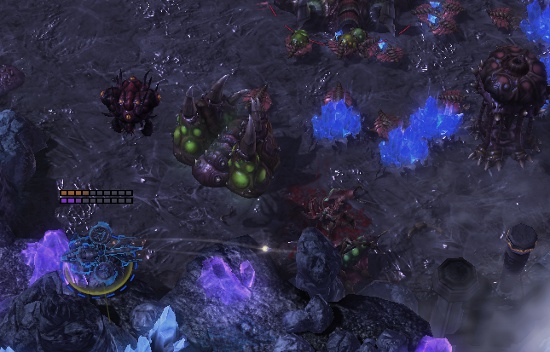
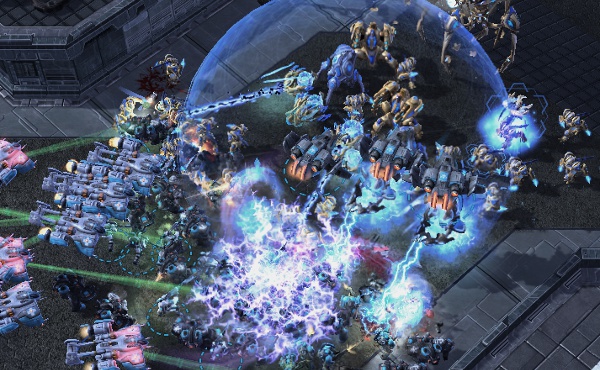
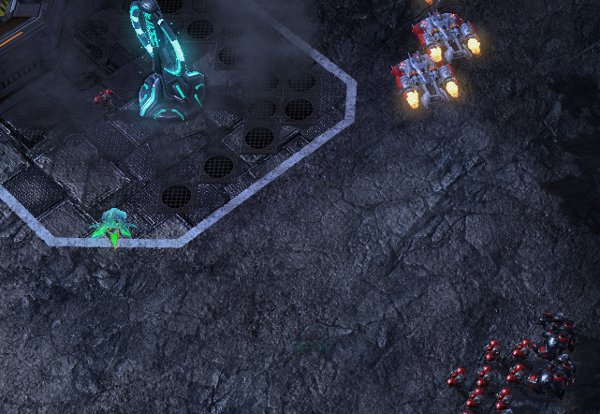
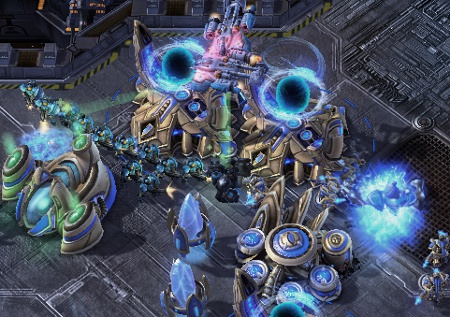
Wanting a simple end to the game rather than a drawn out war (that he was beginning to lose), Life chose to bludgeon his opponent to death by attacking moving ultralisks into his fortified choke. Fortunately, Keen complied with Life's wishes and sent out another 5 medivac doom drop which razed the Zerg main once again. However, this small success came at the cost of losing his entire army at home, as Keen's force was divided in two while Life's was concentrated at the front. Keen's force splitting might have worked against a broodlord army, but versus the ultralisks he knew Life had, a Terran must keep the vast majority of their army in one deathball instead of splitting it in half. Thanks to the starting disparity in strength, Keen's drop was handily cleaned up while Life went on to eradicate all Terran resistance.
Life sends a wave of ultralisks at Keen
Life 3-0 Keen
As with game 1, this game was decided through Keen's decision to be overly aggressive in the early game. Keen's investment into hellions/drop simply didn't pay off. As a result, Life was able to play however he wanted and as a result the whole map was covered in creep and locked down with infestors. While Keen started to make good headway with big drops, it was too little too late as Life already had the necessary forces to force a victory.
To nobody's surprise, Keen @ 5 again elected to take the initiative with an aggressive build, this time choosing the much smarter option of proxy 11/11. Life @11 did not scout for it like last time, and this time paid dearly as Keen displayed much better micro than in game 1.
Keen shows proper micro, keeping his army together and using the scvs to
tank hits while the marine count stays high.
Life is able to muster up enough zerglings to beat back Keen's marines, but simply deflecting the attack isn't good enough for Life. He is still at a disadvantage as he only has three drones to Keen's twelve SCVs. This forces Life to try and even things up with a big zergling counter. He is able to break through Keen's wall but a well placed bunker prevented Life from doing game ending damage.
Keen's bunker at home dashes prevents the counter from killing him.
Life had to be content with a few SCV kills, which more or less evened up the worker count on both sides. Suddenly we found ourselves in a very similar situation to game 1, where both sides had stabilized but with significantly reduced worker counts. Life predicted that Keen would play the same as he did in game 1 and begin to tech up; however Keen went all BitByBit on Life. Keens decision to be aggressive after the Zergling counter, and his commitment to the aggression via the SCV train meant that there was no way Life could stop Keen.
Keen pulls a BitByBit and finishes it off.
Life 3-1 Keen
After both players exchanged blows with early aggression, it was Life's misread which caused him the game. Keen's follow up attack could have been defended if Life had kept a zergling below Keen's ramp. Nevertheless, Keen's decision to commit was a game winning move and at match point, a decision like that takes some serious balls.
On Entombed Valley, Life@7 again went with his characteristic fast ling speed into third that he did on Metropolis, while Keen @ 5 opened the two factory reactor blue flame hellion aggression - the same variation that he used twice against Jonnyrecco in the Ro8. As Life had just begun to saturate his third base a stream of hellions came pouring across the map and begun to harass the base. This forced Life to get a roach warren and begin roach production - but that was still some time away.
Life did what he could to keep the hellions at bay. Firstly he used his queens to the best he could to stall them for as long as possible. Next he kept the third populated with a handful of drones as to bait the hellions into staying in the third. To further encourage the hellions to stay in the third Life set up a fearsome looking speedling-spinecrawler wall at the top of his ramp. Life's ploy worked, and Keen kept his hellions poking into the third long enough for Life's roaches to begin popping from their eggs.
Roaches arrive just in time
Life and Keen continued to dance the hellion/roach dance for the next few minutes. While dancing, Life decided not to saturate his third base and instead decided to mass up a large attack and simply kill Keen right now. However, Keen interpreted Life's roaches simply as a reactionary measure to his hellions rather than the precursor to a killing blow. As Life's roach army begun to grow very large, Keen retreated with his hellions and finally realized the threat. Hurridly, Keen started siege mode and a tank, but it was too little too late. Keen was too ill-equipped to deal with 17 roaches complimented with banelings and was blown out of the water. The bunker and wall were broken, and his very late tanks were picked off. After losing many SCVs, Keen conceded.
Death
Life 4-1 Keen
Life made a questionable attack which only worked because Keen overlooked the threat and didn't start siege mode. Had Keen gotten it in time, Life's attack would have flopped and Keen could have entered the midgame with a decent lead. But like the rest of the series, Keen's misread cost him the game and Life's risky strategy paid off.
Conclusion
Both Life and Keen played highly aggressively and wanted to control the game from outset. Keen has shown fine TvZ before this, but he bizarrely insisted on playing an old style that is no longer valid, and was clearly not ready for Life's less-seen builds in games 2 and 5. But not only was Keen playing an old style he was also reading Life wrong in every match except the Ohana game.
Keen had no business playing the followup he did in game 1 or the opening in game 3, and lacked the sophistication of a player such as MVP or Taeja in holding off Life's attack in games 5 or the game sense to see his plan in game 2. In game 3 he still had a small chance if he had adopted MVP's Metropolis game plan of turtling with mass cc, planetaries, and transitioning into raven/battlecruiser while keeping the Zerg at bay with drops, but instead he kept trying doom drops and questionable attacks before his defense could really be solidified. His game 5 build was one-dimensional and has been easily thwarted every time he has used it.
Keen was potentially rattled from his series against Jonnyrecco, particularly his Daybreak loss, and only chose a normal opening once in game 2. Life did nothing special but played a solid game with few holes, and that was more than enough against Keen's meager resistance. His creep spread in game 3 was superb, and his defense in each game was commendable. Life brings his unique brand of Zerg into the TSL finals where he will no doubt make for interesting games.

Sting's Preparation
Something I’m sure many of you missed: Two minutes into the game, Sting sends out what looks to be a “scouting” SCV into the middle of the map and parks it there for twenty seconds. Right after Creator’s scouting probe just barely passes the SCV without seeing it, Sting begins to move it out again, parking it in Creator’s third ready to build a proxy factory. Sting has clearly meticulously prepared for this series, researching precise probe scout paths and timings to ensure that both his SCV and his proxy would not be found.
Sting first runs his 3 hellions into Creator's natural and nets a cool 7 probes, a rather even trade, but definitely less than Sting wanted, especially considering how few units Creator had to defend with.
Some of the least probe kills we've ever seen from 3 hellions
Sting's medivac filled with 8 marines is late to the party, only arriving when all the hellions are dead. This leads me to believe Sting made a mistake somewhere along the way, as Sting first swings his medivac around a watch-tower, but then decides to pass through the tower anyways. If he had gone the fastest straight-forward path, he could have caught up with the hellions in time, and if he had completely gone around, his drop would have been more potentially hidden.
This medivac takes a rather curious path, so it's late to the party.
Sting follows his aggression up with even more trickery, hiding a command center at the 12 o'clock main as early as the 6:15 mark. Later on, he builds a third CC inside his own base to draw away suspicion from this hidden CC.
After Sting’s aggression is held off, Creator transitions into a Creator-esque style, opting to build double forges immediately. Sting goes into a standard bio transition including double tech lab and only a single reactor add-ons in order to catch up on the tech lab upgrades. Because of Sting's low marine count and his delayed tech labs, Creator knows he now has a long window in which his opponent cannot be aggressive, allowing the Protoss to cut some corners. Because of this, Creator begins an extremely early robotics bay without adding additional gateways or warping in many units for defense.
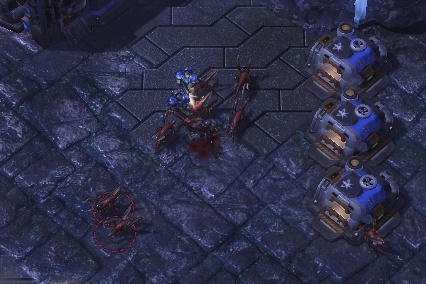
Things settle down for a while as Creator beings to venture onto the map, attempting to take the watch tower dominance when Sting also begins to move out with his small bio force. At 11 minutes, Creator begins to get suspicious, and sends a probe to scout out for hidden expansions, eventually finding the hidden third after only 1500 minerals have been mined from it. The CC is able to lift off and retreat, but Creator kills all the SCVs at the expansion, negating the benefits Sting gained from it completely. Creator safely takes his third base behind this.
Creator kills off the SCVs from Stings hidden base
Small skirmishes and attempted drops from Sting occur, but Creator ends up ahead after every engagement with his excellent unit splitting and positioning.
It is worth noting at this point that Creator has cut all colossi production, choosing to stay only at one, and not even researching thermal lance. Instead, he’s opted for heavy upgrades, storm, and immortal production. However, Sting’s proxy factory from the start of the game is still at work, and scouts a templar archives in addition to Creator's exact colossi count (one). Because of his impeccable scouting, Sting will not make a single viking until the 16 minute mark, even though Creator has had a colossi from as early as 11 minutes.
Sting continues to maximize the utility of his factory by drawing units to Creator’s natural while he doom drops Creator's main with three full medivacs. This is Sting’s first successful attack, as his trades half of his drop for a much larger amount of gateway units. Even so, Creator still holds the lead in total units lost.
Units lost before and after the drop
There’s a long lull until the next fight as both players attempt to take a fourth base. It’s interesting to note that while Sting’s third base in the middle of the map is extremely vulnerable, it still will not be scouted for a while. Only as Creator preps for his 3-3 maxed timing does he notice the rather conspicuous base. He forces the base to lift, and a battle occurs twenty seconds before Creator’s 3-3 kicks in, leaving both players at even 2-2 upgrades. Even though Creator lands a decent storm, he’s eventually forced to retreat without any more area of effect damage. The retreat doesn’t last long though, as with his 3-3 finishing and a new round of Zealots, Creator turns the tables and it’s Sting’s turn to back off. During this commotion, Creator sends a warp prism to harass Sting’s main, but it's unceremoniously shot down by a few marines who saw the drop coming.
Both players back off for now, but the loss of Sting’s 3rd is certainly felt. Because Sting's refineries at his now dead third were extremely delayed, and he does not yet have refineries at his fourth, he’s been low on gas the entire game. Thus, Sting cannot afford to purchase gas-intensive upgrades, ghosts, and vikings at the same time, and something has to give. The thing Sting decides to cut are his upgrades, and he stays at 2-2 for the rest of the game. Creator, meanwhile, is operating on 4 full bases, and can now afford shield upgrades, colossi, and colossi range, in addition to his templar and archons.
Creator decides to aggressively push his advantage, and while the trades in the middle of the map are even, this pressure alone prevents Sting from transferring SCVs to his new third, so he’s essentially fighting with two bases versus Creator's four. Creator compounds his advantage for a few more minutes without much action either side until he’s insurmountably ahead in every single way. Tech-wise, he's got everything a Protoss could dream of in this situation, with both templar and colossi. Economy-wise, he’s on five bases versus Sting three. And perhaps most importantly, army-wise, Creator is maxed with 3-3-1 upgrades and two colossi versus Sting’s 2-2 bio army supported by only three 0-0 vikings. Creator plays almost over-cautiously for a while and the two get into a drawn out positioning war But in the end, the better upgraded Protoss army supported by both templar and colossi easily tears through Sting.
GG!
Creator 1:0 Sting
Sting’s initial marine/hellion/medivac aggression is held off quite well by Creator. Sting follows this up with a hidden CC, but Creator eventually finds it without too much benefit gained from the Terran. Through mid-game trades, Creator gets a small, but substantial advantage, and cautiously and slowly pushes this advantage to win the game.
On Daybreak, Creator spawns top right and Sting spawns bottom left. Creator opens 1 gate FE into fast robotics yet again while Sting goes for a 3 CC build, all in his base. Nothing exciting happens until around seven minutes, when Sting moves out into the map with his tiny marine army. Sting is so sure that Creator won’t be aggressive against his greedy build supported by one bunker that he's willing to take even more risks by putting his marines in danger to possibly snipe an observer.
These men are far from home.
Sting eventually gets the first observer, which is huge, as Creator won’t be able to respond properly to Sting’s greedy play. To make matters worse, Sting’s wayward marines actually get Creator’s 2nd observer, putting Creator in total darkness.
Second observer dies: Sting shows either good knowledge of
timings or extreme attention paid to sniping these observers
But once Creator confirms that Sting has at least 2 bases, he transitions into a variation of his trademark CreatorPrime double forge style that includes extremely fast colossi. Creator’s third observer goes a safer but longer and more roundabout path, and it finally successfully scouts Sting’s fast third. Creator immediately puts up a third Nexus, which Sting sees immediately due to a scouting SCV. However, due to the consistent observer snipes, this third base is about 2 minutes late. Oh, and did we mention that Creator’s third observer is immediately sniped as well, though thankfully after seeing the third CC?
Although Sting takes map control as he move out to the middle of the map with his bio force, both players remain passive for a while until Sting snipes Creator’s fourth and final observer on the map. This forces Creator to cut colossi in favor of observers, and forces him to take risks when splitting his army.
Moments before the fourth observer is killed.
Mini Mindgames
Sting has two realistic paths of attack against Creator at this point, including drops into the main and a direct attack into the third, so Creator has to defend both locations. Because of all the previous observers Sting has killed throughout the game, he can assume that Creator will be low on observers, so Creator won’t be able to see any attacks coming, won’t be able to tell how strong these attacks are, and probably won’t be able to send the correct amounts of units to deal with each location.
As soon as Creator’s final observer dies, a mini mindgame opens up between the two players. Sting can either doom drop all his forces into his main, attack with everything into the third, or split his army in some combination. If Creator sends a majority of his forces into his main, he'll be able to defend a doom drop, but will be weak against a frontal attack at his third and a half-and-half split. Conversely, if he sends a majority of his forces into the third, he'll be be able to defend a front attack there, but will be weak to any sort of drops that occur in his main. On the other hand, if he splits his army evenly, he'll do well if Sting also splits evenly, but will be weak if Sting sends all his forces in one direction. The following is a decision tree showing the possible outcomes.
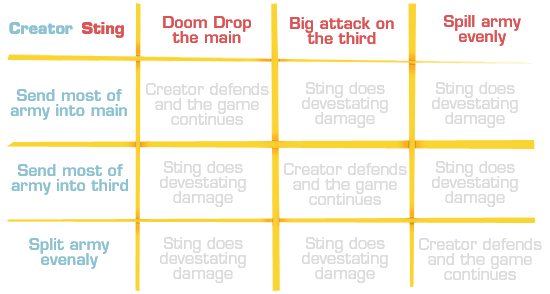
The instant his observer dies, Creator reacts to Sting's impending attacks by splitting his army almost perfectly between the two points. Not only does he directly the correct amount of units to each base, the sends the correct types as well. To his main, he sends the slightly larger force of 1 colossi, 5 zealots, 2 stalkers, and 1 sentry. To his third, goes 1 colossi, 3 zealots, 2 stalkers, and 2 sentries. This happens to perfectly counter Sting’s split of units. The bigger 3 medivac-full force in the main is held off by the more zealot-heavy army, which contains only one sentry for guardian shield (forcefields are rather useless against drops). The smaller 14-supply worth bio strike force is held off by the more zealot-light force that include two sentries, which are useful against these ground units unsupported by medivacs who can lift them behind forcefields.
Both armies are deflected perfectly.
Sting retreats with his force in Creator’s main and loses his force in Creator’s third. He then attempts to drop again with his 3 medivac force in a different location, and succeeds in unloading. He targets a colossi, but leaves it at 3 HP before it escapes. Sting leaves empty-handed after losing almost his entire harassing bio force.
By this time, after all the failed harass, Creator has evened up the game after starting off with an economic disadvantage. Both players retreat, and the game remains passive for a short while. Sting is too badly bruised to continue attacking, and Creator does not wish to overextend, instead preferring to head for late game.
However, Sting quickly reloads another three-medivac force and drops into the main while his main army pressures Creator’s third yet again. This time, the drop is much more successful as it kills the 3HP colossi and all the remaining gateway units guarding the main. This bio force ravages the main for a full minute killing waves and waves of gateway warp-ins, as Creator cannot devote his main army into defense, for fear of a nexus snipe at his third. At the end of this conflict, Creator is left with 129 supply to Sting’s 158.
Back to finish the job.
It’s still a much closer game than it seems, however, as Creator has better upgrades (2-2 vs 1-1) and better tech (templar and colossi versus no ghosts). Things cool down once again as both players take their fourth. As Sting maxes (notably without ghosts), he pulls 13 SCVs in order to use his perceived supply advantage. Unfortunately for him, he actually hits an anti-timing as Creator delays just enough so that his 3-3 upgrades kick in against an army rather lacking in ghosts, medivacs, and vikings.
Creator dominates Sting in the deciding fight
Creator ends the fight with a 170 to 129 supply advantage. Again, with such a huge supply, tech, upgrade, and economy lead, all Creator has to do is push to secure the victory.
Creator 2:0 Sting
Sting opens a greedy 3 CC play while Creator plays standard, so Sting gets an initial lead. Sting’s persistence at sniping all of Creator’s observers puts him even more ahead, as his opponent cannot properly react to his greed. A key moment of the game occurs when Sting scans his fourth and final observer and as a result, goes for a two pronged attack. Creator splits his army perfectly to defend this, winning the mini-mindgame. If Sting had decided to change his plan after he killed Creator's observer the game might have been very different. A second wave of drops hits the mark though, and puts Creator down 30 supply. However, Sting overestimates the damage he’s done and pulls SCVs for an almost all-in timing attack. It turns out to be an anti-timing, however, as Creator’s upgrades kick in just in time to both devastate the army and win the game.
Creator spawns 1 o’clock on Cloud Kingdom while Sting spawns 7 o’clock. Sting takes gas and blocks Creator’s scouting probe with a supply depot wall. His plan is a marauder hellion timing push, designed to punish unsafe and greedy expansions. Creator goes for a 1 gate FE and pokes Sting’s front with a zealot/stalker combo. He finds 2 marines and 2 marauders. Unfortunately, he has to sacrifice his zealot in order to obtain this scouting information, and without the zealot, he cannot hold the push, in a catch-22 situation. Creator knows this, so he cancels his nexus, and prepares to defend his ramp.
Why did Creator move out?
Why did Creator poke up Sting's ramp with his zealot and stalker, if it meant not being able to defend this push? When a Terran blocks off his front with a second depot, it means he’s purposely trying to deny scouting of whether he took a gas. For example, in game 2, Sting took a greedy 3 CCs, but realistically, any form of expansion play or gas play is viable from this situation, so that’s basically everything. Creator must do some kind of scouting in the form of a poke in order to not play blindly.
Usually, with this poke, you will not lose your scouting zealot, the reason being that a vast majority of builds Terran will use will not include a marauder with concussive shells at this point. Approximately 35% of Terrans will follow up with some type of expansion play, and 60% with factory play. Especially in the pro scene, tech lab play is extremely rare, and accounts for about only 2% of all Terran builds in TvP. Of all the most popular follow-ups, none of these include a concussive shells marauder.
And even among tech lab plays, only a few variations could have truly punished Creator for losing the zealot. For example, a reaper first build definately would not have a marauder at this timing. And even the most common build with a tech lab, the 1 rax tech lab pressure/expand could be held off minus a zealot on such a large map. The only two (somewhat popular) builds that could have conceivably punished Creator are the very rare marauder hellion push and the even more rare 2 rax push involving tech lab first. Both builds are extremely aggressive builds that sacrifice economy for an attack that has to do damage. And I want to emphasize again, they’re extremely rare.
Creator’s poke was a calculated risk that was good against a majority of builds, and just happened to be bad against this particular one. His other choices included using a probe to poke instead, playing a bit blind, or using a less economy intensive build like 2 gate robo. All of these options have their unique advantages and disadvantages, and in this particular game, both the builds and the calculated risks/initial decision making from both players ended up in favor of Sting.
Creator then decides that he’s too far behind to play the macro game, and builds 4 additional gateways in order to go all-in. As he moves across the map, he's caught by Sting’s marauder-heavy force and loses most of his army. Creator has retreat to his main in order to gather more units in preparation for another attempt at his all-in. It’s not looking good for the Protoss player at this point as Sting already has medivac tech along with a building CC while Creator is still stuck on one base with only gateways and very low-energy sentries.
Creator vastly overestimates his gateway units
Sting then decides to camp outside of Creator’s main, a grievous mistake as he underestimates Creator’s gateway count. Creator quickly reproduces a zealot-heavy army against Sting’s marauder heavy force and barrels down the ramp to break his opponents’ contain. Although he flubs some forcefields, the sheer amount of units is too much for Sting and he loses the majority of his army.
And then Sting vastly underestimates Creator’s gateway count
Sting is only able to save 2 marauders and 2 hellions inside a medivac and tries to drop Creator’s main while Creator is on the other side of the map going for his all-in. Creator warps in units in an attempt to defend the drop and even pulls probes, but it’s not enough as just the remaining 2 marauders and 1 hellion continue to ravage his main. Fortunately for Creator though, he’s already at Sting’s doorstep and is already knocking down the door against a meager defense of one incomplete bunker, 2 marines, and a marauder.
With the probes not mining due to Sting’s harassment, Creator only has the minerals to warp in one last stalker. He does so and pulls all his probes in a last ditch attempt to save his main. Although Sting’s positioning is perfect, as his medivac runs out of energy, his units eventually fall.
Kind of reminds you of how many kindergartners you can beat up
(although the big blue one uses steroids).
On the other side of the map, Creator finally busts down the wall, although it takes a long time due to almost all of Sting’s SCVs being pulled.
Although the bunker-depot wall is impressive, 4 army supply cannot hold 28 supply of Protoss DPS.
Creator saves his main with only 10 probes remaining. Sting, on the other hand, is not so lucky. His 3 effective barracks of production kick in too late, and he cannot hold Creator’s remaining meager force of 10 very badly damaged gateway units, so he has to tap out.
Creator 3:0 Sting
The game is set into motion as Creator loses his first zealot to Sting’s concussion shells. Although Creator knows what push is coming, he cannot stop it, and decides he has to all-in from his unfavorable position. Although Creator loses his first poking army, Sting overextends, trying to contain his opponent even though he should have retreated after seeing his opponent still did not have a nexus. After Sting loses his army, he still tries to do even more damage with a drop even though he should have focused on defending. Sting is underprepared as he did not think Creator would all-in even after seeing all those units, so he gets busted.
On Antiga Shipyards, Creator spawns bottom right while in the top left, we have Sting. Sting is on the ropes here, down 0-3 and must win the next game on this rather Terran favored map. Creator opens up without scouting into a 1 gate fe while Sting opens 1 rax CC after blocking his main again. First blood is drawn when Creator’s poking stalker is killed by an angry group of marines.
Creator is also known for losing his initial stalkers.
Sting transitions into the most standard build in modern TvP, the 2 reactor, 1 tech lab follow-up with a fast engineering bay and fast starport for medivacs. Creator goes for a safe and standard 3 gates into robo, and follows it up with an extremely fast robotics bay.
Don’t mind me, I’m just visiting.
As Sting begins to push out at 10 minutes, Creator prepares to defend with a single colossi and a small handful of gateway units. As with game 1, Creator cuts colossi at just one, solely using it as a tool to defend small infantry attacks with. Sting hides the majority of his bio force in his two medivacs, and although Creator sees Sting’s entire army in vision, he incorrectly splits his army, allowing for Sting to successfully drop in Creator’s main. Creator loses a ton of gateway units, and even his first colossi as the units in his natural rush to help. While this fight is still going on, the rest of Sting’s army marches towards the natural, taking advantage of the fact that Creator has pulled all his troops into this main, and this small force kills its fair share of gateway units as well.
This is exactly why Antiga favors such drop play. Terran can easily swing around between the natural and main with ease while the Protoss has to take a much longer path.
At the end of the battle, Sting is left with 110 supply and a completed third base, while Creator is down to 84 supply and no third in sight. Almost even more importantly, Sting has scouted Creator’s entire base with his pokes, and now knows that Creator is attempting either an archon or templar switch.
Creator decides his best chance in this game is to do what he does best and rely on his solid defense to avoid any more damage. He also beings research for storm, as he deems it one of most likely ways he will be able to get back into the game. He takes a third and starts remaking a colossi to be safe from any more bio attacks. At the very last minute however, as he deems that his storm will finish before Sting attacks, so he cancels this colossi. This turn out to be a grievous mistake, however, as Sting would not let off the pressure. A two medivac drop hits Creator’s main and picks off countless gateway units as they rush single file to their deaths. Sting then finds a perfect nook in Creator’s base where the drop finds itself invulnerable to both zealots and archons. This small drop ravages the base for almost two minutes.
It will never be removed.
Without colossi or templar, Sting’s bio force is almost impossible to excavate.
A second force attacks Creator’s third, and although it’s similar in size to Creator’s force positioned there, it manages to trade extremely cost-efficiently. As this army is chased out, a quick glance at the supplies tells the grim tale; Sting is almost doubling Creator’s supply at this point, 140 to 75. Not to mention Creator still has no answer to the units in his main.
The drop in the main was initially supposed to distract from this attack. It turns out that this attack ends up being the distraction for the drop in the main.
Creator’s last attempt to remove the remaining 9 marine and medivac force in his main is in the form of one archon that takes forever to swing around to the back of his base. When he sees this archon has perished, taking only one marine along with him, Creator knows it’s time to leave the game.
Creator 3:1 Sting
This game was pretty much decided by the first drop. As Creator was caught out of position on a map where poor positioning is harshly punished, he was immediately set way back. His initial unit loses snowballed, as he had even fewer units to defend future drops, which eventually proved too much from the usually solid Protoss.
On Ohana, Creator starts bottom right as the blue pieces while Sting gets the red pieces in the top left. Creator actually opens an extremely timid defensive 3 gate expand with a late robo while Sting goes for an early wall off with depots again into cloaked banshee with the intention to go for a 1-1-1 all-in.
Creator gets no scouting information until the first cloaked banshee shows up at his base. The banshee shows up at Creator’s base, but thankfully, Creator’s first observer is fairly close and he wards off this threat, damaging it enough so that it won’t come back without a repair. Sting, in this time, gets only four probes with his banshee harass, which isn't too bad for Creator. Additionally, because the banshee is too damaged to come back without a repair, Sting has lost the threat of this banshee, which relieves a lot of pressure off of Creator.
Two of these probe deaths are from scouting probes. Creator really loves to scout.
At the 10 minute mark, something seemingly minor occurs, but I would argue it’s a defining moment of the game. Sting ninjas in a banshee into Creator's natural and snipes off a singular sentry. Because of this, Creator is left with only one sentry, which is just enough to guardian shield, but not enough to provide any useful forcefields. We'll see why this is such a huge deal later on.
This little guy is kind of a big deal. His loss will be felt by all.
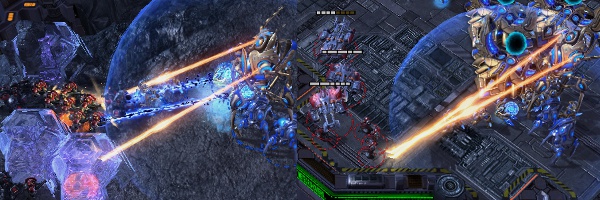
At the 10:20 mark, Sting begins to move out of his base for the final blow, pulling 16 SCVS along for the ride. Then, in possibly the strangest decision of the entire series, Creator pulls all 16 of his probes in his natural, warps in a round of stalkers, and tries to meet Sting halfway on the map!?! Sting sees this and actually retreats. Even more bewilderingly, Creator actually tries to chase him down. The two engage, but Creator starts the fight in an extremely awkward position as the large stalkers and immortals trip across each other and the zealots and probes march single file to their deaths. For a moment, it looks like Creator has the upper hand, but then Sting begins kiting his entire army back in a favorable position, something which could have been easily prevented if Creator just had one more sentry. Creator barely loses the battle and retreats his few remaining stalkers and immortals back to his natural, losing many stragglers on the way.
String of small cropped screenshots depicting the battle with arrows between them
The finale of the battle
While both players have lost a similar amount of workers, Sting has mules to back him up, so his reinforcement capability is not crippled as Creator's is. Creator tries to mount a last-ditch defense, and musters 6 stalkers against the remaining 9 marine, 4 banshees, and 5 SCV force in Creator's base. Unfortunately, Creator disconnects at this point, just as the game is nearing its final moments. The game was awarded to Sting, and Creator did not contest it as I'm sure he knew he was done for.
Creator knows he's done. Shortly he will gg.
Creator 3:2 Sting
Creator opens with an incredibly safe 3 gate expand, and holds off Sting’s initial banshee harass reasonably well. He then prepares as close to perfect as possible for the incoming 1-1-1 all-in, but makes a questionable decision pulling all his units in addition to a bunch of probes to chase the Terran army down. This decision proves to be folly and Creator just barely loses the fight, and thus the game.
The third match point for Creator finds him at the bottom left while Sting spawns just above him at the top left. Both players seem to open with their most standard builds yet. Sting opts for 1 rax FE and transitions into the standard 3 rax double reactor build he used in game 4. Creator, for the 5th time in 6 games, opens 1 gate FE. He then follows it up with 3 gates, which is perfectly normal, right?
Nope, far from it. In Creator’s first planned aggressive move of the series, he adds two additional gateways and cuts probes in preparation for a 5 gate all-in attack.
So exactly how greedy was Sting this game? Actually, slightly less greedy than in his other games. Unlike in game four, Sting actually set up a bunker right as his CC went down. Unlike in both games two and four, Sting did not venture out into the map at all with his marines. And unlike in game one, Sting actually sent out a scouting SCV, which actually found out that Creator had an expansion. But for a full three minutes, between 5:40 when that SCV died and 8:40 when Creator’s push hit, Sting had zero vision outside of his own base.
Fun fact: Sting did not scan Creator’s base once this entire series. In this game, any scan in the general vicinity of Creator’s base would have revealed Creator’s true intentions and won him the game. A scan in the main would have revealed all of Creator’s not very well-placed gateways. A scan in the natural would have revealed a lack of gas taken, indicating that Creator is either going to gateway all-in or that he took a quick third. A scan somewhere in between would have seen Creator’s entire army consisting of either four or five sentries. If Sting truly did his research of his opponent, he would have known that Creator never gets more than three sentries in macro PvT (as is the current trend in Korea) and that something fishy was going on.
Another interesting tidbit: Creator’s push hit at 8:40. Between 7:10 and 8:40, 100% of Sting’s attention was devoted to looking for observers in his base. Sting was so sure that a robotics follow-up was coming that when the push finally hit, he still had a handful of marines inside his main, ready to shoot down the observers that were nowhere to be found. By the time Sting realized something was off (by the lack of observer deaths), it was too late and the scouting SCV sent out at 8:30 saw only death.
Oh Crap
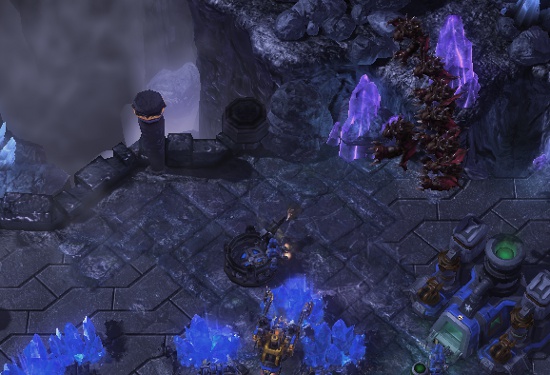
At this moment Sting’s heart skipped a beat. His stim had just barely not finished, his medivacs were still a minute away, a good chunk of his force was still in his main, and there was only one bunker standing between him and utter destruction. Sting tries to retreat to his main, but 6 marines and all of the SCVs in his natural get caught by a force field.
Let us in!
Creator busts and moves up the ramp, ready to claim victory, but Sting was determined not to have it all end here. Just as stim finishes, he pulls a handful of SCVs for his final stand. But with exceptional forcefield donuts and the sheer power of numbers, Creator breaks his opponent and secures the first spot in the TSL4 finals.
GG!
Creator 4:2 Sting
Sting’s greed finally caught up with him in this game. He depended too much on Creator to play like Creator, and when his opponent finally caught onto what he was doing all the previous games, Creator decided to channel MC this game. He went for the 5 gate bust, quickly ending Sting’s run in the TSL.
Conclusion
This series went rather predictably. In each game, Creator opened with a rather safe fast expansion, while Sting employed clearly well-prepared builds, each tailored specifically for both a specific map and to abuse Creator’s predictable style. In his macro games, Sting played as greedily as possible. The most evident example of this was in his insistence on sniping Creator’s observers, even if it meant taking huge risks along the way to do so. So sure was Sting that Creator would employ a macro robotics build that he seemed to ignore all other possibilities. Which would lead to his eventual downfall.
Another theme in Sting’s play today was in his focus on denying scouting information. Sting knew that one of Creator’s greatest strengths was his ability to adapt well to a variety of builds… but only if he knew what was coming. To that extent, Sting was determined to keep Creator in the dark. Not only did Sting furiously try to kill observers, as was previously discussed, he opened the same depot-barracks-depot build in every game, maximizing Creator’s uncertainty of his opponent's opening each time.
Meanwhile, Creator went into this match with his tried and true macro builds and towards the end of the series began changing up his play to throw Sting off. It was absolutely clear that Creator could not be broken in a straight up macro game as he illustrated his prowess in long PvTs. But what really impressed me about Creator was that after Sting gained some momentum in games 4 and 5 he was able to identify that Sting had prepared meticulously for him and change his normal style for to one that Sting could not have anticipated.
Creator goes into the finals with as much momentum as possible. Although he has had only middling results in the past, during this past month, he really seems to have turned it on. Not only does he have a 14-2 record so far in the TSL, higher than any other potential finalist, he recently took the very pretigious WCS Korea tournament for himself as well. With some time to prepare for the finals, look for Creator to be a strong contender, or even a strong favorite in the upcoming TSL finals.
Thank you for supporting the TSL and TeamLiquid. Full TSL+ details.
Sponsors:


TwitchTV is the world’s largest video game entertainment and chat community. TwitchTV features the top gaming personalities, players, tournaments and commentary, in addition to the most active and interesting discussions around video games. TwitchTV provides publishers and advertisers a platform to create long term engagement and commitment from gamers.
Learn more at www.twitch.tv
Learn more at www.twitch.tv
Razer has been a pioneering supporter of e-Sports since its conception. It is in our blood and we are driven to further the culture of professional gaming in all that we do. We work hand in hand with our pros to forge weaponry for the players who stake their livelihood on podium placements. Our gear is designed to perform flawlessly in high-stress tournament conditions where winning is everything and mistakes cost championships. Those who compete with our equipment will attest – We live by our words: For Gamers. By Gamers.
For more information, please visit www.razerzone.com
For more information, please visit www.razerzone.com
Art by: