Overview
Alarak, Highlord of the Tal'darim, leads the fanatical Tal'darim in their pursuit of vengeance against Amon. In Co-op, Alarak takes the field as a powerful hero unit supported primarily by an army of Gateway units unique to the Tal'darim. Alarak's forces eschew traditional defenses, instead preferring to engage his enemies with overwhelming firepower in order to end fights before they have even begun. Alarak himself steals life from fallen enemies in order to sustain himself on the battlefield, and will readily sacrifice his subordinates to save his own life whenever the battle turns against him. Alarak relies heavily on the power of his Ascendants, who possess some of the most destructive abilities in Co-op. Growing more powerful as the game progresses, Ascendants are capable of eradicating entire armies within moments - at their peak they may very well be the single most devastating unit in all of Co-op. However, this power comes at a price, as Ascendants are both slow and difficult to manage, and some players may prefer other options. Mastering Alarak requires learning how to use the power of Alarak and his Ascendants, and how to circumvent their weaknesses.
Strengths
Unparalleled Wave-Clearing Ability: With a fully-realized Ascendant army, Alarak is able to destroy enemy attack waves more easily than any other commander, and from greater range. By Sacrificing Supplicants, Ascendants grow into monstrous spellcasters that are capable of reducing any enemy in their path to ashes, able to deal both tremendous amounts of area damage and single target damage. This results in one of the strongest late-game armies available to any commander, one that is not dependent on the defensive aid of his ally.
Weaknesses
Poor Mobility: Alarak suffers from an inability to move from one side of the map to the other quickly. All his units have poor movement speeds and his only relocation ability is tied to his ultimate - Death Fleet, which has a prohibitively long cooldown. For all but the most skilled Alarak players, it may be difficult to engage in battles on more than a single front at a time.
Weak Anti-structure Damage with Ascendants: Ascendants have low auto-attack DPS, and only Psionic Orb can deal damage to structures. Ascendant-heavy compositions will have trouble dealing with structures that they cannot Mind Blast, and this can be a problem for many mission objectives such as Void Shards on Rifts to Korhal and Infested Structures on Dead of Night.
Difficult to Recover after a Bad Engagement: Alarak can be a punishing commander for newer players. When Alarak falls below 50 health, he automatically sacrifices a nearby unit to restore his health. While Supplicants are prioritized for sacrifice, more expensive units will be sacrificed just as readily should you run out of Supplicants. This can potentially result in you losing an entire army if you cannot retreat from tricky situations fast. While other commanders can still rebuild their armies, Alarak will find it particularly difficult to effectively replace lost Ascendants with stacks of Power Overwhelming.
Suggested Unit Compositions
![[image loading]](http://www.teamliquid.net/staff/Chimaron/Guides/Alarak/Units_Comp1.jpg)
Ascendant + Supplicant:
A typical late-game army of 12-20 Ascendants supplemented by an army of Supplicants is very powerful against attack waves due to the long range and high damage of the Ascendant’s abilities. This allows any attack wave to be cleared even before enemy units can get within range to attack. However, Ascendants have one of the slowest movement speeds of all units, rendering this composition vulnerable to simultaneous attack waves approaching from different directions. With sufficient Power Overwhelming stacks, it is possible to split your Ascendants into two or three different groups in order to deal with split attack waves, but this requires significant practice to execute well.
This composition can have trouble destroying structures, especially high-HP objectives. Mind Blast cannot target structures and Psionic Orb’s damage is not suitable for destroying anything with more HP than static defenses. Also, Ascendants and Supplicants have an auto-attack DPS similar to that of Probes. As such, it may be worth delegating the job of destroying undefended structures to your ally while your army moves ahead to clear further base defenses and attack waves.
The number of Ascendants you choose to get should depend on the trade-off between burst damage and defensive stability. More Ascendants will be able to put out higher burst damage, but they will require more minerals to sustain and empower them via Sacrifice. As a result, you may be more likely to run low on Supplicants. This may disastrously result in Alarak sacrificing the expensive Ascendants instead, should you run out of Supplicants. Less-experienced players are advised to use fewer Ascendants, allowing for a higher number of Supplicants on the battlefield. In most situations, 12-16 Ascendants will suffice. A general rule of thumb is to get one Warp Gate per two Ascendants that you intend to warp in.
This composition is not as effective against some mutators due to poor mobility. It is weak in sustained engagements due to Sacrifice cooldowns, and it can be difficult to rebuild after a poor engagement. However, Ascendants are some of the most powerful units available to any commander when it comes to dealing with unit-enhancing mutators such as Avenger, Just Die, or Transmutation, thanks to their explosive firepower. Consider lowering your Ascendant count if you encounter mutators that target your economy, as you may have difficulty providing a high number of Supplicants to fuel their Sacrifice.
![[image loading]](http://www.teamliquid.net/staff/Chimaron/Guides/Alarak/Units_Comp3.jpg)
Ascendant + Wrathwalker + Supplicant
While Ascendants are weak against structure-based objectives, Wrathwalkers are capable of dealing continuous, heavy anti-structure damage. At the same time, Ascendants can dish out massive AoE damage to enemy units before they can threaten your fragile Wrathwalkers. As such, it is possible to combine them into an effective army that covers for each other’s weaknesses.
For this composition, prioritize building up a group of 8-12 Ascendants early before investing in Wrathwalker tech. As each Ascendant grows more powerful with each stack of Power Overwhelming, it makes more sense to start powering up your Ascendants before tackling the tech cost associated with unlocking Wrathwalkers.
![[image loading]](http://www.teamliquid.net/staff/Chimaron/Guides/Alarak/Units_Comp2.jpg)
Wrathwalker + Supplicant
When you need more continuous firepower or heavy anti-structure damage for maps such as Dead of Night, mass Wrathwalkers are the way to go. Alarak’s Destruction Wave provides all the AoE you’ll need, and its knockback can be used to keep these expensive units safe from enemy fire. Havocs will boost their innately high range even further. Do note that Wrathwalkers have a very high target priority as they can be targeted by both air and ground attacks, and as such you will need to pull them back should they come under enemy fire.
General Tips
- Alarak has the same dynamic as other Hero commanders in that you should hold your base with your Hero and calldowns until your primary units and essential upgrades are ready. Alarak has fairly low shields and HP (200/200) compared to most other heroes and is a melee character on top of that. Therefore, you should not play overly aggressively - don’t send him into large enemy bases without an escape option. Instead, you can lure enemy defenders into chasing Alarak, retreating while using his powerful abilities whenever they are off cooldown in order to wear down the enemy before repeating the process by luring another batch of enemies. You can do this from the moment he spawns at 4:00 and until your primary army is ready - build it up while microing Alarak. With good play, you can carve a swathe of destruction through the enemy ranks without the aid of any unit other than Alarak - learn to use his Destruction Wave and Deadly Charge to great effect and observe how his Soul Absorption passive functions. A video demonstration can be found here: Alarak Kiting
- Use a Probe to warp in forward Pylons. Forward Pylons allow Alarak to reinforce his army quickly and can contribute significant damage to a push with Structure Overcharge’s long range.
- While Alarak will sacrifice Supplicants to stay alive via Soul Absorption, he will just as readily sacrifice your other units if there are no more Supplicants. Retreat before this happens, as rebuilding units other than Supplicants is expensive and can quickly starve you of resources. In the case of Ascendant builds, sacrificing stacked Ascendants can set you back substantially. Having a healthy supply of Supplicants before entering any tough battle is crucial if you do not want to lose any of your expensive units.
- When sacrificing an allied unit, Alarak will directly steal that unit’s HP and shields, restoring it as HP and shields for himself. For instance, if Alarak has 50 HP and 0 shields and the sacrificed unit has 100 HP and 100 shields, the unit will die and Alarak will be restored to 150 HP and 100 shields. If the unit has more HP than he needs, such as in the case of a Wrathwalker, he will only drain as much HP as he needs, leaving the unit alive but weakened. Alarak will not sacrifice Probes. Soul Absorption’s sacrifice range is 15. Alarak will sacrifice units to sustain himself whenever his HP drops below 50.
- Even if an enemy attack would have killed Alarak, he will not die - any damage that would have overkilled him is simply ignored. As long as you have units nearby, Alarak will always be the last one standing.
- Alarak’s level 15 upgrade, “Wrath of the Highlord”, will trigger whenever a Supplicant is sacrificed. This applies whether the sacrifice is made by Alarak himself taking fatal damage or by Ascendants using their Sacrifice ability. When this happens, the cooldowns of Deadly Charge and Destruction wave are reset entirely, allowing Alarak to potentially use these abilities in rapid succession. Refer to the “No Cooldown” Alarak Method section for details.
- During his spawn animation, Alarak has access to his abilities. If you are being overrun, you can use this to your advantage. His cooldowns will reset once he finishes spawning.
Calldown and Unit Overview
Calldowns
32.00 DPS (up to 99.20 DPS with Structure Overcharge mastery)
Overcharges a structure, granting it a 200 HP Barrier for 45 seconds and enabling it to attack nearby enemies within 10 range for 40 damage per hit. This results in a tremendous amount of damage over its full duration.
Due to the long range of Structure Overcharge, you can use it to siege enemy bases using forward Pylons. As you can only hold a maximum of 3 charges, try to get use out of Structure Overcharge by using it offensively whenever you near 3 charges - don’t waste the massive amount of free damage it can provide. Whenever you complete a shield or weapon upgrade at the Forge, the shield and attack damage of Structure Overcharge increase by 20 and 4, respectively. This gives them 260 shields and 52 damage with level 3 upgrades. Structure Overcharge is further enhanced with the Structure Overcharge Shield and Attack Speed mastery - refer to the Masteries section.
Structure Overcharge will prioritize attacking targets in the following order: enemy units that are attacking your units or structures, enemy units within range, enemy structures and lastly neutral Rocks. If there are multiple targets with the same priority, Overcharge will attack the closest enemy unit first. Therefore, enemies that can spawn minions such as Brood Lords, Infestors, and Swarm Hosts may be difficult to deal with using Structure Overcharge.
You cannot Structure Overcharge summoned or temporary structures.
Since Structure Overcharge will attack Rocks, you can use it to expand quickly, provided you have mastery points in Structure Overcharge Shield and Attack Speed. Use this to your advantage to jumpstart your economy.
Mothership’s attack: 84.30 DPS (range of 2)
Mothership’s Thermal Lance: 20.00 DPS
Destroyer: 20.70 DPS x8
Warps in a Tal’darim Mothership and eight Destroyers, which last for 60 seconds. Initially available at 10 minutes, with a 6 minute cooldown for subsequent casts. The Mothership’s Thermal Lance ability attacks both air and ground enemies in a line for 20 damage, on a 1 second cooldown. The Mothership itself has high auto-attack DPS and, coupled with its escort of Destroyers, can wipe out enemy attack waves with ease. Do note that the Mothership has a very short range of 2, which is not immediately obvious. You will need to actively move it forward to attack objective targets, otherwise its auto-attack will not be used. The Mothership also has access to Mass Teleport, which warps it and any nearby friendly units to a targeted friendly unit or structure anywhere on the map - with no cooldown on this ability, you can potentially warp your entire army between multiple key locations within a short timespan, making this your best form of mobility. Mass Teleport does not relocate your Probes or your ally’s workers.
The Death Fleet provides 42 supply for Alarak’s Empower Me, granting him a large boost to his abilities. The Mothership’s duration of 60s allows for Empower Me to be used to great effect while the Death Fleet is present. Combine these whenever possible for a devastating payoff.
Alarak
20.00 (up to 40.00 with Attack Damage mastery) DPS
Alarak is a strong early-game hero who controls the battlefield by stealing life from fallen enemies and knocking back approaching enemies.
Alarak dashes to a target point, dealing 200 damage to a nearby unit. Has a 10 second cooldown.
Whenever Alarak sacrifices a Supplicant due to fatal damage, his next Deadly Charge will benefit from his level 7 upgrade, Lightning Surge. This causes Deadly Charge to deal an additional 50 damage to up to 4 units around that target. This ability is Alarak’s primary source of mobility, both in and out of combat.
Whenever Alarak sacrifices a Supplicant due to fatal damage, his next Deadly Charge will benefit from his level 7 upgrade, Lightning Surge. This causes Deadly Charge to deal an additional 50 damage to up to 4 units around that target. This ability is Alarak’s primary source of mobility, both in and out of combat.
Alarak sends out a psionic shockwave, knocking back and dealing 50 damage to all enemy units caught in it. Has a 5 second cooldown.
Though this ability can wipe out many lower tier enemies instantly, it also allows Alarak to wear enemies down by attrition, engaging groups of enemies to cast Destruction Wave and then retreating. It also serves as a great tool for preventing the enemy from dealing damage to you or your units thanks to the knockback. While the Ascendant’s Psionic Orbs are flying past Alarak, you can use this to knockback enemies in order to keep them in the Psionic Orb’s area of effect for as long as possible, reducing the number of casts you need to use to destroy an enemy wave.
Though this ability can wipe out many lower tier enemies instantly, it also allows Alarak to wear enemies down by attrition, engaging groups of enemies to cast Destruction Wave and then retreating. It also serves as a great tool for preventing the enemy from dealing damage to you or your units thanks to the knockback. While the Ascendant’s Psionic Orbs are flying past Alarak, you can use this to knockback enemies in order to keep them in the Psionic Orb’s area of effect for as long as possible, reducing the number of casts you need to use to destroy an enemy wave.
Alarak gains additional damage for both his auto-attacks and abilities based on the total supply of friendly units in a large radius around him, and his ground auto-attacks deal AoE damage.
The damage he can dish out during this ability is significant. He gains +1 auto-attack damage per supply and his ability damage is boosted by 5% per supply up until 100 supply, after which it is boosted by 2.5% per additional supply. This translates to 1200 damage dealt by Deadly Charge and 300 damage dealt by Destruction Wave if Alarak is surrounded by 100 supply of units during Empower Me. This means that having as many units around Alarak as possible during Empower Me is critical, and you may wish to stay close to your ally’s army in order to enjoy this multiplicative bonus. This ability can be used in combination with the No Cooldown Alarak Method and Empower Me Duration mastery to devastating effect.
The damage he can dish out during this ability is significant. He gains +1 auto-attack damage per supply and his ability damage is boosted by 5% per supply up until 100 supply, after which it is boosted by 2.5% per additional supply. This translates to 1200 damage dealt by Deadly Charge and 300 damage dealt by Destruction Wave if Alarak is surrounded by 100 supply of units during Empower Me. This means that having as many units around Alarak as possible during Empower Me is critical, and you may wish to stay close to your ally’s army in order to enjoy this multiplicative bonus. This ability can be used in combination with the No Cooldown Alarak Method and Empower Me Duration mastery to devastating effect.
Units and Structures
3.48 DPS
Alarak’s fodder. These fortunate individuals are the first units that are sacrificed by him whenever his life is threatened. They are also Sacrificed by Ascendants to regenerate their energy. These are cheap units by protoss standards, costing 150 minerals to warp in two of them and coming at 2 supply each. As these are your primary mineral dump, all builds will heavily feature Supplicants. They will provide Alarak and his Ascendants with a buffer of sacrificial units to sustain their fighting capabilities, and will also serve as your primary boost to Alarak’s damage during Empower Me.
7.99 (11.18 vs armored) DPS
Alarak’s general purpose ranged unit. They are overshadowed by the much more powerful Wrathwalker and Ascendant, but they can be decent units to use while levelling Alarak up, or to supplement other unit compositions. Their Phasing Armor upgrade provides a massive increase to their survivability, rendering them invulnerable to damage for 2 seconds when they take damage with only a 5 second cooldown. However, they remain a poor choice primarily due to their lackluster damage output and low impact on the battlefield. They can occasionally serve a role in niche mutations where survivability is preferred over damage, but are not recommended for general use.
Alarak’s support caster. Serves as a detector and can be upgraded with permanent cloaking. Havocs provide powerful damage amplification by casting Target Lock on enemies in place of an auto-attack. This ability increases all damage taken by the target, including spell damage, making it an invaluable addition to Alarak’s army. The percentage-based damage increase is useful for all attacking units, but hard hitting units such as the Siege Tank find their benefit particularly useful due to the scarcity of comparable buffs from other commanders. The Havocs’ passive ability, Squad Sight, provides +2 attack range to all nearby allied units’ ranged attacks. Bulky ground armies and siege units benefit the most from this bonus range. The aura remains even after a Havoc is loaded into a War Prism, allowing for support of allied air armies. These powerful abilities combine to make 1-3 Havocs a powerful addition to any army composition.
5.91 DPS
Alarak’s spellcaster. Has access to Psionic Orb and Mind Blast.
Psionic Orb is your primary weapon against enemy attack waves, dealing a base of 10 DPS to all enemies within a range 5 AoE at the cost of 100 energy. 2 second cooldown. The damage from multiple Psionic Orbs stack and each Orb lasts for 4 seconds and moves at a speed of 4, damaging all enemies within its path and resulting in tremendous damage over time.
Mind Blast is their secondary ability, and can be very effective against anything with high health. Deals a base of 200 damage to a single target at the cost of 100 energy. 8 second cooldown. Both these spells benefit greatly from setting up Rapid-Fire on their respective hotkeys, as it allows you to offload a barrage of spells very quickly, especially against objective targets with high HP, such as Trains.
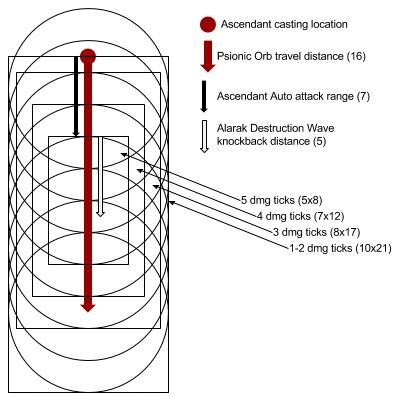 Sacrifice consumes a nearby Supplicant to replenish 200 energy. Comes with a 60 second cooldown. Once upgraded, Sacrifice also grants the caster a stack of Power Overwhelming, which boosts their shields by 100 and ability damage by 25%. At a maximum of 10 stacks, each Ascendant possesses a 1040 point shield while dealing 35 DPS with their Psionic Orb and 700 damage with their Mind Blast. While Ascendants will automatically Sacrifice Supplicants when their energy is depleted, it may be wise to manually Sacrifice Supplicants in order to build up stacks of Power Overwhelming - this can be especially beneficial in the early game. Using Sacrifice will also trigger Alarak’s “Wrath of the Highlord”, resetting his cooldowns.
19.63 (36.80 vs armored) DPS
Alarak’s sustained area damage unit. While campaign players may have fond memories of these annihilating masses of enemies, they only deal half the damage of their campaign counterparts. Each of their attacks comes in the form of eight Scatter Cannons launched at a targeted ground area, which results in enemy ground units within the splash radius sharing the damage. When there is only one unit present, all the damage will be borne by that unit. However, the Scatter Cannons do not track the targets, and may miss completely against fast-moving units such as Zerglings. When you are not opting for an Ascendant build, Wrathwalkers are generally a superior unit as it has superior range, can fire on the move and has the ability to attack air units, even though they possess a comparable damage per resource invested.
38.33 (67.08 vs structure) DPS
Alarak’s siege unit. Deals bonus damage to structures. Can fire on the move and has an extremely long range, making them reasonably evasive when controlled properly. Their high single target damage and relative fragility make them work well in combination with Alarak’s area damage and knockback. You should prioritize the Aerial Tracking upgrade, which allows these units to attack air units as well. The Rapid Power Cycling upgrade reduces the charge time of their attacks, but not the overall attack speed, hence it is a decent but not essential upgrade.
7.48 DPS
Alarak’s mobile power field. When deployed into its Phasing Mode, Ascendants, Havocs and Supplicants can be warped in. However the role of the War Prism is sadly obsolete as it is difficult to warp in significant numbers of Supplicants within the limited area of the power field. Forward Pylons fulfill this role more effectively, being less expensive, not requiring as much micro, being targetable by Structure Overcharge and providing supply. While these units are able to attack both ground and air enemies, you should not depend on their weak attacks in place of other offensive units.
16.00 DPS
The standard Protoss Photon Cannon. Structure Overcharge makes static defense for Alarak largely unnecessary, as even an Overcharged Pylon will perform much better than several Photon Cannons. Alarak is also typically starved for minerals as he needs as many Supplicants as possible; thus, Photon Cannons are usually a luxury that Alarak can’t afford.
In-depth
Build Order
Maximizing mineral income is an essential goal of any Alarak build. Supplicants are essential for sustaining Alarak and his Ascendants. Actively Sacrificing Supplicants is key to proper Ascendant usage, but this places a constant drain on your mineral reserves. Just 16 Ascendants are capable of fully spending your mineral income for the rest of the game. Therefore, any reduction in mineral income directly limits the number of Ascendant spells you can cast. Use Alarak’s hero unit to solo the early game while maximizing economy and climbing the tech tree.
Alarak should always aim to expand as quickly as possible with his first Structure Overcharge. With sufficient points in Structure Overcharge Shield and Attack Speed mastery he will generally be able to expand before 2:00, the second fastest on-site expansion in the game behind Karax. The following build is effective for maps with Rocks at the expansion, and assumes full mastery in Structure Overcharge Shield and Attack Speed.
- 14 Pylon
- 15 Assimilator (Do not assign Probes to harvest gas yet)
- 18 Pylon (at Rocks, immediately Overcharge it)
- 20 Nexus
- Immediately assign 3 Probes to your Assimilator
- 21 Assimilator
- 22 Gateway
The "No Cooldown Alarak" Technique
The “No Cooldown Alarak” technique, also sometimes called “1qe2c”, is Alarak’s most advanced technique and can be exceedingly difficult to thoroughly master. Alarak’s Wrath of the Highlord ability resets the cooldowns of his Deadly Charge and Destruction Wave whenever a Supplicant is sacrificed regardless of how far it is from Alarak. As such, an Alarak player may manually Sacrifice Supplicants with Ascendants in order to continuously reset both his Deadly Charge and Destruction Wave abilities from anywhere on the map. This allows Alarak to essentially play with no cooldowns on his two primary abilities, allowing him to steamroll through the mid game with ease.
This order of execution assumes default hotkeys. You may use whichever hotkeys you prefer, though the difficulty of this technique demands a certain level of efficiency.
- Alarak is assigned to control group 1
- All Ascendants are assigned to control group 2
- Q = Alarak’s Deadly Charge
- E = Alarak’s Destruction Wave
- C = Ascendant’s Sacrifice
- Select Alarak (1)
- Use Alarak’s abilities (Q and E)
- Select Ascendants (2)
- Use Sacrifice (C), resetting Alarak’s cooldowns
You may start using this technique once your first Ascendants are warped in and you have researched Power Overwhelming. While you are unlikely to be using your Ascendants’ offensive abilities yet, this is alright as they won’t have full stacks of Power Overwhelming yet, and Alarak’s spells are comparatively stronger during this point of the game. Later in the game when Ascendants overtake Alarak in power, it will be more important to mix in Ascendant spells with this technique, rather than relying solely on Alarak.
Using Alarak’s hero in this manner mitigates Alarak’s weakness against structures as his spells deal full damage against structures.
When paired with Empower Me, Alarak’s abilities become extremely potent, being able to clear any wave or any base with ease as long as you have sufficient sacrifices available.
You can split your army into two groups, one with Ascendants/Supplicants and the other with Alarak alone. This allows Alarak to defend and attack more than one area at a time, mitigating another one of Alarak’s weaknesses - his lack of a way to efficiently split his army.
If you are particularly skilled, you can use both Alarak’s abilities and those of the Ascendants as part of this technique, allowing you a very strong defense at two separate locations by rapidly casting both sets of abilities - but this will require significant practice. This will also ensure that Sacrifice restores energy, meaning you won’t be wasting energy refills to boost Alarak.
If you plan to use this technique, researching the Imposing Presence (2 second stun) ability can be useful. However, you’ll want to forgo researching the Telekinesis (double Destruction Wave knockback) research as each upgraded Destruction Wave will knock units out of the subsequent Destruction Wave’s range.
Masteries
Power Set 1:
- Alarak Attack Damage (+1 to +30)
- Combat Unit Attack Speed (+0.5% to +15%)
Power Set 2
- Empower Me Duration (+0.5 to +15 seconds)
- Death Fleet Cooldown (-2 to -60 seconds)
Power Set 3:
- Structure Overcharge Shield and Attack Speed (+7% to +210%)
- Chrono Boost Efficiency (+1% to +30%)
Synergies
Raynor
Alarak can overcharge Raynor’s floating structures, which represents about as much power as the Hyperion. Raynor’s small and compact army can serve to boost Empower Me greatly.Swann
One of Alarak's main weaknesses is his lack of pushing power against buildings, something that Swann has in spades. Alarak can Structure Overcharge Swann’s floating structures, which can be used to great effect offensively.Zagara
Since Zagara only has a maximum of 100 supply, she is not able to provide as much support for Empower Me as some other commanders. Both Alarak and Zagara have plenty of burst damage, allowing them to cover for each other during their downtime.Vorazun
Alarak’s Hero unit and Structure Overcharge can control the early-game while Vorazun powers up. Dark Pylons assist in the mobility of Alarak’s slow-moving army. Alarak can help Vorazun by using Structure Overcharge on Dark Pylons. When going Ascendants, Vorazun can take 2-3 gases off Alarak after the initial investment into Ascendants and upgrades.Karax
As Alarak is lacking mobility with his slow-moving army, he greatly appreciates Karax’s global defensive abilities. He can also Structure Overcharge Karax’s static defenses to provide a DPS boost whenever needed.Abathur
Alarak can push entire enemy waves into Abathur’s Toxic Nests for a massive Biomass pay-off. Abathur can heal Alarak’s units, but this is of limited usefulness to Alarak.Nova
Nova’s Defensive Drones can help to keep the expensive Ascendants and Wrathwalkers alive. Unfortunately, you cannot Structure Overcharge summoned units like Defense Drones or the Raven’s Auto Turrets. When going Ascendants, Nova can take 2-3 of Alarak’s vespene geysers after his initial investment into Ascendants and upgrades. Alarak will appreciate a timely use of Tactical Airlift.Stukov
Structure Overcharge can be used to protect Stukov’s Infested Bunkers when rooted, as well as his other buildings. When coupled with the use of Stukov’s Infest Structure, it creates an almost impenetrable defensive line. Note that Structure Overcharge cannot be used on an unrooted Infested Bunker, but it can be used on any of Stukov’s other unrooted structures. Stukov’s Infested and his calldowns can provide an absolutely massive bonus to Alarak’s Empower Me.Fenix
Mass Recall helps with Alarak’s mobility issues. Alarak’s high burst damage helps make up for Fenix’s lack thereof.Dehaka
Dehaka can Deep Tunnel Primal Wurms to anywhere with vision and Alarak can Structure Overcharge them. However, Alarak cannot Overcharge Greater Primal Wurms. Dehaka’s plentiful unit calldowns and decent mobility also makes up for Alarak’s poor mobility.Han & Horner
Alarak can push enemy units into Mira’s Mag-Mines. The high anti-structure damage of Han and Horner’s units can make up for Ascendants’ lack of effective structure damage.Map-Specific Tips
Chain of Ascension
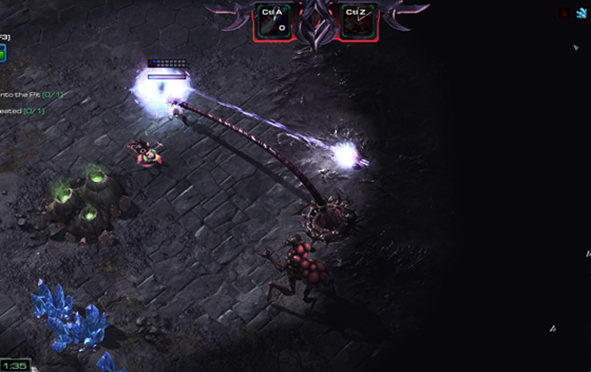
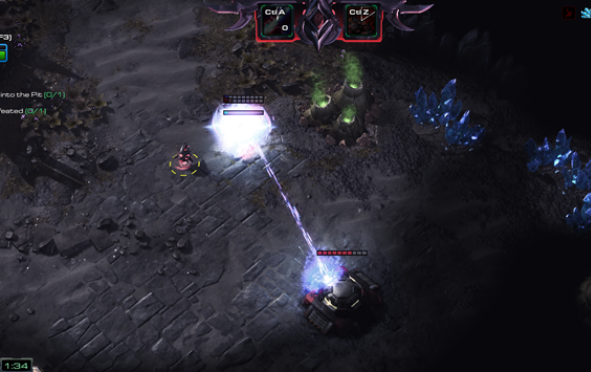
- Your expansion can be taken shortly after the first Structure Overcharge is available. Send a Probe to warp in a Pylon beside the expansion and Overcharge it. Thereafter, you will need to move the Probe closer to the enemy base in order to provide vision for the Overcharged Pylon. Alternatively, warping in an Assimilator on a nearby gas geyser can draw some aggro away from the Probe. Against Zerg, you will need to warp in a second Pylon to trick the Ultralisk into unburrowing, as it will not react to your Probe.
- The first attack wave can come from either the left or right ramp and will arrive shortly after 4:00. Use Alarak to destroy it and then send him to your ally’s expansion to help clear it.
- At the same time, there will be a small attack wave headed for Ji’nara. After taking your expansion, a forward Pylon warped in beside her for Structure Overcharge is a good way to prevent her from being pushed back by approaching enemies. Overcharging forward Pylons along Ji’nara’s path will help you to defeat the small attack waves headed for her.
- Use Empower Me on the first set of Hybrids, and focus on clearing the smaller enemies guarding them. This will save your Ascendants’ energy, which can then be used for casting Mind Blast on the Hybrids. If you have any charges of Structure Overcharge, you can use one or two casts of it on Pylons you warp in nearby and save your Empower Me for later. If this first spawn includes a Hybrid Dominator, you may want to retreat immediately and warp in some Supplicants before re-engaging, as these can easily catch an unsupported Alarak off guard with their heavy burst damage. The first set of Hybrids spawns at 9:00 if you do not push Ji’nara forward, and the distance between Ji’nara and the Pit of Sacrifice is too short to wait one minute for the Death Fleet, so you must kill all of them without the Death Fleet.
- Once your Ascendants are on the field, you will be able to advance through the mission easily. You can Mind Blast enemy Hybrid spawns and Slayn Elementals, and use Psionic Orb to deal massive damage to the enemy bases blocking Ji’nara’s path.
- If possible, save Death Fleet in order to help you push through the last two heavily-defended bases along Ji’nara’s path. These bases have strong anti-ground presence and many static defenses, so Ascendants tend to struggle slightly more than usual. Death Fleet can also allow you to teleport to and from Hybrid Spawns, and back to the central path.
Lock & Load
- The first wave spawns at 4:00, so you can use your second Structure Overcharge to clear your ally’s expansion if necessary before sending Alarak to clear the first attack wave and capture the central Celestial Lock at the same time.
- Before warping in Ascendants, send Alarak to clear out the nearby small enemy bases. This allows you to move your army through later. After warping them in, you can use the No Cooldown technique to easily destroy all enemy units and structures guarding the western and southern Celestial Locks.
- Warping in some Pylons next to each Celestial Lock gives you additional strategic options for defending them. A single Structure Overcharge will often be sufficient, but Supplicants can be warped in to stall against stronger waves.
- Enemy attack waves frequently visit the southern Celestial Lock, so defending it with some Photon Cannons is advised.
- It is dangerous to send Alarak alone into the northern and eastern enemy bases, even if you are proficient in using the No Cooldown technique. You’re better off using your entire army or supporting your ally as they push. If you send Alarak with your army, you should be ready to defend against enemy attack waves coming from your side of the map.
- Ascendants are able to handle the Xel’Naga Construct easily with Mind Blast. It should pose no risk unless you are forced into an extended engagement. Should it survive the initial damage from Mind Blast, you may want to disengage while waiting for Mind Blast cooldowns.
Malwarfare
- Sneaking your Probe into the expansion can be risky. The proper placements for Pylons to Overcharge are shown below.
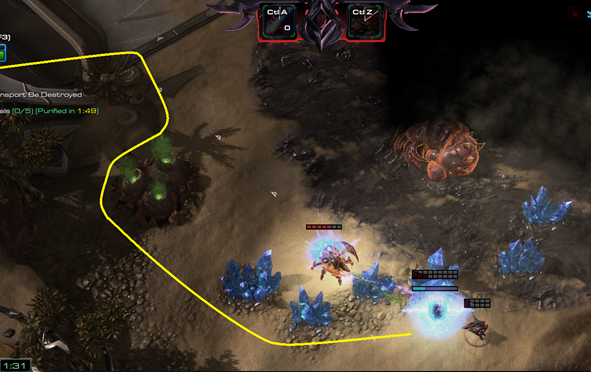
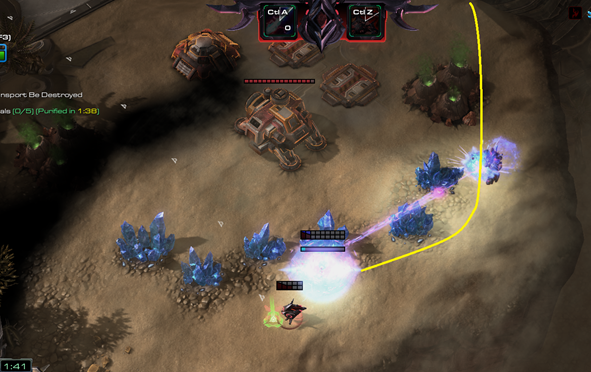
- Once Suppression Towers spawn, they will begin a 15 second countdown after which they will interrupt Aurana’s progress and deal 240 damage to her. This process will then repeat, interrupting and damaging her every six seconds thereafter. If any non-summoned allied unit is near the Suppression Tower, it will take them 30 seconds before they interrupt Aurana - try to destroy the Suppression Tower before then. The Death Fleet can deal massive damage to Suppression Towers, but will not prevent them from interrupting her.
- Bring a Probe along with your army in order to warp in Pylons at each Security Terminal, Purifier Data Core and potentially at each Suppression Tower spawn point.
- The first wave spawns at 3:45, so you can use your second Structure Overcharge to clear your ally’s expansion if necessary and let Alarak take care of the attack wave before sending him to clear the two small enemy bases guarding the first Suppression Tower spawn points. Send a Probe to warp in three Pylons - one at each of the two possible Suppression Tower spawn points, and one in front of the Security Terminal. This will enable you to reach both of the possible Suppression Tower spawns with two Structure Overcharges. Alarak can easily handle the small attack waves that attack Aurana’s Transport, but he will need the extra firepower from Structure Overcharge in order to handle the Suppression Tower.
- After repelling each attack wave, you have time to clear the surrounding enemy bases. At 10:00, use the Death Fleet to push into and clear the enemy base to the north of the third Security Terminal.
- Two Overcharged Pylons will be enough to destroy each Suppression Tower. You should aim to make use of this whenever necessary, as Ascendants struggle to deplete their 6000 HP pool. You can also use Empower Me with the No Cooldown technique in order to save charges of Structure Overcharge.
- At the third Security Terminal, the first Suppression Tower will spawn at the top on either the left or right side - you should try to have a Probe in position to warp in Pylons for you to Overcharge.
- For the first Purifier Data Core bonus objective, you can warp in a Nexus after clearing out the enemy base there. Enemy attack waves will attack once you start the objective, but you don’t have to rush to start it. With Structure Overcharge and the large health pool of the Nexus, you can rely on it to tank for the Purifier Data Core and gain time to download the Purifier AIs. For the second bonus objective, it is better to use your army or Alarak with the No Cooldown method to defend.
Miner Evacuation
- You can claim your expansion early by sending one or two Probes up the right ramp to warp in and Overcharge a Pylon. Carefully move the Probe(s) around to gain vision for your Overcharged Pylon, as the elite Infested Terrans in the center of the expansion will move to attack - you’ll need at least one of them to survive. After the two Infested Colonist Huts are destroyed, quickly warp in a Nexus. An enemy Aberration will unburrow. It must be killed before your Structure Overcharge ends, otherwise the Nexus, the Pylon, and your Probes will all be destroyed. Other enemy units will attack the Nexus, but they will not be able to destroy it.
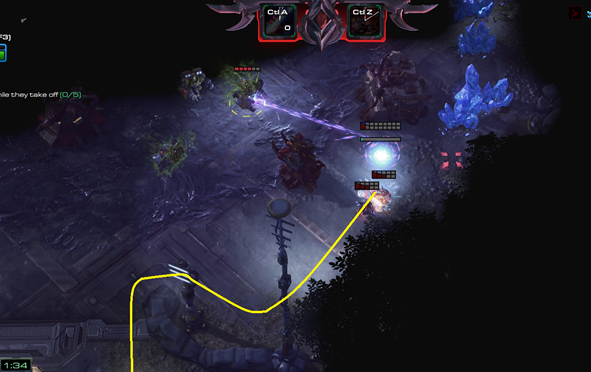
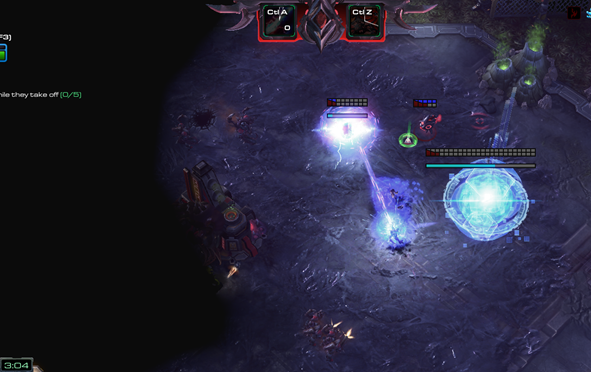
- To clear the rest of the expansion, warp in a second Pylon and Overcharge it. If you handle your Probes well, all enemy units and structure will be destroyed by the time the Nexus finishes warping in. At this point, Alarak will spawn.There is a less risky way to claim your expansion by circling around the map and approaching from the north, but it relies on the Evacuation Ship to the east of the expansion to be inactive, as the path will otherwise be blocked by an enemy base.
- Warping in two Pylons near each Evacuation Ship will give you access to reinforcements and give you the option to use multiple casts of Structure Overcharge to counter overwhelming enemy forces.
- Enemy Infested infantry units have their HP doubled on this map. You will need multiple casts of Destruction Wave to kill them, and the No Cooldown technique can be useful for this.
- Enemy Banshees, Aberrations, Volatile Infested, and Hybrid Nemeses are particularly dangerous to Alarak if you are not paying attention. Ascendants are particularly useful for this map, as they are able to deal massive AoE damage with their Psionic Orbs from a great stand-off range. However, you are advised to be conservative with the Ascendants’ spell usage, so that you have sufficient Ascendants’ spells for a sustained engagement.
- If the first Evacuation Ship is not by the expansion, you will want to push into the enemy base guarding it with Alarak and warp in a Pylon. You should be able to defend the Evacuation Ship with just Alarak and a Structure Overcharge or two. If the first Evacuation Ship is in the base east of the expansion, you may want to forgo expanding early.
- For the second Evacuation Ship, you’ll want to warp in two Pylons beside the Evacuation Ship, as well as a few Supplicants as a safeguard. You can defend the Evacuation Ship with Alarak and Structure Overcharge while you gather your main army in your expansion. If you launch the second Evacuation Ship as soon as possible, the second enemy attack wave will arrive at your expansion after it lifts off at 13:00. Repel them with your army.
- You can quickly handle the Blightbringer by leaving a Pylon or Probe near it and using the Death Fleet to transport your army to the bonus objective after you finish defending Evacuation Ships and repelling attack waves. With sufficient Ascendants, you may be able to almost instantly kill the Blightbringer with Mind Blast before Mass Teleporting back to another part of the map.
- For Eradicators, be extremely careful in your approach - they are able to deal significant AoE damage to ground units, and should only be approached by the Death Fleet and Ascendants with multiple stacks of Power Overwhelming. Do not send in Alarak or the Supplicants.
Mist Opportunites
- The first enemy attack wave will come from the top right, through the narrow ramp near the center of the map. Warp in a Pylon there and Overcharge it to clear both the first attack wave and the units guarding the first Harvesting Bot.
- Alarak can defend the first Harvesting Bot alone. He may need support from Structure Overcharge for the second set. After the first Harvesting Bot, it is useful to warp in a few Pylons near each Terrazine Geyser or chokepoint so that you can use Structure Overcharge for defense.
- The Harvesting Bot waves are more than four minutes apart from each other, allowing you to use Empower Me once per wave of Harvesting Bots.
- A large attack wave will head towards your base at 10:00. You can use the Death Fleet to move your army across the map and intercept it. You should be able to clear a few enemy encampments with it as well.
- After defending the first Harvesting Bot, you can send Alarak to clear the encampments near the first Extraction Device with the support of a forward Pylon and Structure Overcharge. While two uses of Structure Overcharge are enough to destroy each Extraction Device, you can also save your Structure Overcharges by warping in a Pylon and a Photon Cannon in the corner next to the Extraction Device, since the timer pauses while the Extraction Device is under attack.
- A large attack wave will head towards your base at 15:30. Even if you aren’t using the Death Fleet mastery, you can wait until 16:00 and use the Death Fleet to deal with it, provided that you previously used the first Death Fleet as soon as it became available.
- For the fourth and fifth waves of Harvesting Bots, enemy attack waves spawn from multiple directions. It is especially tricky for Alarak to handle the split waves as his army is lacking in mobility. Make sure to have Pylons ready at certain Terrazine Geysers or chokepoints. It is useful to split up your Ascendants into two or three groups to handle the split waves better. If you are proficient with the No Cooldown technique, you can also split Alarak and a few Supplicants away from your Ascendant army.
Oblivion Express
- One cast of Structure Overcharge plus Alarak can take out the first Train, allowing you and your ally to build up your forces without worry.
- Ascendants are powerful on this map due to their ability to take out Trains and their escorts quickly. While Wrathwalkers are not as devastating as Ascendants, they are still capable of dealing well with Trains. You can make use of their attack-on-the-move ability to deal continuous damage to the Trains.
- Warp in a few Photon Cannons at the ramps leading into both of your bases, so that they can intercept any trickling enemy units.
- Warp in some Pylons on the high ground of your main base nearest to the top and bottom Tracks. Structure Overcharge when cast on these Pylons will be able to damage the passing Trains, while the Pylons are kept out of reach of most enemy units.
- Two casts of Structure Overcharge plus Alarak is enough to destroy the second Train. While Empower Me is available for this Train, it does not offer much benefit as there will not be substantial number of friendly units around Alarak during Empower Me. It is better to reserve this ability for the third Train, which comes with significantly tougher Train escorts. However, if you plan on using Empower Me for the first double Train waves (4th-5th), you can possibly use Empower Me on the second Train and skip it for the third Train.
- For the double Train waves (4th-5th and 7th-8th), you can possibly combine the use of Death Fleet and Empower Me for devastating damage to take down the Trains quickly, since the additional units spawned by Death Fleet will enhance the damage dealt by Empower Me. Try to use Mass Recall to teleport your army to the other Train before the Death Fleet times out. For this to work, you will have to avoid using these two abilities on the single Trains, save for Empower Me on the second Train.
Part and Parcel
- You will likely need to bring two Probes if you hope to use the first Structure Overcharge to claim the expansion early. Doing so before Alarak spawns can be especially tricky, as there are many enemy units along the way, and can be risky to execute even with prior experience. A safer option will be to use your first Structure Overcharge to clear the encampment leading to the expansion, and the second cast to clear the expansion itself. If you wish to learn how to do it with the first cast of Structure Overcharge however, be aware that the path you will need to sneak your Probe into the expansion varies by race. Once you have Overcharged your Pylon to clear out the expansion, enemies will attack. Use your Probes to gain vision for the Pylon, ducking behind it when enemies draw near in order to protect the Probes.
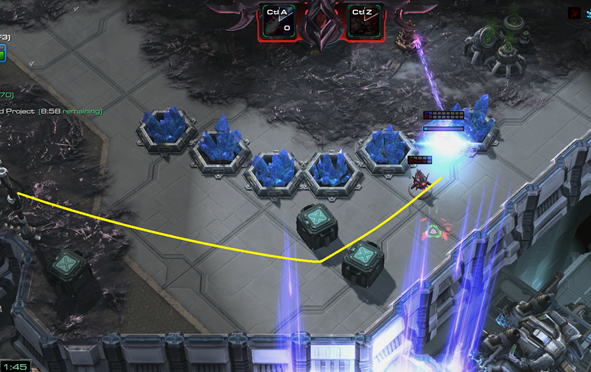
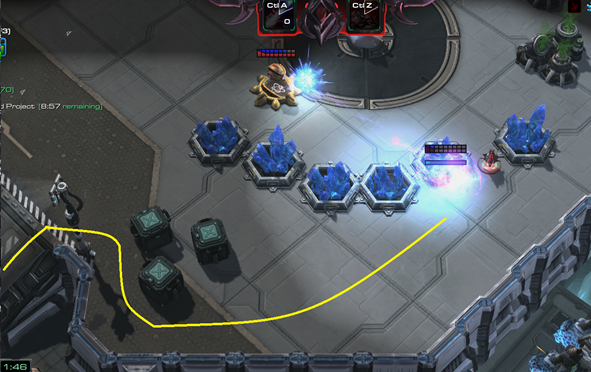
- As the countdown timer of the first objective is very short, you will have to send Alarak to destroy the Parcels as soon as possible, once the first attack wave has been dealt with. There are lots of Parcels available at the westernmost edge of the map as well as the at the southernmost edge. Both encampments are lightly-defended.
- The Hybrid Experiments and bonus objective Trains are both susceptible to Mind Blast, making Ascendants a strong option on this map.
- In order to defend the attack waves headed for your bases, you can possibly use the Death Fleet to Mass Teleport your army to your base and deal with the attack wave, before Mass Teleporting back to a friendly unit or structure. They may also be dealt with by splitting a few Ascendants away from your army.
Rifts to Korhal
- The optimal opener for Rifts to Korhal is to claim your expansion with your first charge of Structure Overcharge, but due to the early enemy attack wave - spawning at 2:00 on this map - this may result in the enemy being able to attack your structures for several seconds before you can destroy them with your second Structure Overcharge. If you do not expect your ally to be able to defend the first wave on their own and you are not comfortable with the greedier approach, simply use the the first cast of Structure Overcharge for defense and the second to expand.
- Structure Overcharge on forward Pylons can be a great way of pushing into enemy bases, or in combination with Alarak to defend against attack waves.
- It may be worth adding a few Wrathwalkers to your army in order to more effectively deal damage to Void Shards, as they are immune to the Ascendants’ Mind Blast. Alarak can also deal significant damage to Void Shards with Empower Me and the No Cooldown technique.
- The Pirate Ships can be easily destroyed with Mind Blast.
- You can use a War Prism to gain vision of the second Pirate Ship and then use the Death Fleet to Mass Teleport a group of Ascendants over to Mind Blast it, before returning to the original objective.
Scythe of Amon
- You’ll have to sneak your Probe into the upper expansion. Warp in both a Nexus and a Pylon and Overcharge the Pylon, then be ready to use a second Overcharge when the first expires - you need to time it in order to prevent the Void Sliver from leaving combat and spawning new units, which could possibly destroy your Nexus.
- You can destroy the second Void Sliver with Alarak and a cast of Structure Overcharge.
- The first bonus objective is especially hard to deal with for Alarak as his Ascendants are unlikely to be strong enough at this stage of the game, while the Death Fleet is not available yet. The No Cooldown technique can be used to significantly strengthen his early game potential and secure the first bonus objective - refer to the replay pack for more details.
- While Ascendants can’t effectively damage Void Slivers or Rifts, they can Mind Blast the Death Grip Crystals and the many high-HP units that guard the Void Slivers.
- You may want to start branching into Wrathwalker tech if your ally is not capable of contributing significant damage to the Void Slivers. You can destroy the third Void Sliver with your army and the Death Fleet, and the fourth with Empower me and casts of Structure Overcharge, but you’ll want a few Wrathwalkers for the final Void Sliver.
- If you are not very familiar with the attack wave spawn patterns, it can be difficult to deal with these tough attack waves that come with Hybrids and may arrive from either direction. It is likely that you need an entire army to deal with them as Structure Overcharge is unable to clear them without losses. Have your army defend against an attack wave first before committing to a bonus objective encampment or a Void Sliver.
Temple of the Past
- Ascendants are very powerful as they are equally capable of killing the clumped up attack waves with Psionic Orbs and Hybrids with Mind Blasts. As they obtain sufficient stacks in Power Overwhelming, they can split into two or three groups to deal with split waves.
- One cast of Structure Overcharge is enough to kill the first Void Thrasher when it spawns at 8:20.
- Use Structure Overcharge on forward Pylons to destroy the Zenith Stones, which cannot be Mind Blasted by Ascendants.
- Against split waves, use Ascendants to defend one lane while Alarak + Structure Overcharge defends the other. When your Ascendants are strong enough, you can also split them to deal with both waves.
- Use the Death Fleet to deal with the attack wave at 10:00, and try to clear out the lane with it as well. Use Death Fleet and/or Empower Me to deal with the attack waves that accompanied by Hybrids.
- Use the Death Fleet or Ascendants to intercept the air waves that try to cross the gap from the northeast. Try to destroy the transports before they can unload.
- Preemptively warp in Pylons next to each Void Thrasher spawn location so that you can kill the Void Thrashers with Structure Overcharge. Alternatively, use Mind Blast.
The Vermillion Problem
- You’ll have to sneak a Probe into the expansion through the right ramp in order to claim your expansion early with your first Structure Overcharge. Send the Probe to the expansion at the start of the game, before the first Lava surge.
- The first attack wave arrives after Alarak spawns, so you can comfortably use two casts of Structure Overcharge to clear the expansion island.
- It is likely better to conserve your Structure Overcharge charges to deal with enemy attack waves headed for your bases, instead of using them on forward Pylons. It is also useful to keep a few Ascendants on standby on the expansion island in order to intercept attack waves and enemy units guarding nearby Xenon Crystal spawns.
- As Alarak’s army lacks mobility, Death Fleet can be very useful for relocating your army to another part of the map. Be prudent with this calldown as it comes with a relatively long cooldown.
- After clearing each island, warp in a few Pylons on it. This allows you to use Structure Overcharge to clear the units that spawn together with the later Xenon Crystals, as well as for Mass Teleporting your army to the Pylons with the Death Fleet.
- Mind Blast can quickly deal with Molten Sal. You can leave a Probe or Pylon nearby and then use the Death Fleet’s Mass Teleport to take it out during the lava surge downtime. Clear out the enemy base on the left side of the island at the same time.
- The island to the east of your expansion is heavily fortified and should ideally be cleared last or when your ultimate abilities are available.
Void Launch
- Placing a few Pylons near each Warp Conduit will allow you to Structure Overcharge them on demand, should you need to support your troops against attack waves and Shuttles.
- You will likely need to rely on Structure Overcharge to deal with the first wave of Shuttles and the concurrent attack wave headed for your or your ally’s expansion.
- If you are not very familiar with the enemy spawn patterns, you are best advised not to venture too deep into enemy bases, as you may be left vulnerable to the enemy attack waves and Shuttles heading away from your army.
- Alternatively, you can leave a group of Ascendants near the center of the map in order to defend against the periodic attack waves headed for either the Research Vessels or your bases. Their Mind Blast ability is also very effective against the Shuttles and their escorts. This leaves Alarak and the rest of your army to push into enemy bases and possibly secure a third mining base and access to the Shuttle Launch Bays, which can be spawn-camped with Photon Cannons.
Void Thrashing
- Warp in a Pylon in front of the first Void Thrasher and use your second Structure Overcharge on it to take out the first attack wave, the units defending the Void Thrasher, and the Void Thrasher itself.
- Before pushing into the bases defending the other Void Thrashers, warp in a few Pylons right outside those bases and Overcharge them as you push.
- After clearing out the second set of Void Thrashers, you can warp in a Nexus in front of the left enemy spawn point, then Overcharge it to defend against the attack waves spawning there. The Nexus’ massive HP pool can stall dangerous enemy waves that would simply roll over a few Overcharged Pylons before they finish dealing their damage.
- Be mindful of your Ascendants’ location. Because Void Thrashing is such a short map, they have little time to gain stacks of Power Overwhelming. As a result, they can easily be killed if you are not careful with them.
- Death Fleet and Empower Me are useful for pushing into each set of Void Thrashers beyond the first Void Thrasher. Ascendants’ Mind Blasts are great for taking out the many capital ships guarding each Void Thrasher. Take out most of the enemy units before unloading your remaining energy on Mind Blasting the Void Thrashers.
Replay Pack
Note that these replays are all produced by the most experienced publically known Alarak player around, and make extensive use of the No Cooldown method and other advanced Alarak strategies.- Ascendant/Supplicant: Chain of Ascension, Lock & Load, Malwarfare, Miner Evacuation, Mist Opportunities, Oblivion Express, Part and Parcel, Rifts to Korhal, Scythe of Amon(100%), Temple of the Past, The Vermillion Problem, Void Launch, Void Thrashing
- Ascendant/Supplicant/Wrathwalker: Scythe of Amon(any%)
- Wrathwalker/Slayer/Supplicant: Dead of Night(100%)
Other Commander Guides
Writers: Dr_Orgo, Raincamp, T.Chosen1, 테라진/Terrazine, Yuriprime
Graphics: Jester, Kat, v1
Editors: Aron, Dr_Orgo, MemeMastodon, Raincamp
Graphics: Jester, Kat, v1
Editors: Aron, Dr_Orgo, MemeMastodon, Raincamp


