

Blackheart's Bay
Get ready for battle you landlubber, and welcome...to Blackheart's Bay!
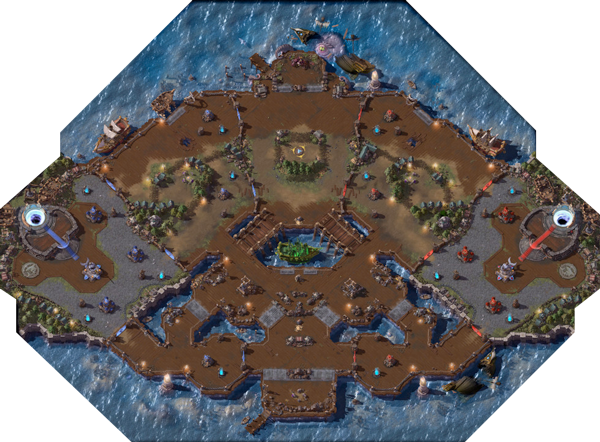
Blackheart's Bay is one of the battlegrounds available in Heroes of the Storm and also one of the most interesting ones too, thanks to both its unique tileset and coin mechanics.
Right now, Blackheart's Bay is one of the only two maps that doesn't focus on killing or controlling a big, powerful creature. Instead, mercenary camps and Blackheart's undead crew will drop two doubloons when they are defeated. Two treasure chests appear on the map throughout the game too, giving five coins each. After that, you can win the pirate's favor and have him bombard enemy structures...for a price. At first it will be a small one at 10 doubloons. However, every time you pay, the amount of doubloons he wants will increase by two, but only for your team. So if you get the first turn in, the next time you want his help he will ask 12 coins from you, but still only 10 from your enemies.
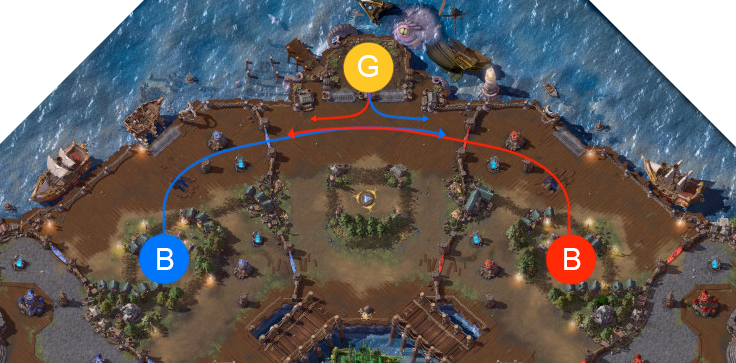
After you gather the coins, you will need to turn them into Blackheart, who is waiting for you between the middle lane and bottom lane. Once you pay up, his pirate ship will attack your opponent's structures, always starting with the middle fort.

Turning-in will take you a couple of seconds, be sure the enemies aren't close.
The Map Design
Blackheart's Bay is a three-lane map with varying lane length; the top one is the longest and the bottom one is the shortest. Thanks to this, and the fact that the bottom lane holds three mercenary camps along the way, the bottom lane is the easiest to push.
Because of the design of the map, some areas will see more play depending on the time of the game. At first, most of the action happens around the watch tower and top chest in the top and middle lane. Therefore, most of the time you'll want to have four heroes bouncing between the lanes and just one person in bottom lane to gather experience. This is because the bottom lane is the farthest from the other two, and by being in control of top and middle lane you’ll have access to the top treasure chest at 0:50. A watchtower gives vision over the space between those two lanes and your team will gain access to some of Blackheart’s undead crew at 2:00. Most importantly, since the first attack of Blackheart is directed to the middle lane structures first, dealing early damage to the tower is vital for your first turn in.
Going into the mid game after the first few forts are cleared, the focus shifts towards the bottom lane, which not only is the easier to push, but crucial because of its proximity to Blackheart, allowing your team easier turn ins. If the opposing team wants to turn in as well, you'll have to fight the enemy team to stop them from turning in their doubloons. A common tactic is to leave just one person going between top and mid lanes while the other four focus on the bottom of the map.
To balance the disparities between the lanes, you will find three mercenary camps on the top. One of them is a powerful Boss Golem, and there are two Bruiser camps, one for each team. These camps will help you push the lane fast and efficiently while getting some doubloons in the process. Once the camps are captured, the focus will shift again to the other two lanes, causing a bit of a “dance” around the map. Although most of the time you will be on the lower half of the map, you will rapidly move towards the top to capture the mercenaries camps, and then go back to the south area after the push or while the mercenaries or the golem are pushing. Another of Blackheart's Bay's unique aspects is that there isn’t a clear formula to it of “do this, then do that”. On maps like Cursed Hollow, you generally get mercenary camps after taking the tributes, but on Blackheart's, it all depends on the team composition, if you are ahead or behind, and if you have enough coins to turn in. For example, turning in isn't always optimal if you don't have enough coins to start the cannon, and you should definitely not go out of your way to do it. However, if you are close to Blackheart, and know the enemy team isn’t close, it is fine to turn in because it will lessen the risk of losing your doublons later on.
The Golem and the Bruiser Camps are a great way to push the top lane.
One of the distinctive things about this map is that every lane has several different paths, especially top and middle, making them especially vulnerable to ambush tactics. Because of this, map awareness on this map is vital, and heroes who provide vision, like Tassadar, are excellent picks for the map.
At the top center of the map, you will find the "smiley face" watch tower, which is crucial for map control. Vision of the top and mid lane are very important, so you will want to take it whenever you can. However, If you have played the game you surely have encountered a lot of people who rush over the watch tower to try and secure it with their lives at the start of the game. Unfortunately, most of the time it's not necessary. In fact, even if you manage to kill someone, they will probably be back by the first treasure chests with full health. It's vital to understand that, although the watch tower is important, the most important thing is to get the coins from the treasure chests. If you get the watch tower, awesome! If not, don't suicide over it, get the chests, then capture the watchtower later.
At the top center of the map, you will find the "smiley face" watch tower, which is crucial for map control. Vision of the top and mid lane are very important, so you will want to take it whenever you can. However, If you have played the game you surely have encountered a lot of people who rush over the watch tower to try and secure it with their lives at the start of the game. Unfortunately, most of the time it's not necessary. In fact, even if you manage to kill someone, they will probably be back by the first treasure chests with full health. It's vital to understand that, although the watch tower is important, the most important thing is to get the coins from the treasure chests. If you get the watch tower, awesome! If not, don't suicide over it, get the chests, then capture the watchtower later.

Attacking the treasure chests is one of the most effective ways to get doublons.
At the start of the game, one of the common mistakes people make is wanting to turn in the coins immediately, and although this helps to lessen the risk of dying and losing them, it makes ultimately Blackheart's first attack less powerful.
The cannon shots of Blackheart attack the middle lane first, and they have enough strength to bring down the all of the towers, the gate, the healing fountain, and bring the fort to about half health. To ensure that the fort goes down in the first cannon volley, you need to take down at least one of the towers. Before the most recent patch, turning in before taking down a tower was a massive mistake because all the experience was concentrated on the fort. What you’d want to do is wait until you destroyed one of the front towers, or the gate, and then turn in so that the cannons would destroy the fort and you would gain 2000 experience. Since the last patch however, all the towers that guard the fort now give 400 experience, while the fort itself now gives 800 experience points. It's obviously still good to bring one tower down before you turn in, and you should encourage your teammates to do it, but not bringing one down isn’t as terrible as it was before.


Map strategy
At the start of the game, one of the common mistakes people make is wanting to turn in the coins immediately, and although this helps to lessen the risk of dying and losing them, it makes ultimately Blackheart's first attack less powerful.
The cannon shots of Blackheart attack the middle lane first, and they have enough strength to bring down the all of the towers, the gate, the healing fountain, and bring the fort to about half health. To ensure that the fort goes down in the first cannon volley, you need to take down at least one of the towers. Before the most recent patch, turning in before taking down a tower was a massive mistake because all the experience was concentrated on the fort. What you’d want to do is wait until you destroyed one of the front towers, or the gate, and then turn in so that the cannons would destroy the fort and you would gain 2000 experience. Since the last patch however, all the towers that guard the fort now give 400 experience, while the fort itself now gives 800 experience points. It's obviously still good to bring one tower down before you turn in, and you should encourage your teammates to do it, but not bringing one down isn’t as terrible as it was before.
Not as bad, but not as good either.
If the teams are of similar level, and your team has doubloons while the opposing team doesn't, you shouldn't fight with them unless it is strictly necessary. They have nothing to lose, but you do; by choosing to fight you are at risk of losing your advantage. This, along with the fact that it pretty easy to get ambushed if you are past the middle of the map, is one of the most important reasons why this map is almost never played on the competitive scene.
When you manage to get ahead, a team can enter what most people would grudgingly call a “PvE” mode, in which the winning team can take control of all the mercenary camps, giving them coins and applying pressure that the enemy team will be forced to take care of. During this time, the winning team is given enough time to capture more mercenaries, gain experience, and turn in doubloons to the pirates, making it easy to maintain the advantage if they do not commit to fights or lose coins. Once you gain the control of the map, you will most likely get the chests when they appear as well because the enemy team will be busy fighting back minion waves, increasing your advantage even more.
While this certainly is a problem for the map in the competitive scene, in the casual scene it’s much easier to get a back-and-forth game on this map because the teams aren't as organized. Frequently people will be out of position, and you can capitalize on it and get some coins. Another important factor is that in versus mode, you don’t get to know your team composition -- unless you are playing with friends -- or the enemy composition until the game has already started. This may cause the enemy team could be much stronger in direct engagements. If they have a good initiator or they catch your team out of position, even if you are a couple of levels ahead, you might still lose the engagement. Losing an engagement not only gives them enough experience to catch up, but they get doubloons too. Since the losing team typically is behind in turn ins, they need less doubloons than the other team to gain Blackheart's favor. This is a bigger loss for the winning team than it would appear at first, and it makes for a fairly balanced map in versus matches.
Thanks to its design, heroes that can use teleporting abilities can jump from one lane to another. Use this to your advantage when making an ambush or an escape. Stitches can pull enemies from this distance too, so watch out!
Alright that's enough, lets get to the fun part! We will now analyze a pro-game on this map to get you into the in the mood for some treasures!
This match was played between Team Evil Geniuses and Glorious! Gaming in the 3rd place match from Kings Of the Storm Weekly #5.
From Evil Geniuses side, the picks were Uther, Jaina, Valla, Arthas and Zagara -- a strong composition with high sustain and great lane pressure heroes. On the Glorious! side was Tassadar, Tychus, Anub’Arak, Kerrigan and Brightwing -- a composition with lots of stuns, and survivability. Falstad and Stitches were banned this match.
As the game started and the chests appeared, all ten doubloons were captured by Glorious! Gaming, and they didn't rush to turn in. However, when Mookiepants, playing Arthas for EG, got out of position, Glorious nabbed an early kill thanks to the heavy CC combo of Anub’Arak’s Impale, Kerrigan’s Primal Grasp, and grenade from Tychus. With some extra experience from the kill, Glorious! then proceeded to turn in, and thanks to the fact that towers now give experience when destroyed, what would have been a massive mistake on their part in the previous patch, transformed in a level advantage, which was used to capture the bottom mercenary camps which in turn would pressure and destroy the bottom towers and give them more of an experience lead. Even at level 4, both teams almost completely abandoned the top area of the map, leaving just one person from each team to gather experience from two lanes. This is because the lane phase is almost non-existent on this map, and turning in coins is far more important.
Competitive Analysis: EG vs Glorious!
This match was played between Team Evil Geniuses and Glorious! Gaming in the 3rd place match from Kings Of the Storm Weekly #5.
From Evil Geniuses side, the picks were Uther, Jaina, Valla, Arthas and Zagara -- a strong composition with high sustain and great lane pressure heroes. On the Glorious! side was Tassadar, Tychus, Anub’Arak, Kerrigan and Brightwing -- a composition with lots of stuns, and survivability. Falstad and Stitches were banned this match.
As the game started and the chests appeared, all ten doubloons were captured by Glorious! Gaming, and they didn't rush to turn in. However, when Mookiepants, playing Arthas for EG, got out of position, Glorious nabbed an early kill thanks to the heavy CC combo of Anub’Arak’s Impale, Kerrigan’s Primal Grasp, and grenade from Tychus. With some extra experience from the kill, Glorious! then proceeded to turn in, and thanks to the fact that towers now give experience when destroyed, what would have been a massive mistake on their part in the previous patch, transformed in a level advantage, which was used to capture the bottom mercenary camps which in turn would pressure and destroy the bottom towers and give them more of an experience lead. Even at level 4, both teams almost completely abandoned the top area of the map, leaving just one person from each team to gather experience from two lanes. This is because the lane phase is almost non-existent on this map, and turning in coins is far more important.
There are a lot places you can hide near all of the lanes. Use this on your favor when playing Abathur or Murky.

Blackheart’s Bay is one of the most unique battlegrounds on the game right now. Unfortunately, it is one of the least played maps at the professional level currently. There are a lot of cool features in the map, such as the coin mechanic itself, and its design and multitude of playmaking areas make it interesting. However, this map is a testament of one of the most important aspects that could make or break Heroes of the Storm as a competitive ESPORT: the game is as good as its maps. While it’s all right that some maps are viable at the highest level of play and others are fun but only good on a casual level, it does raise questions of whether all maps should be viable in the competitive scene. Will Blizzard will be able to find a balance? It could end up being a crucial factor in the development and growth for the game.
At 6:00, all of Glorious! went top to take on the boss. However, thanks to the watchtower, Evil Geniuses knew they were headed to the golem, and moved to intercept them. Both teams sat at level ten, but neither wanted to commit to a fight because losing the engagement would mean losing the golem and falling behind. Coincidentally, this is exactly what happened when Mookiepants got stunned and an impromptu fight began, resulting in EG losing the engagement and Glorious! taking the golem.
After the golem is defended, both teams go back to the south of the map, where another team fight is forced to gain control of Blackheart. After the fight ended, Glorious! Gaming manages to turn in while still having some of coins in their possession.From here, they start to dominate.
Both teams go back and take their merc camps, and EG still has enough coins for turn in so they go back to the center of the map. However, when the chests spawned again, EG had more coins than the other team and made a terrible mistake by getting caught up in a fight near the south chest where enemy team ambushed them. The result of this was one dead hero for team Evil Geniuses. This wouldn't be too much of a problem on any other map, but on this one, losing coins is a huge danger. Rusty, playing as Uther, got killed trying to save Arthas while he had 15 coins in his possession. Added to the doubloons Glorious! Gaming already got from the north chest, this gave them enough coins to complete two turn-ins and destroy one of the Evil Geniuses keeps. From that point forward, the only thing Glorious! Gaming needed to do was to maintain their map control and stay close to Blackheart to win. Thanks to all of their crowd control abilities and high damage, it wasn't a hard thing to do. After one last team fight in front of the pirate, they were able to kill four of the Evil Geniuses heroes, and then proceeded to attack the core.
Never tasted sweeter!
Conclusion
Blackheart’s Bay is one of the most unique battlegrounds on the game right now. Unfortunately, it is one of the least played maps at the professional level currently. There are a lot of cool features in the map, such as the coin mechanic itself, and its design and multitude of playmaking areas make it interesting. However, this map is a testament of one of the most important aspects that could make or break Heroes of the Storm as a competitive ESPORT: the game is as good as its maps. While it’s all right that some maps are viable at the highest level of play and others are fun but only good on a casual level, it does raise questions of whether all maps should be viable in the competitive scene. Will Blizzard will be able to find a balance? It could end up being a crucial factor in the development and growth for the game.


 Sure, towers dealing exp is a big incentive, but how much exp does a creep wave gives? According to
