Chapter VI is all about Wards. Do not get me wrong; you will not find any specific ward spots here. This chapter will show you that warding is dependent on your lineup, on the current game state and on the objectives that you are aiming at. Buying wards and placing them randomly just for the sake of vision is the wrong approach. When you place wards, make sure that they do something since they are not simply map decorations.
6.1 Idea of Efficient Warding
Wards can be placed efficiently. That does not mean that wards have to see as much as possible, but rather that they must give vision in certain areas and choke points. Different tactical concepts and drafts require vision of different places. Understand your team’s needs and predict your opponents’ movement.
6.1.1 Efficient Wards
What makes wards efficient?
Checklist:
Your wards are not being dewarded.
Your wards give vision at areas that are important in the current game state.
Your wards support certain objectives.
But how shall we measure if a ward is good or bad?
6.1.2 Good and Bad Wards
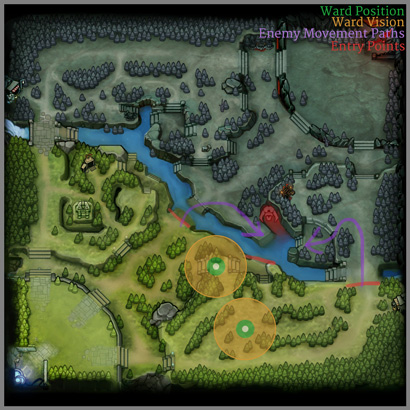
If you count how much enemy movement is spotted by wards, you can determine between good and bad wards. Good wards show a lot of enemy movement, while bad wards show literally no movement.
6.1.3 Deward Prevention
Here are some rules that should prevent you getting dewarded.
Rules:
Do not get spotted while placing wards.
Avoid standard ward spots.
Avoid obvious moves that expose the ward’s position.
Also note that smoke and/or special heroes can be used to place wards in tricky positions without being seen.
Example: You know that the area you want to enter is warded so you use a smoke to get in unseen and place your wards. Another scenario would be that an invisible hero takes the wards and places them at the desired position.
6.2 Warding Objectives
As I said before, warding is done to secure or support certain objectives. Let us see which types of objectives can be supported by wards:
Defensive, Aggressive, Push, Roshan, Neutral.
6.2.1 Defensive Warding
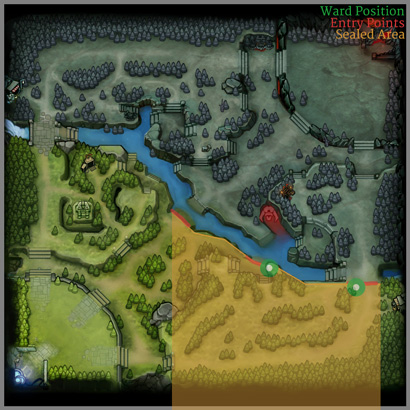
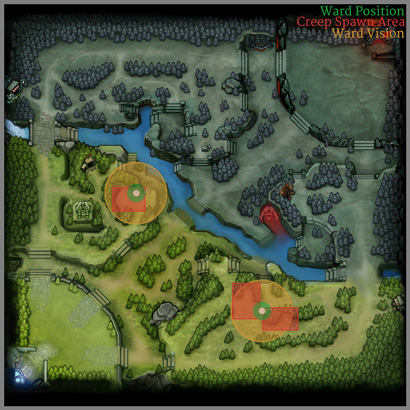
This type of ward is used to seal off areas. Place them to provide vision of the areas’ entry points which you want to protect. When you want your cores to farm in peace, this warding type should be used. Four-protect-one lineups and dual/tri-core lineups will benefit more heavily from not getting killed.
Defensive ward objectives:
To provide safe areas to farm
To provide vision on incoming pushes
To provide vision on incoming ganks
There are 3 entry points. Two entry points get covered by wards, the middle entry point is covered when your T1 tower is alive, otherwise this will be the weak spot. This example is to protect the radiant jungle.
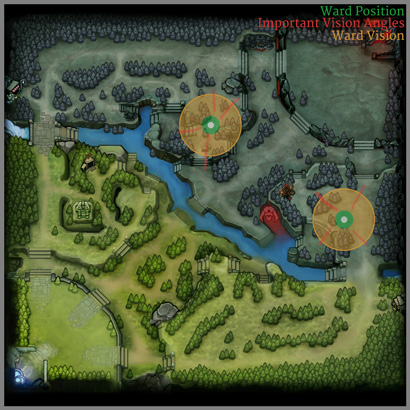
6.2.2 Aggressive Warding
Aggressive warding is used to spot enemy movement on their side of the map. This is needed in order to play an aggressive lineup, otherwise it is hard to find targets when your opponents play safe.
Aggressive ward objectives:
To provide vision which can be used to set up ganks
To provide vision which can be used to pressure opponents
These two wards provide vision in areas that are highly frequented by the dire in a given game state. In this scenario we assume that the T1 towers near the wards are nearly gone. Opponents who try to farm in their forest or at their ancients will be seen. This allows you to set up ganks.
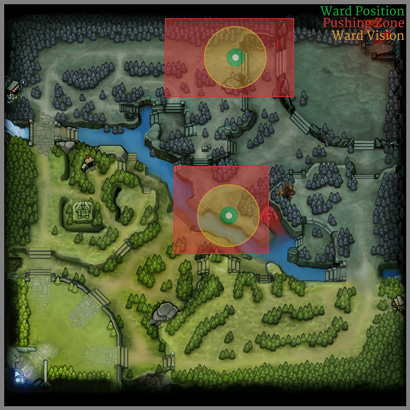
6.2.3 Push Related Warding
These wards provide vision to make pushing and split pushing safer. This kind of ward will help pushing and split push heavy lineups immensely.
Push related ward objectives:
To provide vision on incoming teleports
To provide vision on rotations
To provide the ability to avoid engagements
These two wards are placed from the radiant point of view. Both wards are placed in areas which the radiant side want to push into. The mid ward is used to make a T1 mid tower push safe. The ward on the top lane assumes that T1 and T2 towers are already destroyed. Its purpose is to make split push attempts safer.
6.2.4 Rosh-Pit Warding
When you want to take Roshan and you have the feeling that your opponents are capable of contesting it, you need wards around the Rosh-Pit.
Rosh-Pit Ward Objectives:
To provide the ability to abort the Roshan attempt
To provide the ability to engage into opponents before they reach the Rosh-Pit.
This time both wards are placed from the dire point of view. They cover the bottom and middle entry points to the Rosh-Pit. The only entry not covered is from the mid-lane which is also the weak spot of this ward placement. In this scenario we assume that the t1 middle and bottom towers are already destroyed.
6.2.5 Neutral Warding
If you want to limit your opponents’ neutral creep income, neutral warding comes into play. Keep in mind that wasting observer wards on this can limit your vision. If you want vision in the area, feel free to use observer wards. The drawback of using observer wards is that they are easy to deward if not placed in trees, which will not provide vision so you might want to think about blocking via sentry wards.
Neutral warding should be considered if you want to shut down jungle heroes like Enigma and Chen. Another example is against heroes that can clear any stack easily, like Tinker and Luna. Blocking their neutral creep spawns can throw off their game completely.
Neutral Ward Objectives:
Prevent neutral creep spawn
Provide vision at certain creep spawns in order to contest them
This ward placement is from the dire point of view. The bottom ward blocks both the hard and the small camp. The top ward blocks the ancient spawn.
6.4 Rune Ward
Is a rune ward always necessary? The answer is short and easy: no. There are several reasons why rune wards in general should not be placed just to have vision on the rune.
6.4.1 Why Rune Wards Should Be Avoided
At first, wards are very limited. If you waste a ward just to have rune vision, more important wards cannot be placed. Runes should be contested by the support duo which scouts and or secures them. Why would you ward the rune if you are there when it spawns? The second thing that comes to mind is the fact that there are several heroes that can provide vision on the rune when it’s necessary. There are long range spells or summons which can scout the rune.
Example: A position four Enigma is in the jungle. Every time the rune spawns he sends a low hit point Eidolon to the rune near him. When it spawns, he can see it and deny it if necessary.
6.5.2 Rune Ward Conclusion
Rune wards are nice to have, but not necessary. Keep your wards for more important tasks. When there are wards that fulfill a purpose and provide rune vision, good. But never waste wards just to have vision on the rune.
Chapter VII: Epilogue
This book is written for players that want to learn and improve. I am aware of the fact that Dota cannot be put into a black box and that there are many borders that cannot be drawn clearly. The aim is that you receive something that you can think about. It is obvious that this document reflects my point of view on certain things and that there are other people out there who have other opinions on these things. These people should understand that this book is a contribution to the discussion. A more intensive discussion about support gameplay in general is a good thing.
On September 20 2014 06:46 devilesk wrote: I don't like the color scheme of the guide. Gray on gray on gray isn't easy to read. The blue links are almost invisible.
On September 20 2014 07:47 Heyoka wrote: It seems I broke all the pictures. It sure does make a lot more sense with images that explain what is actually happening.
In both "Neutral wards" examples you place the wards in spots that are fairly easy to deward. Magic bush is notorious for being a supremely obvious pinpoint of the ward, and as dire placing a ward just inside the spawn box of the ancients leaves it in a space where it could be dewarded almost accidentally by a sentry placed on the typical observer ward spot on the cliff overlooking radiant's t1. Perhaps it's a decent idea to include a note about being sure to hide your wards well, because a camp not spawning will very likely incite a dewardng attempt every time!
I know putting in every common ward spot would be too much work. But I would suggest at least the common pull camp blocking/dewarding spots and maybe the off map tinker hunting spots. People seem to screw those up all the time.
On September 20 2014 09:48 Chewbacca. wrote: I know putting in every common ward spot would be too much work. But I would suggest at least the common pull camp blocking/dewarding spots and maybe the off map tinker hunting spots. People seem to screw those up all the time.
this stuff is already on the web - just google it.
The main thing you're missing here is a section that details when it is acceptable to skip wards as a support. I've included the text here, so you can copy it right into the guide easily.
6.3 Skipping the Purchasing of Wards 6.3.1 When can I skip buying wards? -Never.
Er, sometimes it is acceptable to have someone else buy them instead if you're really close to say a blink on an initiator. In pubs this may be impossible.
"If you count how much enemy movement is spotted by wards, you can determine between good and bad wards. Good wards show a lot of enemy movement, while bad wards show literally no movement."
Oh I get it, so instead of wasting money on sentry to deward, we can stick to lanes for about 12 minutes and render their wards completely useless + their support will look like a total fool.
Win-Win.
But no seriously now; I'd argue that ward that spots 0 movement is still a legit ward because in case of defensive warding you don't have to know exactly where they are, you have to know where they aren't. If you know 100% that they aren't on a point X, you know that from that point, there will be no hooks, spears, hookshots, etc. You ward defensively so you can farm without fear of getting ganked and if they don't gank you, your ward is useless? It's stupid not to ward to protect farm (protect yourself from a gank, that is). Because the risk is too great and 150 gold is nothing compared to the amount you're going to farm given the vision from the wards.
I don't see why people have the need to quantify everything. If they don't decide to gank, my defensive wards are bad? They could have been invested in something else (gold), but that's too great of a risk. Without wards all they have to do is decide, and I'm dead.
That definition seems kind of only partially right, I don't know...
On September 20 2014 16:26 Badjas wrote: Applause for Ler, great contribution! There is nothing better for pro dota than to increase the skill level of the breeding pool.
This is fucking amazing, thank you! Makes me wanna play support again. In fact its so good that it got me to contribute to LD for the first time, by linking the 3rd and 4th part of this guide to Liquipedia! Yay!
On September 20 2014 16:26 Badjas wrote: Applause for Ler, great contribution! There is nothing better for pro dota than to increase the skill level of the breeding pool.
What is a "breeding pool"?
Trash tier Everyone started there. Many high-potential players will quit the game in favor of other activities for various reasons, one of them being that they have a hard time improving.
On September 20 2014 11:46 Acritter wrote: The main thing you're missing here is a section that details when it is acceptable to skip wards as a support. I've included the text here, so you can copy it right into the guide easily.
6.3 Skipping the Purchasing of Wards 6.3.1 When can I skip buying wards? -Never.
(this is probably an important point to make)
I have to say that i had games where buying wards on cd was just plainly wrong. The main purpose of warding is to understand your enemies plans and movements and e.g. in a game where your enemy pretty much just 5-man pushes you more than two wards are hardly necessary.
Don't get me wrong, it would be good for the enemy to 5-man smoke gank into the push, but that rarely ever happens in pubs. Also in that scenario you need very aggressive wards and guess by their absence that they are 5-man-smoking, which is usually risky if your enemies have the better skirmish/teamfight.
@Ler: Thank you for the guides, that had to be a lot of work. When is it acceptable to risk not seeing a rosh attempt? Cause I tend to have a ward down at rosh after 15 mins always, but 99% of the rosh attempts that aren't done by lycan/troll/ursa (who pretty much always smoke anyways) are done after big won teamfights. Which makes the ward very underwhelming on average.
Shift-queuing a move command in the same direction you're going after a ward placement can make it hard/impossible to spot you placing a ward (unless they look at your inventory).
Just want to add on the point that not seeing any enemies in 1 side of the map under your ward vision means you can infer that the heroes are on the other side on maps. Sometimes you just have to weigh the choice of planting sub-optimal wards VS the difficulty of planting the best possible ward.
Using the same logic, aggressive wards can also part of the roles which defensive wards perform. If you see no heroes farming their lanes and jungle on the other side of the map, you can safely back off and not risk losing any farming time because you know they are not farming anything either. Whereas with just only defensive wards, you have to somewhat make an intelligent guess whether they are smoked up or actually still farming outside your vision.
Also another category of wards where you place before battles to help you teamfight better. Vision that helps the team to initiate or prevent enemy initiation (e.g. playing against void during night time), and also reveals positioning of their backline heroes.
On September 20 2014 09:48 Chewbacca. wrote: I know putting in every common ward spot would be too much work. But I would suggest at least the common pull camp blocking/dewarding spots and maybe the off map tinker hunting spots. People seem to screw those up all the time.
On September 20 2014 17:13 Hexo_ wrote: "If you count how much enemy movement is spotted by wards, you can determine between good and bad wards. Good wards show a lot of enemy movement, while bad wards show literally no movement."
Oh I get it, so instead of wasting money on sentry to deward, we can stick to lanes for about 12 minutes and render their wards completely useless + their support will look like a total fool.
Win-Win.
But no seriously now; I'd argue that ward that spots 0 movement is still a legit ward because in case of defensive warding you don't have to know exactly where they are, you have to know where they aren't. If you know 100% that they aren't on a point X, you know that from that point, there will be no hooks, spears, hookshots, etc. You ward defensively so you can farm without fear of getting ganked and if they don't gank you, your ward is useless? It's stupid not to ward to protect farm (protect yourself from a gank, that is). Because the risk is too great and 150 gold is nothing compared to the amount you're going to farm given the vision from the wards.
I don't see why people have the need to quantify everything. If they don't decide to gank, my defensive wards are bad? They could have been invested in something else (gold), but that's too great of a risk. Without wards all they have to do is decide, and I'm dead.
That definition seems kind of only partially right, I don't know...
On September 20 2014 06:03 Heyoka wrote: Aaaaaaaaand now that it's done I'll get a post up that has the whole guide in something like a PDF so you can reference it all at once easier.
how did you guys determine the circumference of the ward vision when scaling it down for the minimap. and is the radius of the vision accurate in proportion? i would like to know due to the fact i keep a log of specific ward spots and would like to use the same image for my own.
On September 20 2014 17:13 Hexo_ wrote: "If you count how much enemy movement is spotted by wards, you can determine between good and bad wards. Good wards show a lot of enemy movement, while bad wards show literally no movement."
Oh I get it, so instead of wasting money on sentry to deward, we can stick to lanes for about 12 minutes and render their wards completely useless + their support will look like a total fool.
Win-Win.
But no seriously now; I'd argue that ward that spots 0 movement is still a legit ward because in case of defensive warding you don't have to know exactly where they are, you have to know where they aren't. If you know 100% that they aren't on a point X, you know that from that point, there will be no hooks, spears, hookshots, etc. You ward defensively so you can farm without fear of getting ganked and if they don't gank you, your ward is useless? It's stupid not to ward to protect farm (protect yourself from a gank, that is). Because the risk is too great and 150 gold is nothing compared to the amount you're going to farm given the vision from the wards.
I don't see why people have the need to quantify everything. If they don't decide to gank, my defensive wards are bad? They could have been invested in something else (gold), but that's too great of a risk. Without wards all they have to do is decide, and I'm dead.
That definition seems kind of only partially right, I don't know...
this is faulty. this also contrast with objective wards. a simple example would be, placing a defensive safelane ward at 2 mins when it was clear the composition had a solo offlaner & the safelaner had a dual lane. this is one of the worst mistakes i always see happen. the offlaner could have used that ward for incoming ganks or to block spawn or the mid laner could have used the ward to spot high ground & rune. there is literally no ganks coming unless the enemy team has a level 1 roam pair like mirana & sd, but too often this is not the case.
On September 21 2014 23:40 saocyn wrote: how did you guys determine the circumference of the ward vision when scaling it down for the minimap. and is the radius of the vision accurate in proportion? i would like to know due to the fact i keep a log of specific ward spots and would like to use the same image for my own.
Awesome series, I disagree somewhat about rune wards though. If you're placing a ward JUST for the rune and nothing else then I agree, but several ward positions give vision of the rune AND important paths. Examples: ward near radiant ancients, dire jungle ward that everyone uses, wards that cover rune and rosh, etc.
On September 22 2014 04:53 R3DT1D3 wrote: Awesome series, I disagree somewhat about rune wards though. If you're placing a ward JUST for the rune and nothing else then I agree, but several ward positions give vision of the rune AND important paths. Examples: ward near radiant ancients, dire jungle ward that everyone uses, wards that cover rune and rosh, etc.
However this is exactly what he meant. For example it may be smarter to block the ancients with the ward near the radiant ancient instead of providing rune vision, if the opponents have a tinker on their team. In this case blocking the ancients is worth more than having rune vision.
On September 20 2014 17:13 Hexo_ wrote: "If you count how much enemy movement is spotted by wards, you can determine between good and bad wards. Good wards show a lot of enemy movement, while bad wards show literally no movement."
Oh I get it, so instead of wasting money on sentry to deward, we can stick to lanes for about 12 minutes and render their wards completely useless + their support will look like a total fool.
Win-Win.
But no seriously now; I'd argue that ward that spots 0 movement is still a legit ward because in case of defensive warding you don't have to know exactly where they are, you have to know where they aren't. If you know 100% that they aren't on a point X, you know that from that point, there will be no hooks, spears, hookshots, etc. You ward defensively so you can farm without fear of getting ganked and if they don't gank you, your ward is useless? It's stupid not to ward to protect farm (protect yourself from a gank, that is). Because the risk is too great and 150 gold is nothing compared to the amount you're going to farm given the vision from the wards.
I don't see why people have the need to quantify everything. If they don't decide to gank, my defensive wards are bad? They could have been invested in something else (gold), but that's too great of a risk. Without wards all they have to do is decide, and I'm dead.
That definition seems kind of only partially right, I don't know...
I do agree with you. However he is still right on average. Wards that see more movement are in general more valuable.
I like the guide but I agree that some points may be too vague for people that have trouble warding in the first place.
A prime example is defensive wards aren't always for your safe lane. I regularly use them for my mid lane to be safe from incoming ganks, and they usually see the rune as well (which you say is not necessary but always a perk whenever you can't defend a rune you can know what to expect if the opposing mid doesn't get it).
A lot of times too I will use wards in some what less optimal way because you either aren't in a spot to get your best ward, or because you want to accomplish an immediate objective at the cost of your ward becoming less effective after you accomplish you objective. This is common when warding behind outer towers to take them and see how aggressive you can be pushing into it.
Most of my points though don't include the effect of smoke since that is used to get around wards efficiently but you can't down play the effect of some wards covering runes/other defensive positions.
Overall good guide for newer players and I like it.
On September 22 2014 04:53 R3DT1D3 wrote: Awesome series, I disagree somewhat about rune wards though. If you're placing a ward JUST for the rune and nothing else then I agree, but several ward positions give vision of the rune AND important paths. Examples: ward near radiant ancients, dire jungle ward that everyone uses, wards that cover rune and rosh, etc.
However this is exactly what he meant. For example it may be smarter to block the ancients with the ward near the radiant ancient instead of providing rune vision, if the opponents have a tinker on their team. In this case blocking the ancients is worth more than having rune vision.
Maybe I wasn't quite clear enough. I understand the part about wards that are more important than rune wards. What I'm saying is that some rune wards give vision of the rune AND important paths/rosh that are useful. Granted, these wards are more popular and likely to be dewarded but they still give something big and happen to be rune wards.
you can set the defensive laneward a bit higher to provide the vision of incoming teleports in the backside of the tower. i will also add a list of pretty much every common ward.
Good stuff, but I would avoid headings like '6.5.2' (by the way, why does 6.5.2 come after 6.4.1?)
I also don't really like the title 'Art of Support, part IV'. Some people will think: I'm not a support, so I don't have to read it. Others might think: I didn't read part I-III, so I will probably not understand this part four.
Great guide. A bit sad that it's done so soon, I've learned quite a lot from this, especially since I just recently transitioned to support from being a 2 or 3. I love Part III the most. Great job.
On October 01 2014 03:16 PuercoPop wrote: Are they going to update the guide to the new map?
It's pretty high-level and conceptual, the exact locations aren't really focussed on. If you can't figure out new good spots from the guide, then the guide didn't do it's job and updating the precise maps isn't going to fix that.


![[image loading]](http://i.stack.imgur.com/op9tx.jpg)
