Contents
Chapter VI: Warding Concepts
6.1.1 Efficient Wards
6.1.2 Good and Bad Wards
6.1.3 Deward Prevention
6.2.1 Gank Rotation
6.2.2 Pressure Rotation
6.2.3 Defensive Rotation
6.2.4 Trade Rotiation
6.2.5 Rotations Conclusion
6.2.1 Why Rune Wards Should Be Avoided
6.5.2 Rune Ward Conclusion
Chapter VII: Epilogue
Chapter VI: Warding Concepts
Chapter VI is all about Wards. Do not get me wrong; you will not find any specific ward spots here. This chapter will show you that warding is dependent on your lineup, on the current game state and on the objectives that you are aiming at. Buying wards and placing them randomly just for the sake of vision is the wrong approach. When you place wards, make sure that they do something since they are not simply map decorations.
6.1 Idea of Efficient Warding
Wards can be placed efficiently. That does not mean that wards have to see as much as possible, but rather that they must give vision in certain areas and choke points. Different tactical concepts and drafts require vision of different places. Understand your team’s needs and predict your opponents’ movement.
6.1.1 Efficient Wards
What makes wards efficient?
Checklist:
- Your wards are not being dewarded.
- Your wards give vision at areas that are important in the current game state.
- Your wards support certain objectives.
But how shall we measure if a ward is good or bad?
6.1.2 Good and Bad Wards
If you count how much enemy movement is spotted by wards, you can determine between good and bad wards. Good wards show a lot of enemy movement, while bad wards show literally no movement.
6.1.3 Deward Prevention
Here are some rules that should prevent you getting dewarded.
Rules:
- Do not get spotted while placing wards.
- Avoid standard ward spots.
- Avoid obvious moves that expose the ward’s position.
Also note that smoke and/or special heroes can be used to place wards in tricky positions without being seen.
Example:
You know that the area you want to enter is warded so you use a smoke to get in unseen and place your wards. Another scenario would be that an invisible hero takes the wards and places them at the desired position.
6.2 Warding Objectives
As I said before, warding is done to secure or support certain objectives. Let us see which types of objectives can be supported by wards:
Defensive, Aggressive, Push, Roshan, Neutral.
6.2.1 Defensive Warding
This type of ward is used to seal off areas. Place them to provide vision of the areas’ entry points which you want to protect. When you want your cores to farm in peace, this warding type should be used. Four-protect-one lineups and dual/tri-core lineups will benefit more heavily from not getting killed.
Defensive ward objectives:
- To provide safe areas to farm
- To provide vision on incoming pushes
- To provide vision on incoming ganks
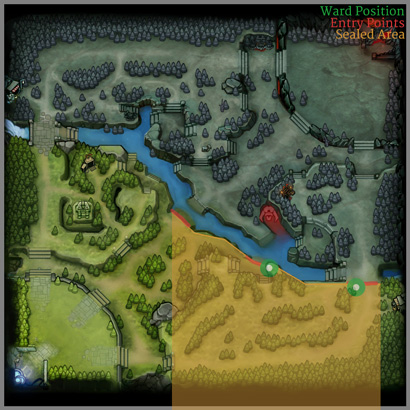
There are 3 entry points. Two entry points get covered by wards, the middle entry point is covered when your T1 tower is alive, otherwise this will be the weak spot. This example is to protect the radiant jungle.
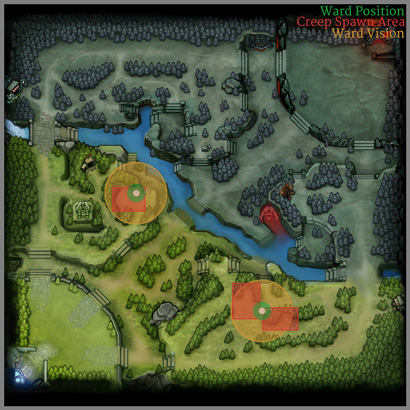
6.2.2 Aggressive Warding
Aggressive warding is used to spot enemy movement on their side of the map. This is needed in order to play an aggressive lineup, otherwise it is hard to find targets when your opponents play safe.
Aggressive ward objectives:
- To provide vision which can be used to set up ganks
- To provide vision which can be used to pressure opponents
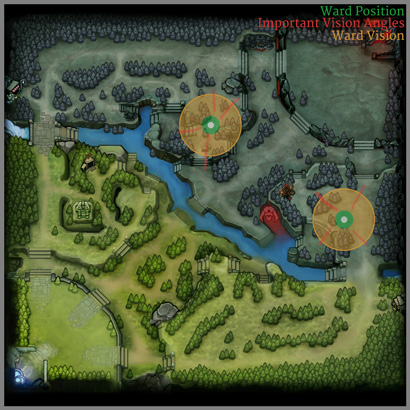
These two wards provide vision in areas that are highly frequented by the dire in a given game state. In this scenario we assume that the T1 towers near the wards are nearly gone. Opponents who try to farm in their forest or at their ancients will be seen. This allows you to set up ganks.
6.2.3 Push Related Warding
These wards provide vision to make pushing and split pushing safer. This kind of ward will help pushing and split push heavy lineups immensely.
Push related ward objectives:
- To provide vision on incoming teleports
- To provide vision on rotations
- To provide the ability to avoid engagements
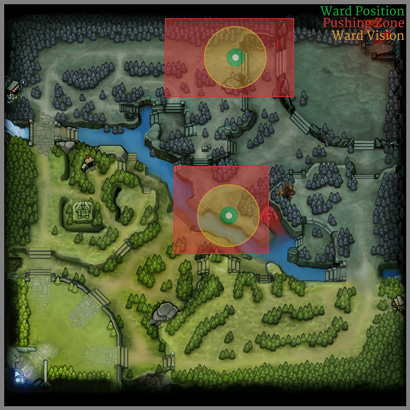
These two wards are placed from the radiant point of view. Both wards are placed in areas which the radiant side want to push into. The mid ward is used to make a T1 mid tower push safe. The ward on the top lane assumes that T1 and T2 towers are already destroyed. Its purpose is to make split push attempts safer.
6.2.4 Rosh-Pit Warding
When you want to take Roshan and you have the feeling that your opponents are capable of contesting it, you need wards around the Rosh-Pit.
Rosh-Pit Ward Objectives:
- To provide the ability to abort the Roshan attempt
- To provide the ability to engage into opponents before they reach the Rosh-Pit.
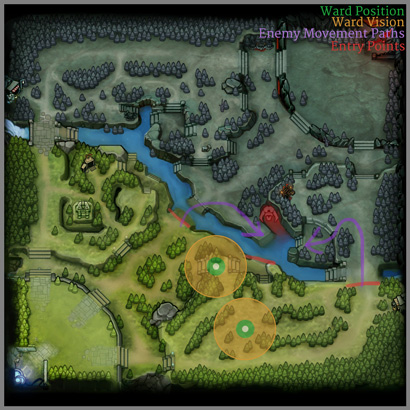
This time both wards are placed from the dire point of view. They cover the bottom and middle entry points to the Rosh-Pit. The only entry not covered is from the mid-lane which is also the weak spot of this ward placement. In this scenario we assume that the t1 middle and bottom towers are already destroyed.
6.2.5 Neutral Warding
If you want to limit your opponents’ neutral creep income, neutral warding comes into play. Keep in mind that wasting observer wards on this can limit your vision. If you want vision in the area, feel free to use observer wards. The drawback of using observer wards is that they are easy to deward if not placed in trees, which will not provide vision so you might want to think about blocking via sentry wards.
Neutral warding should be considered if you want to shut down jungle heroes like Enigma and Chen. Another example is against heroes that can clear any stack easily, like Tinker and Luna. Blocking their neutral creep spawns can throw off their game completely.
Neutral Ward Objectives:
- Prevent neutral creep spawn
- Provide vision at certain creep spawns in order to contest them
This ward placement is from the dire point of view. The bottom ward blocks both the hard and the small camp. The top ward blocks the ancient spawn.
6.4 Rune Ward
Is a rune ward always necessary? The answer is short and easy: no. There are several reasons why rune wards in general should not be placed just to have vision on the rune.
6.4.1 Why Rune Wards Should Be Avoided
At first, wards are very limited. If you waste a ward just to have rune vision, more important wards cannot be placed. Runes should be contested by the support duo which scouts and or secures them. Why would you ward the rune if you are there when it spawns? The second thing that comes to mind is the fact that there are several heroes that can provide vision on the rune when it’s necessary. There are long range spells or summons which can scout the rune.
Example: A position four Enigma is in the jungle. Every time the rune spawns he sends a low hit point Eidolon to the rune near him. When it spawns, he can see it and deny it if necessary.
6.5.2 Rune Ward Conclusion
Rune wards are nice to have, but not necessary. Keep your wards for more important tasks. When there are wards that fulfill a purpose and provide rune vision, good. But never waste wards just to have vision on the rune.
Chapter VII: Epilogue
This book is written for players that want to learn and improve. I am aware of the fact that Dota cannot be put into a black box and that there are many borders that cannot be drawn clearly. The aim is that you receive something that you can think about. It is obvious that this document reflects my point of view on certain things and that there are other people out there who have other opinions on these things. These people should understand that this book is a contribution to the discussion. A more intensive discussion about support gameplay in general is a good thing.
If you have something in mind after reading all of this, feel free to send me a message on twitter or join me on my stream.
Author: Ler
Editor: sn0_man, Heyoka
Art: Nixer


