With the WardiTV Test Tournament coming to a close, it's finally time to begin the voting phase of Team Liquid Map Contest #20!
Your votes will decide which map-makers will take home the biggest share of the prize money, and also which maps will be given extra consideration when selecting future map pools.
The voting period begins now, and will close on March 16th. So make sure to look over our sixteen finalists, check out some games from the WardiTV Test Tournament, and submit your votes!
 Akin to the classic map remasters being made in Brood War at this time—such as Retro, Fighting Spirit, Neo Dark Origin, and Destination—Diffusion aims to modernize the WoL classic Daybreak and bring it up to LotV standards.
It is not a direct clone or modification of the map—it has been made entirely new, sporting third bases that are actually nearby compared to its predecessor, whilst still fielding its wide arcs. The center has been redesigned to feature a rhombus, favoring high and low ground engagements rather than splitting the map via a land bridge. Alternative paths that were not present in the original map now provide additional flanking paths to be opened later. Of course, the staple rich geyser at the forward base makes its return, exposed at the outside cliff edge.
Lastly, two new Xel'Naga towers provide vision on the outskirts of the map, but they themselves are threatened by Coolant Towers that can destroy them should another player wish to permanently deny the towers for the rest of the game.
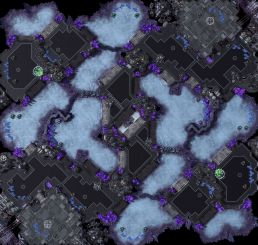
 Tokamak is a wide macro map with 16 bases, two of which are hybrid with 4 blue, 4 gold mineral patches + 1 Vespene gas. First expansions are relatively safe, further ones are more open.
Behind the hybrid base there are destructible towers that can be used defensively or offensively. When destroyed they block the area behind the base, but they crush all 4 blue mineral nodes.
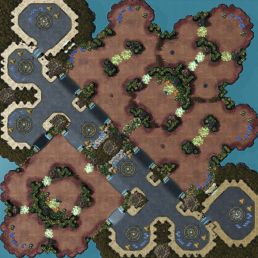
This map owes much of its design to the success of several previous ladder maps, including Dreamcatcher, Eastwatch, and Altitude. Magannatha is a macro-oriented map, with emphasis on the innovative use of collapsible rock/cooling towers (henceforth simply “towers”) and diagonal symmetry.
Key features:
 Standard ramped map with a lowground linear third. Center of the map has a lot of debris that create narrow alleyways.
 Tournament organizers want more than two spawns. Players don't want four spawns. This is the perfect compromise to get more than two spawns. Acceleration Zones promote fast maneuvering.
Distinctive Features: Air blockers surround the map, keeping air space the same for all spawns. All naturals can be walled with three Evolution Chambers with no Creep tumors. All mains and natural mineral lines have pockets for workers.
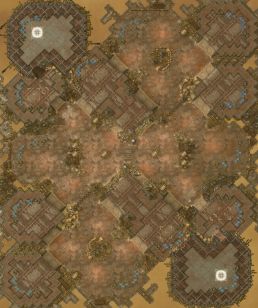
 Persephone is a mostly standard map with some unique features. While the map itself is quite long, expanding to the triangle base significantly shortens the distance between you and your opponent. Due to the triangle third's proximity to the opposing side, the rocks + small mineral wall (5 minerals per node) serve the purpose of making the triangle easier to defend early on.
The triangle fourth base is uniquely positioned to help defend the main base while being only slightly closer to the opposing side than the triangle third base.
On the right side of the map, there is an acceleration zone "highway" leading to a gold base. This path is designed to enable armies to move quickly between the far corners of the map, adding a dynamic and strategic element. The gold base serves as a contestable late-game base that players may fight over.
At the center of the map is a healing shrine paired with an air blocker, preventing air units from taking advantage of it. While the shrine offers a potential tactical advantage, its placement also exposes players to enemy attacks if caught off guard.
Rock towers positioned around the map make it possible to close off smaller 2x ramps making positions easier to defend if used correctly. The rock towers can also be utilized to hinder the defender's (or attackers) ability to rotate their army (somewhat similar to Babylon's linear third base setup)
Near the center, there is also a small LOS blocker "pod" breaking up the open space, this adds a little bit of spice to the otherwise open high ground which players may utilize in various ways (for example, hiding Reapers and Hellions in TvT and surprising the opposing Terrans reapers).
 "The sets of Dragon's Teeth across the center of this desert are Terran fortifications that are used to impede Tanks and larger units while allowing small infantry units to pass freely. Destroying the large rocks adjacent to them can free up large unit movement. The 1500hp 2x2 debris is conjoined.
Key Features:
 A high risk, high reward rich gas base doubles as a mineral wall, leaving it exposed and open after mining out. Double light bridges in the center are not buildable or burrowable. Several open spaces contrast several tighter spots for a variety of engagement types.
 Despite its size, the path to the opponent is very direct. However, it is compromised by having to push up through a narrow ramp, similar to Abyssal Reef. The highground of your natural and third base share extends out into the map to a forward base, and controlling it is the key to defense.
The only other path from north to south leads through 2 small bridges in the very center. To make the outside bases more protected despite their lowground positioning, players can choose to block the paths with cooling towers.
 The map features a narrow lowground passage to the opponent that opens up later in the game through self-destructing Zerg 'rocks', allowing access to the right-side gold base area. You can expand there earlier by mining through a gold mineral wall similar to Amphion or El Dorado. The gold bases on this map are conflict bases, and the gold minerals have a 2 tile wide gap every unit can fit through. Still, bigger armies will struggle to traverse them. On the left side there is a secluded healing shrine.
 This map features an in-base natural, and a third base "natural" with multiple entrances. Two entrances will be opened by the death of an infested rock at around eight minutes. One such entrance will open a backdoor to a fourth base behind the third, and the other opens a small path out to the rest of the map (which may be closed by a rock tower).
 Start the game with a choice of a forward natural or a pocket natural with a mineral wall that can be opened up. Gold bases sit on the sides of the map, rocked off with an inhibitor zone making them high risk, high reward opportunities.
 A central Xel'Naga Tower splits two central high ground pods. Gaining control of the tower provides vision of the primary attack paths, with only the outer paths out of vision range. Collapsible rocks block off strategic pathways.
Two center mineral-only expansions contain 10 blue minerals. Corner expansions can be walled with collapsible rocks, becoming semi-islands.
 When ground units travel inside the exhaust vents, they block vision of the outside terrain acting as the inverse of line of sight blockers. The map has 5 levels all consecutively going lower down the map. Welcome to The Grid.
 A diagonally symmetrical map with many choices for expansion patterns.
Distinctive Features: LoS blockers just outside the main path offer great ambush potential.
 16 base rush/standard map with unique layout. In the main base there's access to a Xel'Naga tower that is blocked by mineral patches and rocks. Next to the tower there's a backdoor to the main blocked by minerals. There's also a second ramp to the natural. Slow zones in the middle can be destroyed.
Voting is open until March 16th (PST).
Time remaining:
Public voting via TL.net determines the final rankings in TLMC #20. All sixteen finalists, as selected by the judges, receive $200 per winning entry. The top five entrants, as determined by public vote, will be awarded additional winnings as follows:
While the popular vote will be taken into consideration, maps that place high in TLMC #20 are not guaranteed to be added to the competitive ladder. Multiple factors will be considered in order to construct a well-rounded and high quality map pool.
Prize money has been provided by Monster Energy, and we thank them for their support of the map making community and competitive StarCraft II.
Your votes will decide which map-makers will take home the biggest share of the prize money, and also which maps will be given extra consideration when selecting future map pools.
The voting period begins now, and will close on March 16th. So make sure to look over our sixteen finalists, check out some games from the WardiTV Test Tournament, and submit your votes!
Team Liquid Map Contest #20: Finalists
- Maps are accompanied by comments from the map-maker.
- The maps are listed in random order and do not reflect their score in judge voting.
- Maps outside the sixteen finalists will be considered for inclusion in the competitive map pool.
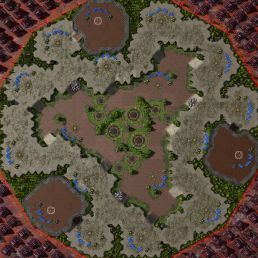
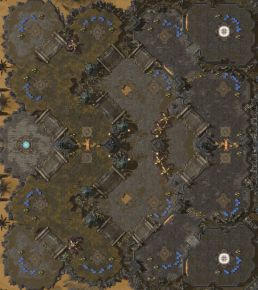
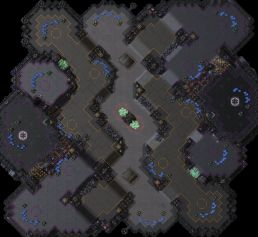
Diffusion
By: Avex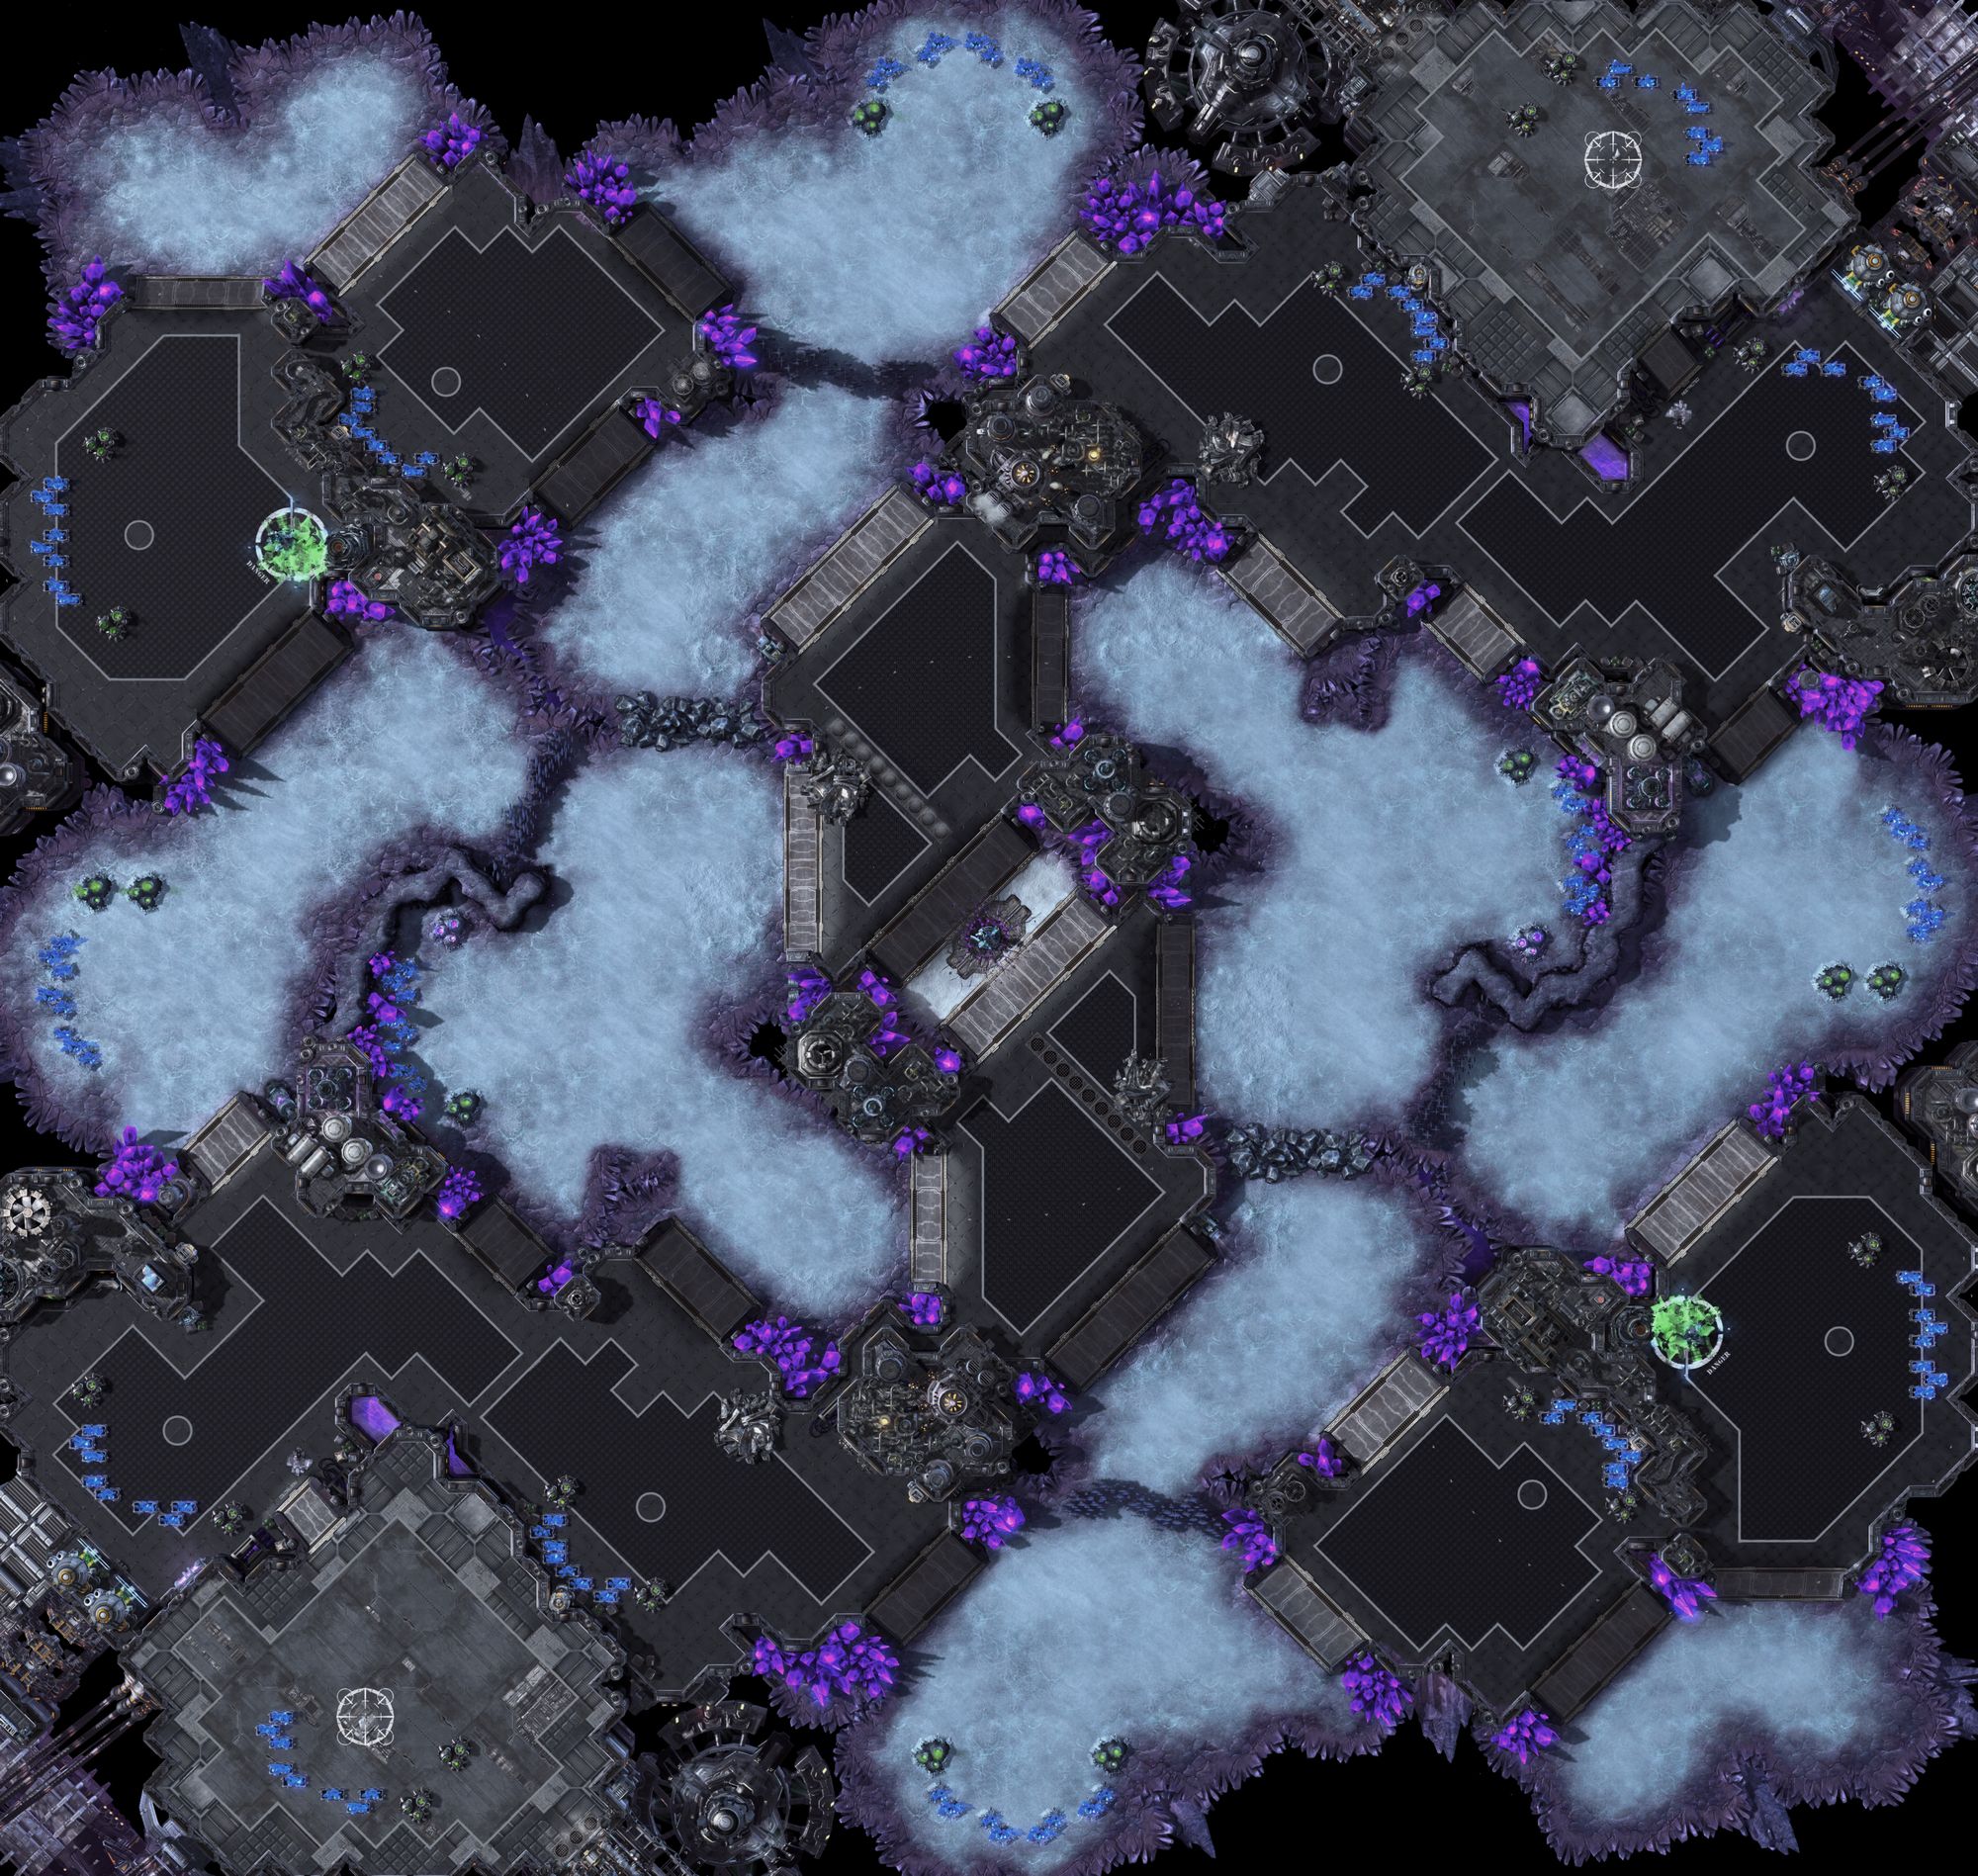 Akin to the classic map remasters being made in Brood War at this time—such as Retro, Fighting Spirit, Neo Dark Origin, and Destination—Diffusion aims to modernize the WoL classic Daybreak and bring it up to LotV standards.
It is not a direct clone or modification of the map—it has been made entirely new, sporting third bases that are actually nearby compared to its predecessor, whilst still fielding its wide arcs. The center has been redesigned to feature a rhombus, favoring high and low ground engagements rather than splitting the map via a land bridge. Alternative paths that were not present in the original map now provide additional flanking paths to be opened later. Of course, the staple rich geyser at the forward base makes its return, exposed at the outside cliff edge.
Lastly, two new Xel'Naga towers provide vision on the outskirts of the map, but they themselves are threatened by Coolant Towers that can destroy them should another player wish to permanently deny the towers for the rest of the game.
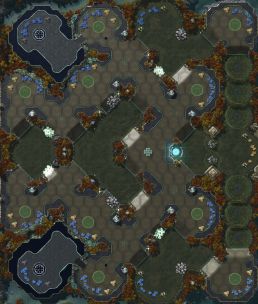
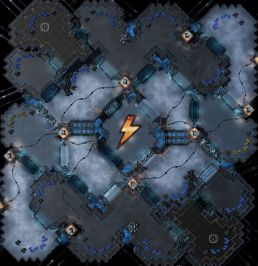
Tokamak
By: volumin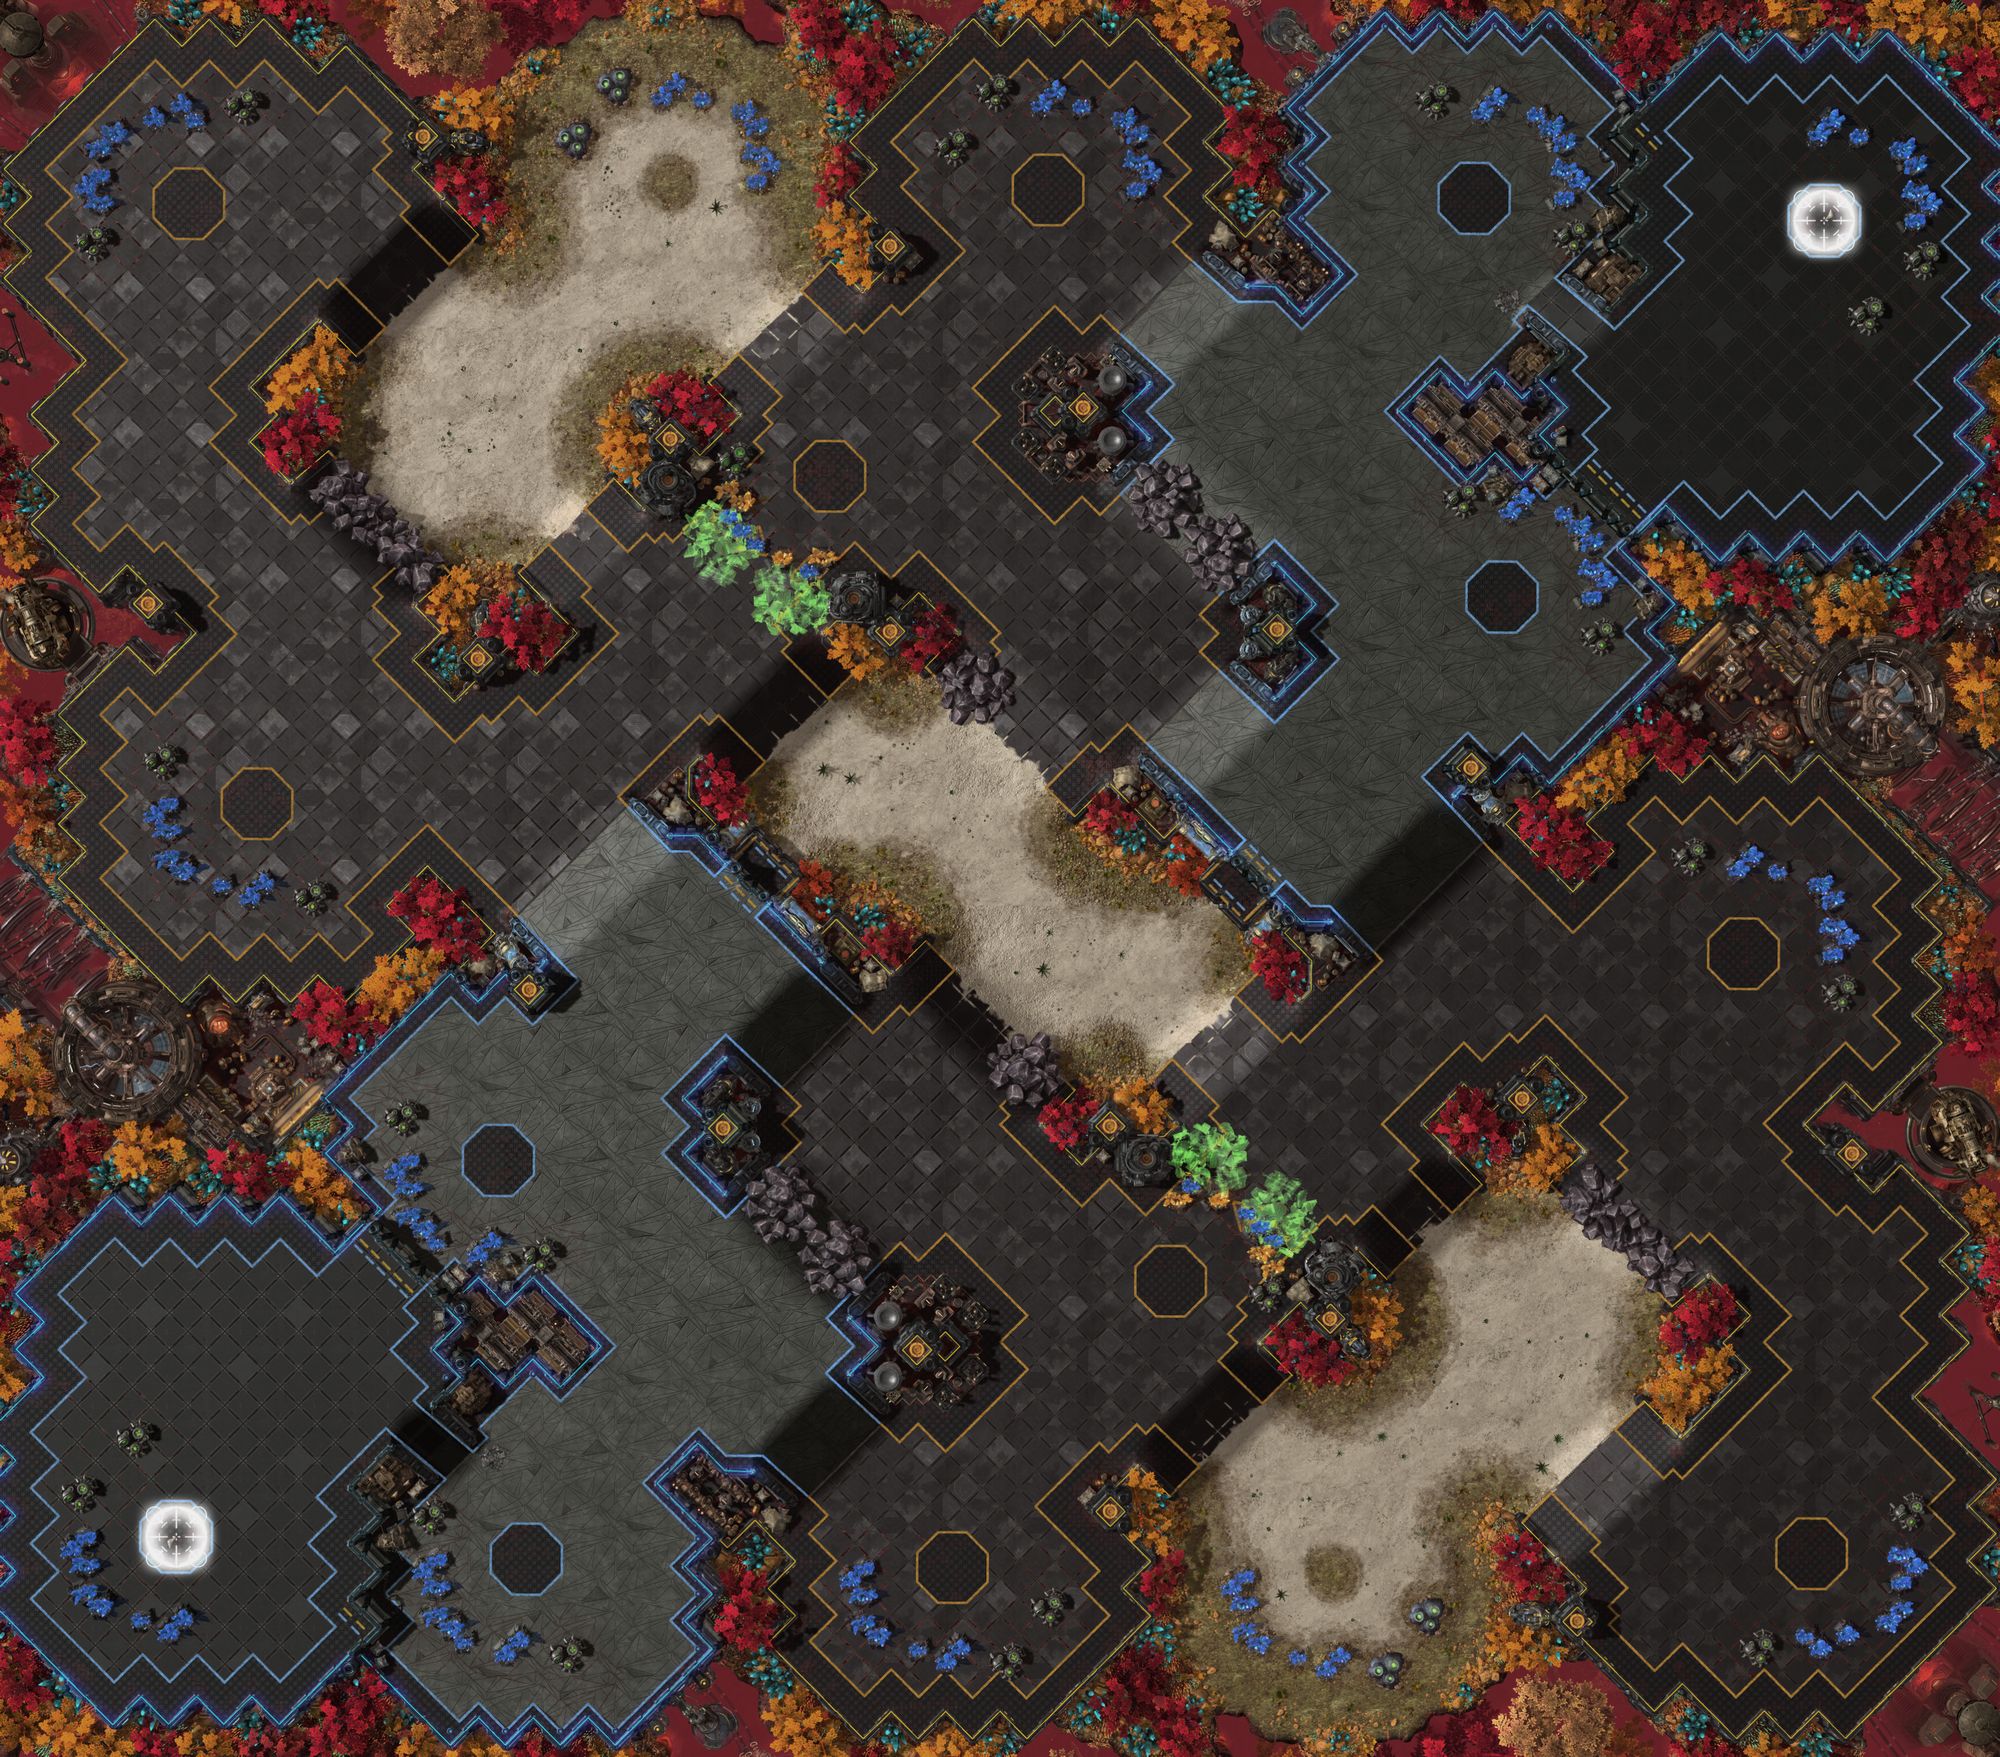 Tokamak is a wide macro map with 16 bases, two of which are hybrid with 4 blue, 4 gold mineral patches + 1 Vespene gas. First expansions are relatively safe, further ones are more open.
Behind the hybrid base there are destructible towers that can be used defensively or offensively. When destroyed they block the area behind the base, but they crush all 4 blue mineral nodes.
Magannatha
By: hoper
This map owes much of its design to the success of several previous ladder maps, including Dreamcatcher, Eastwatch, and Altitude. Magannatha is a macro-oriented map, with emphasis on the innovative use of collapsible rock/cooling towers (henceforth simply “towers”) and diagonal symmetry.
Key features:
- 2 Xel’Naga Towers block gold bases on the diagonal, but do not see the most direct attack path(s) between naturals.
- Zerg oppressively controls the corners on diagonally symmetric maps. Thus, chokes leading into bases lean small on average.
- 3 Large Acceleration Zone Generators reduce the effective size of the top-right corner.
- Every tower has at least 1 of 5(+?) applications:
- Creates Tank spots (obviously). Tank pushes attacking non-diagonal bases on the open terrain of this map are hopelessly impotent without them.
- Seals off an attack route/base. In particular, Terran/Protoss will generally want to destroy the double towers between the triangle 3rd and 4th bases.
- Destroys nearby Xel’Naga Towers. Although first explored by Altitude, the Xel’Naga Towers here see more important regions of the map and destroying them may have greater value.
- Hastens destroying rocks underneath them. Destroying the huge rocks near the northeast gold base requires dealing 2000 damage, but the 500 HP towers flanking it will inflict 1000 damage onto them when collapsed.
- The defining feature of this map: Adjusts the default pathing of units on the map so that they pass through Xel’Naga Tower vision.
- Creates Tank spots (obviously). Tank pushes attacking non-diagonal bases on the open terrain of this map are hopelessly impotent without them.
Steam City
By: Chronoxeo Standard ramped map with a lowground linear third. Center of the map has a lot of debris that create narrow alleyways.
Last Fantasy
By: Timmay Tournament organizers want more than two spawns. Players don't want four spawns. This is the perfect compromise to get more than two spawns. Acceleration Zones promote fast maneuvering.
Distinctive Features: Air blockers surround the map, keeping air space the same for all spawns. All naturals can be walled with three Evolution Chambers with no Creep tumors. All mains and natural mineral lines have pockets for workers.
Persephone
By: Patches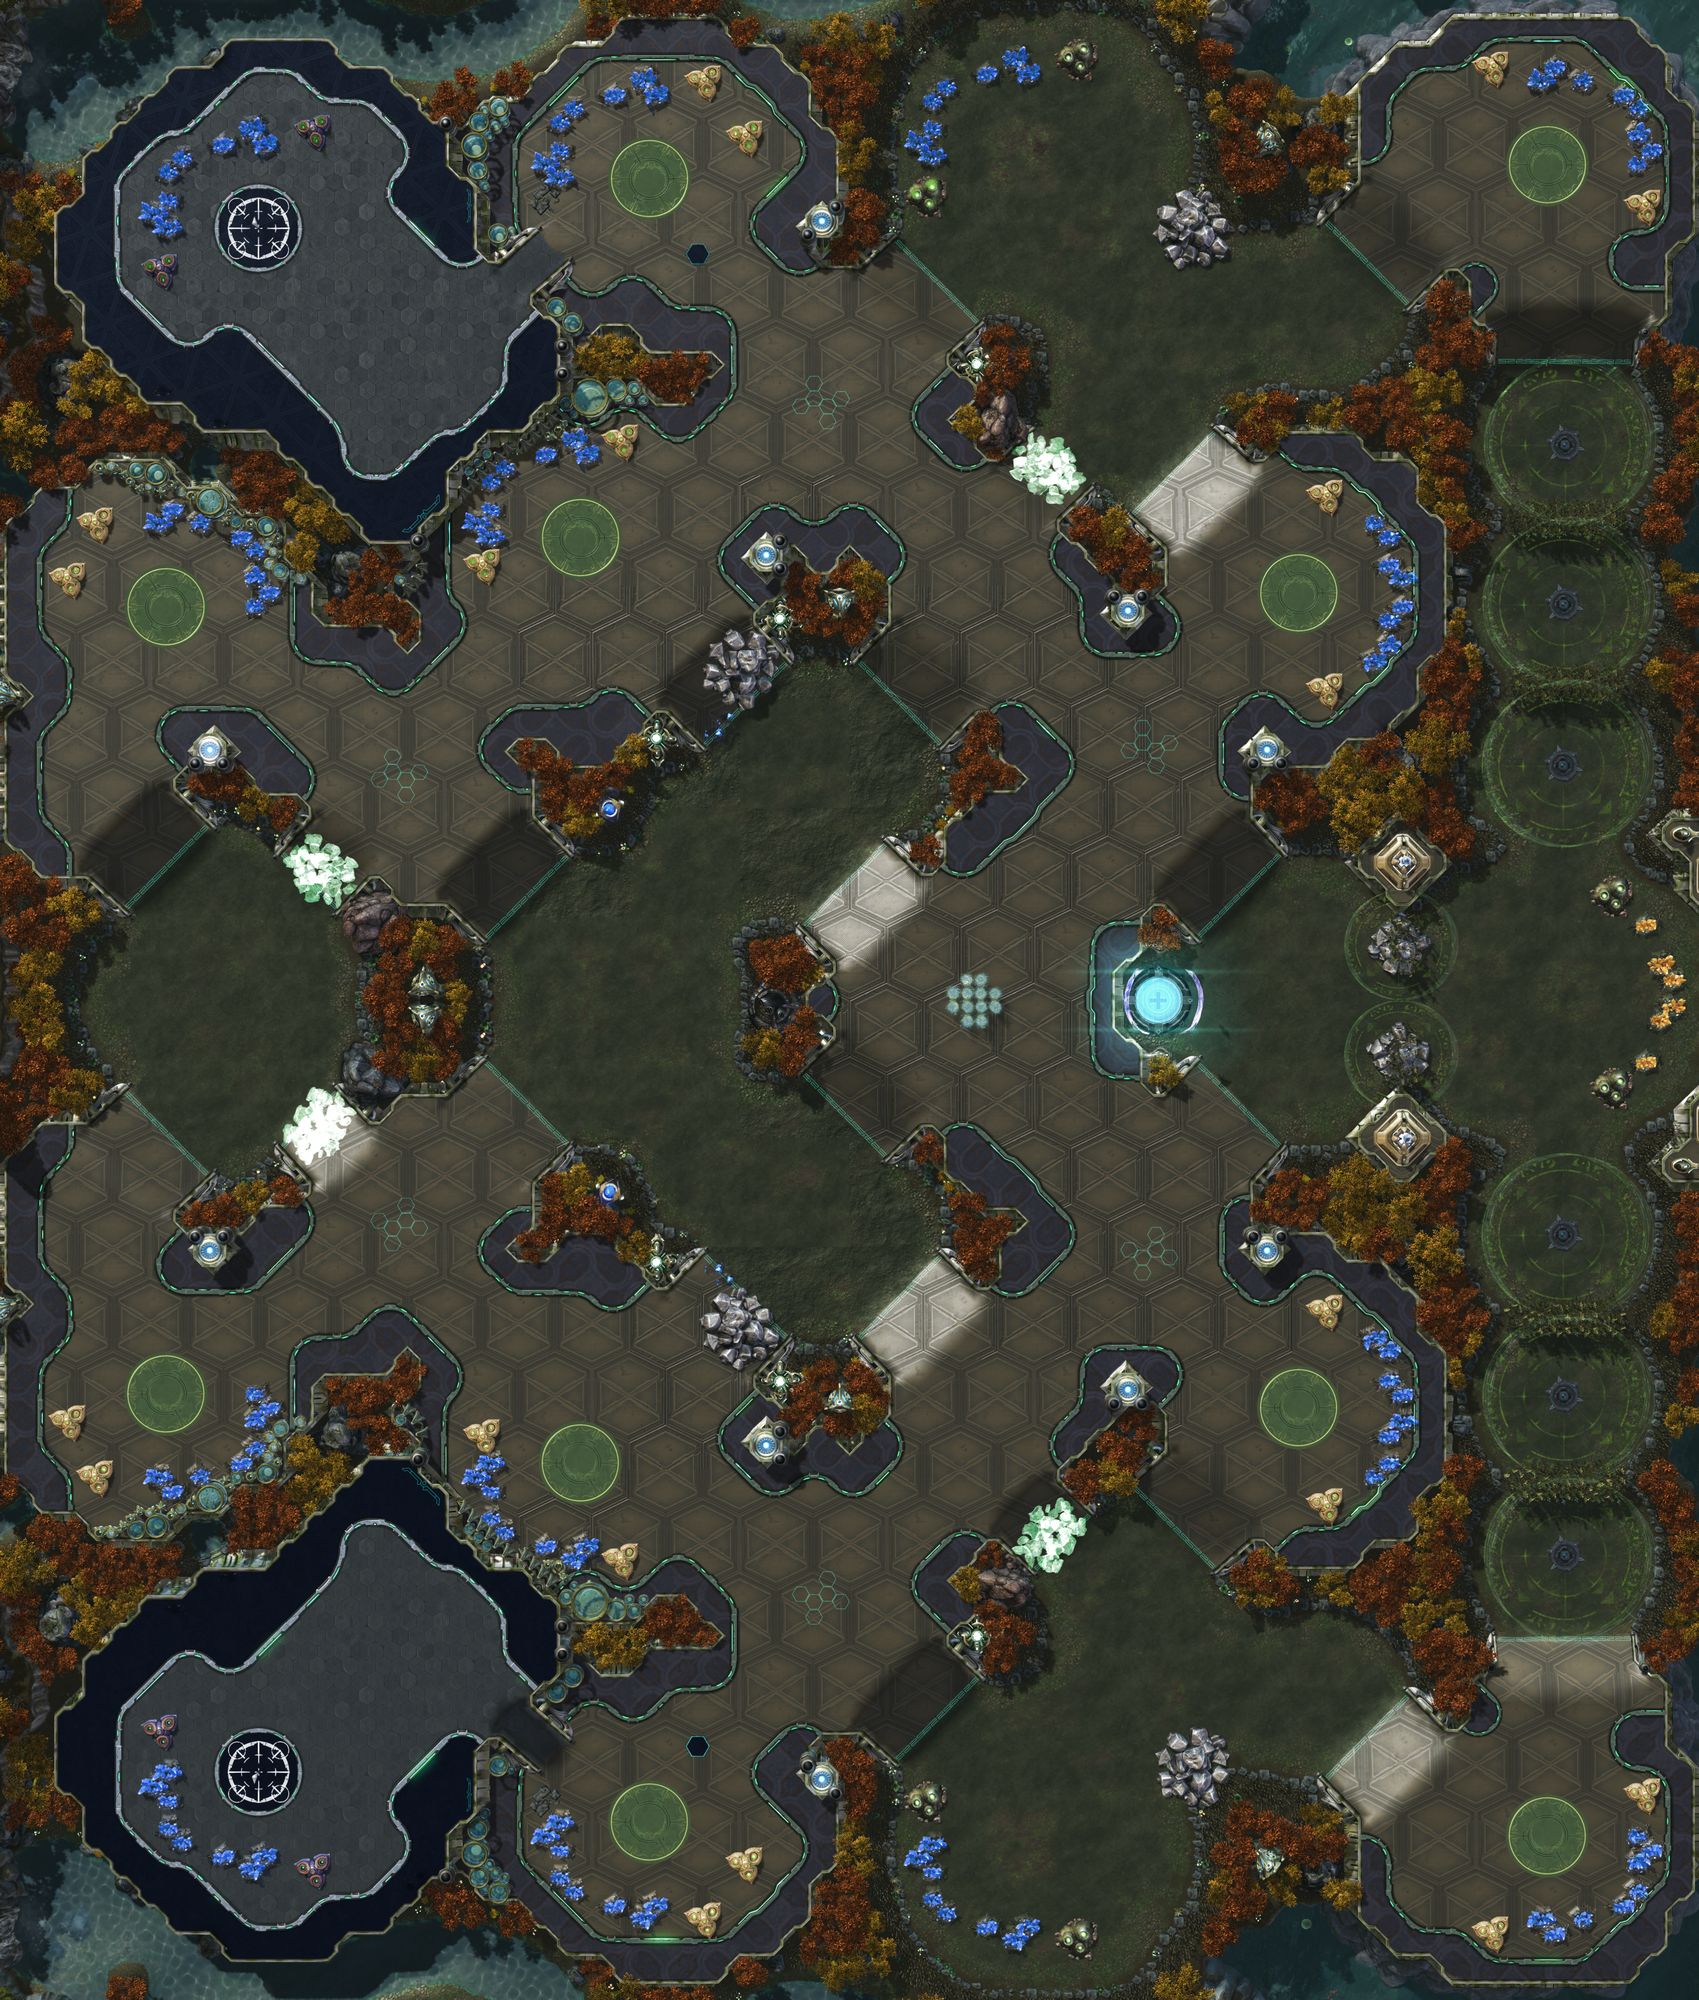 Persephone is a mostly standard map with some unique features. While the map itself is quite long, expanding to the triangle base significantly shortens the distance between you and your opponent. Due to the triangle third's proximity to the opposing side, the rocks + small mineral wall (5 minerals per node) serve the purpose of making the triangle easier to defend early on.
The triangle fourth base is uniquely positioned to help defend the main base while being only slightly closer to the opposing side than the triangle third base.
On the right side of the map, there is an acceleration zone "highway" leading to a gold base. This path is designed to enable armies to move quickly between the far corners of the map, adding a dynamic and strategic element. The gold base serves as a contestable late-game base that players may fight over.
At the center of the map is a healing shrine paired with an air blocker, preventing air units from taking advantage of it. While the shrine offers a potential tactical advantage, its placement also exposes players to enemy attacks if caught off guard.
Rock towers positioned around the map make it possible to close off smaller 2x ramps making positions easier to defend if used correctly. The rock towers can also be utilized to hinder the defender's (or attackers) ability to rotate their army (somewhat similar to Babylon's linear third base setup)
Near the center, there is also a small LOS blocker "pod" breaking up the open space, this adds a little bit of spice to the otherwise open high ground which players may utilize in various ways (for example, hiding Reapers and Hellions in TvT and surprising the opposing Terrans reapers).
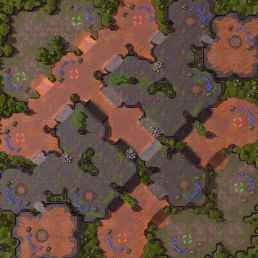
Sandwyrm
By: CharactR "The sets of Dragon's Teeth across the center of this desert are Terran fortifications that are used to impede Tanks and larger units while allowing small infantry units to pass freely. Destroying the large rocks adjacent to them can free up large unit movement. The 1500hp 2x2 debris is conjoined.
Key Features:
- A chicane of Dragon's teeth across the middle that allow small infantry units to filter through while creating a chokepoint for larger units
- 2 smaller sets of dragon's teeth on outer ramps.
- Rocks on either side on the central choke that can be used to bypass the choke later game.
- 2 rich mineral bases blocked by 1500hp debris that allows bases to be taken on location before they can be mined. This way the bases can't be rushed, but don't have the same friction of taking them as traditional 2000hp rocks that block buildings.
Pylon
By: themusic246 A high risk, high reward rich gas base doubles as a mineral wall, leaving it exposed and open after mining out. Double light bridges in the center are not buildable or burrowable. Several open spaces contrast several tighter spots for a variety of engagement types.
Killer's Mile
By: KillerSmile Despite its size, the path to the opponent is very direct. However, it is compromised by having to push up through a narrow ramp, similar to Abyssal Reef. The highground of your natural and third base share extends out into the map to a forward base, and controlling it is the key to defense.
The only other path from north to south leads through 2 small bridges in the very center. To make the outside bases more protected despite their lowground positioning, players can choose to block the paths with cooling towers.
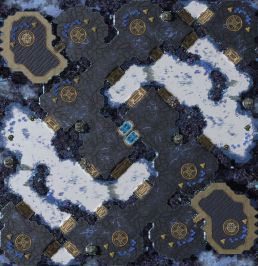
Torches
By: KillerSmile The map features a narrow lowground passage to the opponent that opens up later in the game through self-destructing Zerg 'rocks', allowing access to the right-side gold base area. You can expand there earlier by mining through a gold mineral wall similar to Amphion or El Dorado. The gold bases on this map are conflict bases, and the gold minerals have a 2 tile wide gap every unit can fit through. Still, bigger armies will struggle to traverse them. On the left side there is a secluded healing shrine.
 Selaginella
By: Avex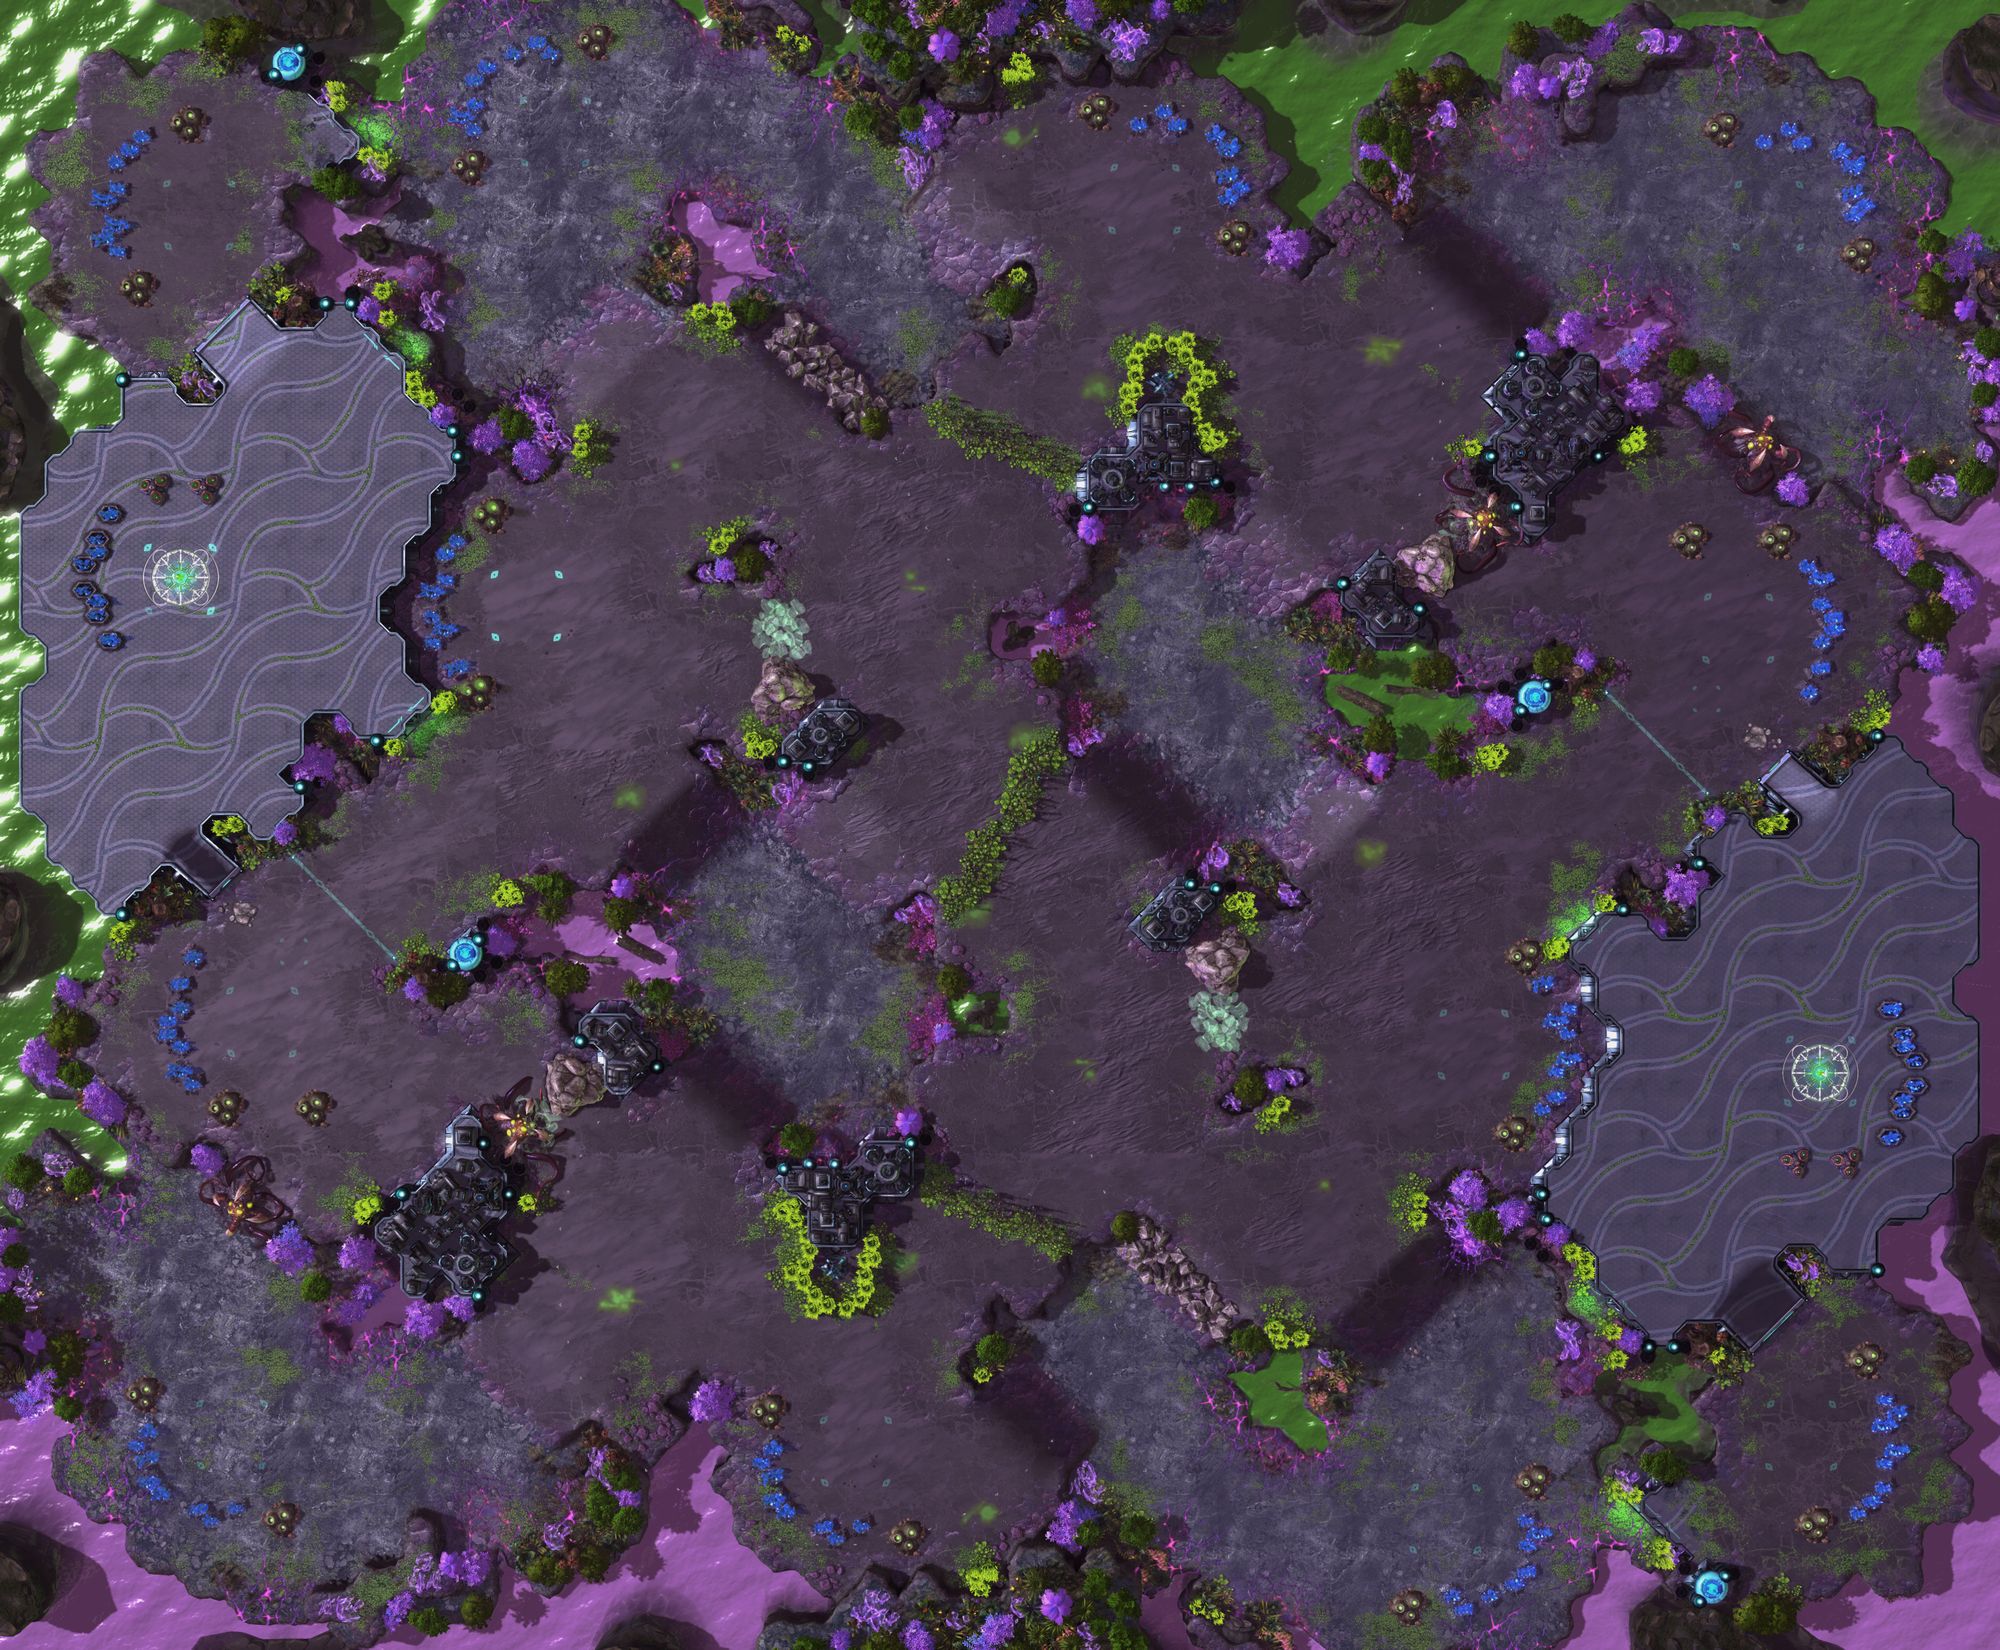 This map features an in-base natural, and a third base "natural" with multiple entrances. Two entrances will be opened by the death of an infested rock at around eight minutes. One such entrance will open a backdoor to a fourth base behind the third, and the other opens a small path out to the rest of the map (which may be closed by a rock tower).
Antimatter
By: themusic246 Start the game with a choice of a forward natural or a pocket natural with a mineral wall that can be opened up. Gold bases sit on the sides of the map, rocked off with an inhibitor zone making them high risk, high reward opportunities.
Incorporeal
By: Monitor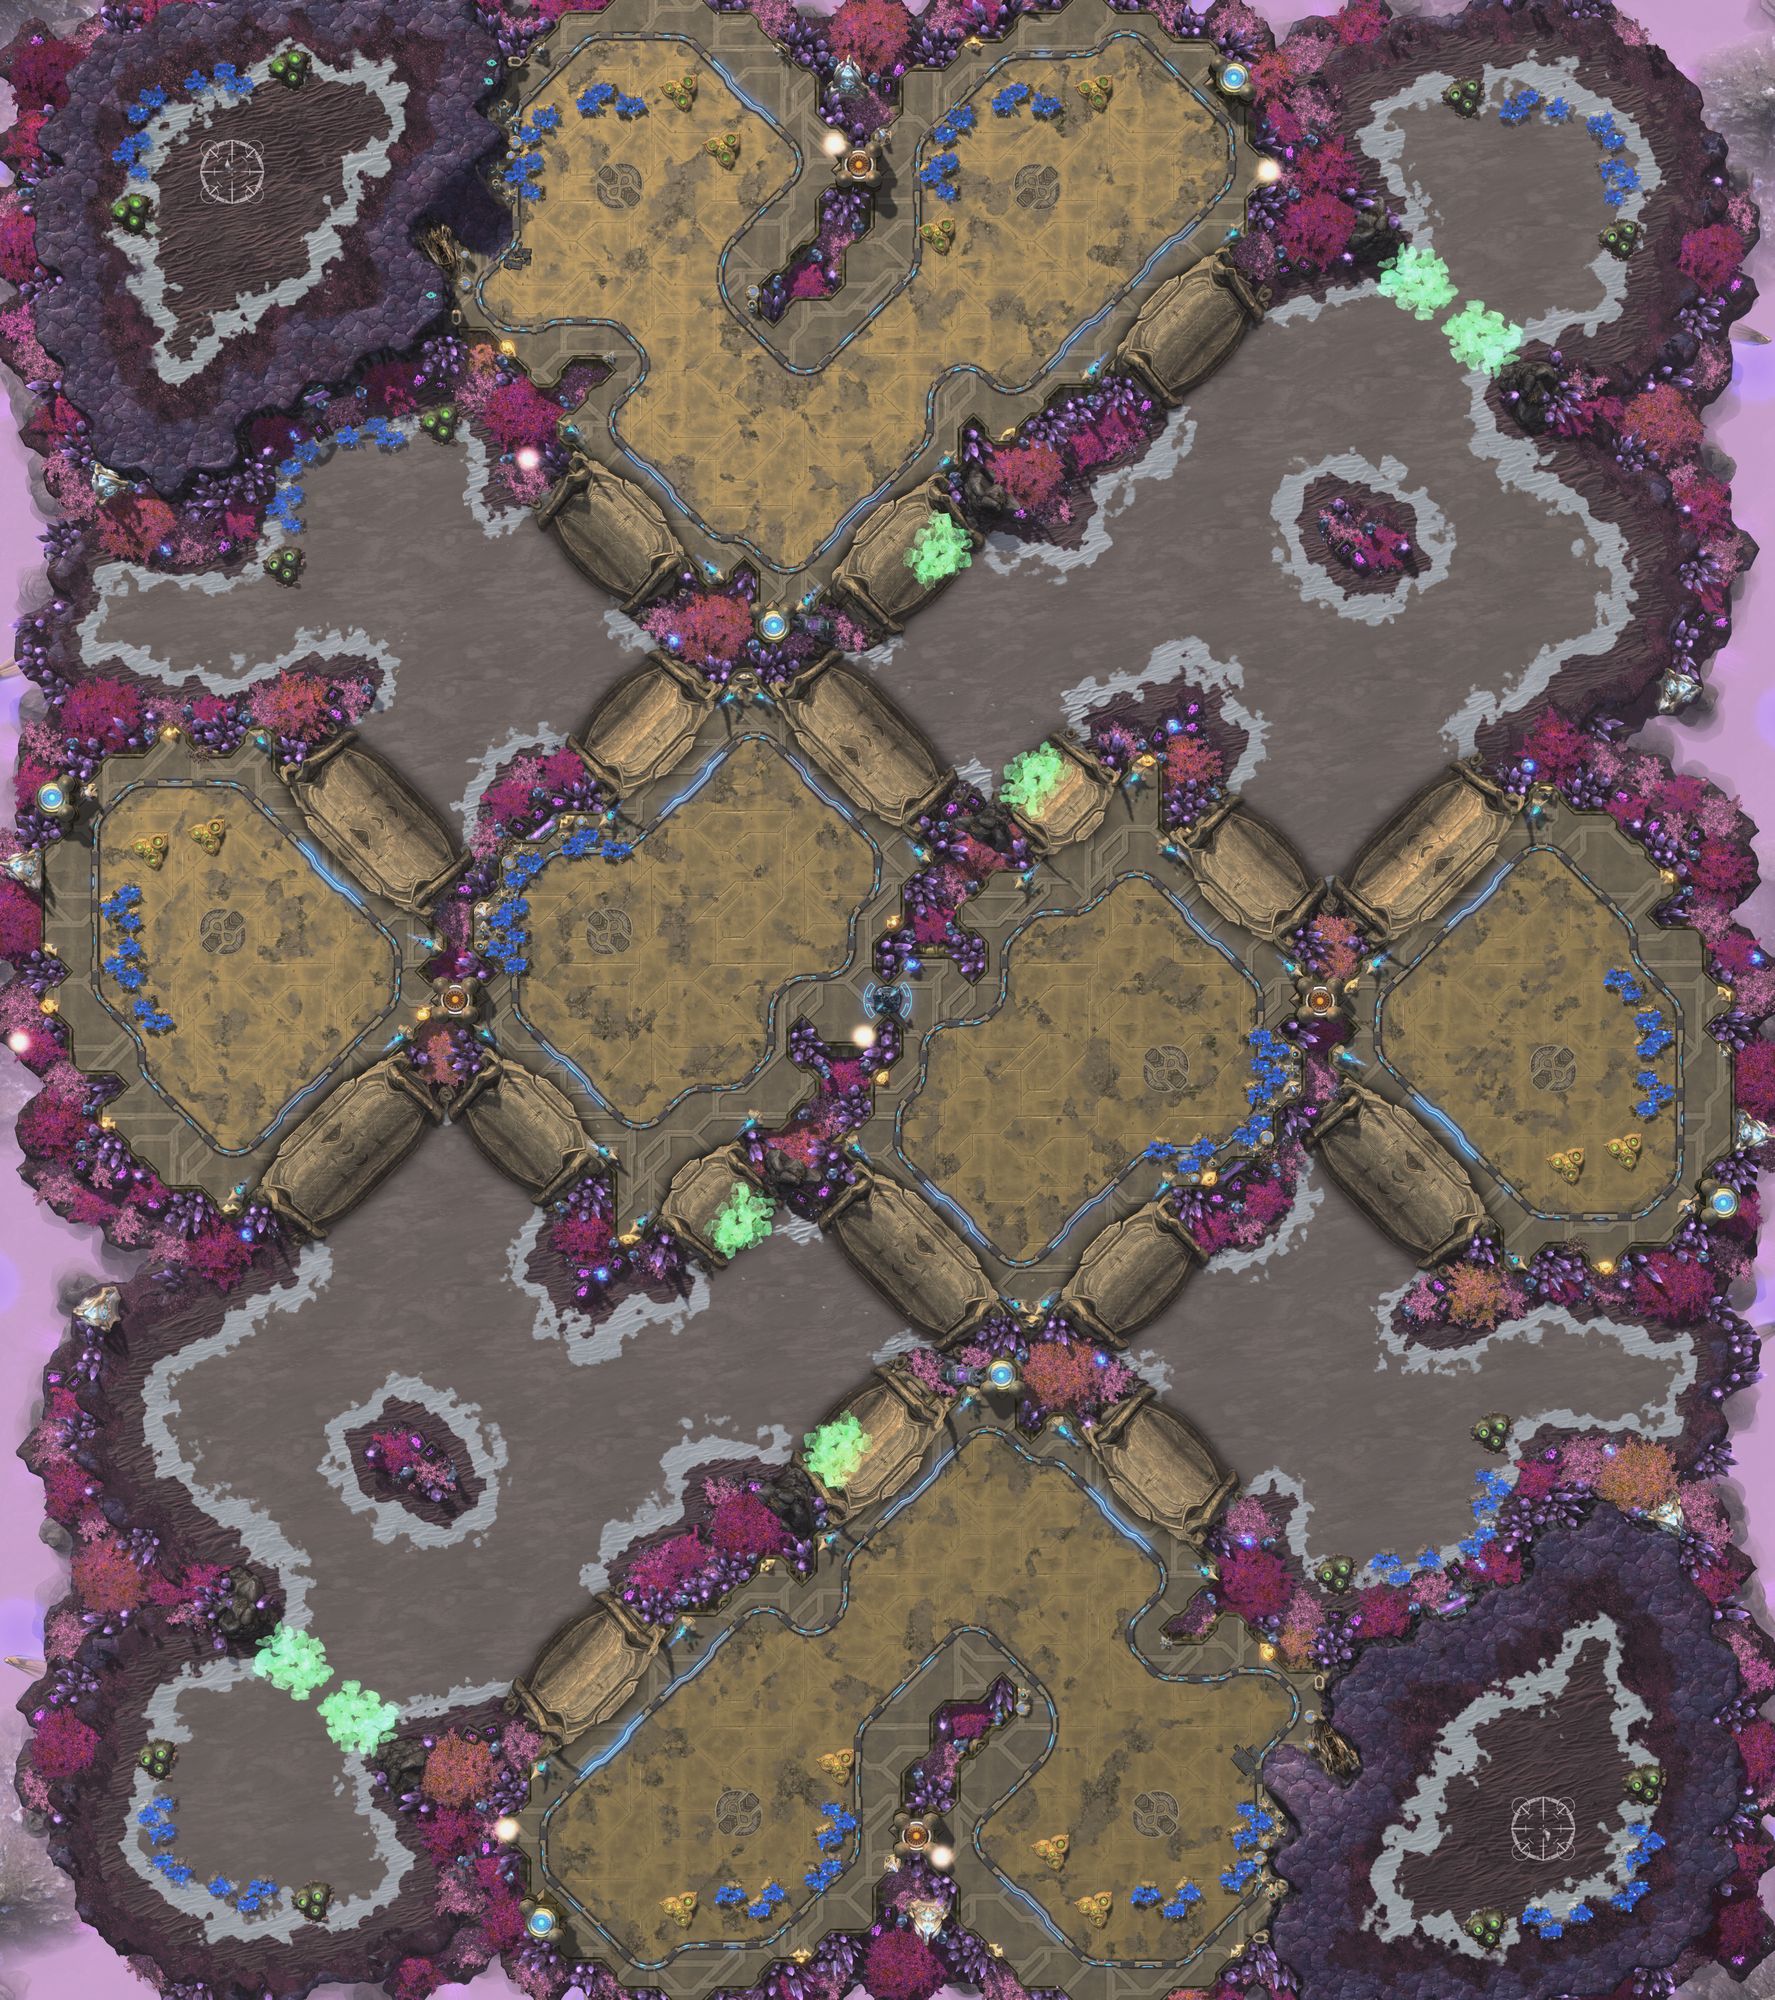 A central Xel'Naga Tower splits two central high ground pods. Gaining control of the tower provides vision of the primary attack paths, with only the outer paths out of vision range. Collapsible rocks block off strategic pathways.
Two center mineral-only expansions contain 10 blue minerals. Corner expansions can be walled with collapsible rocks, becoming semi-islands.
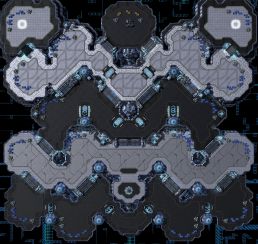
The Grid
By: themusic246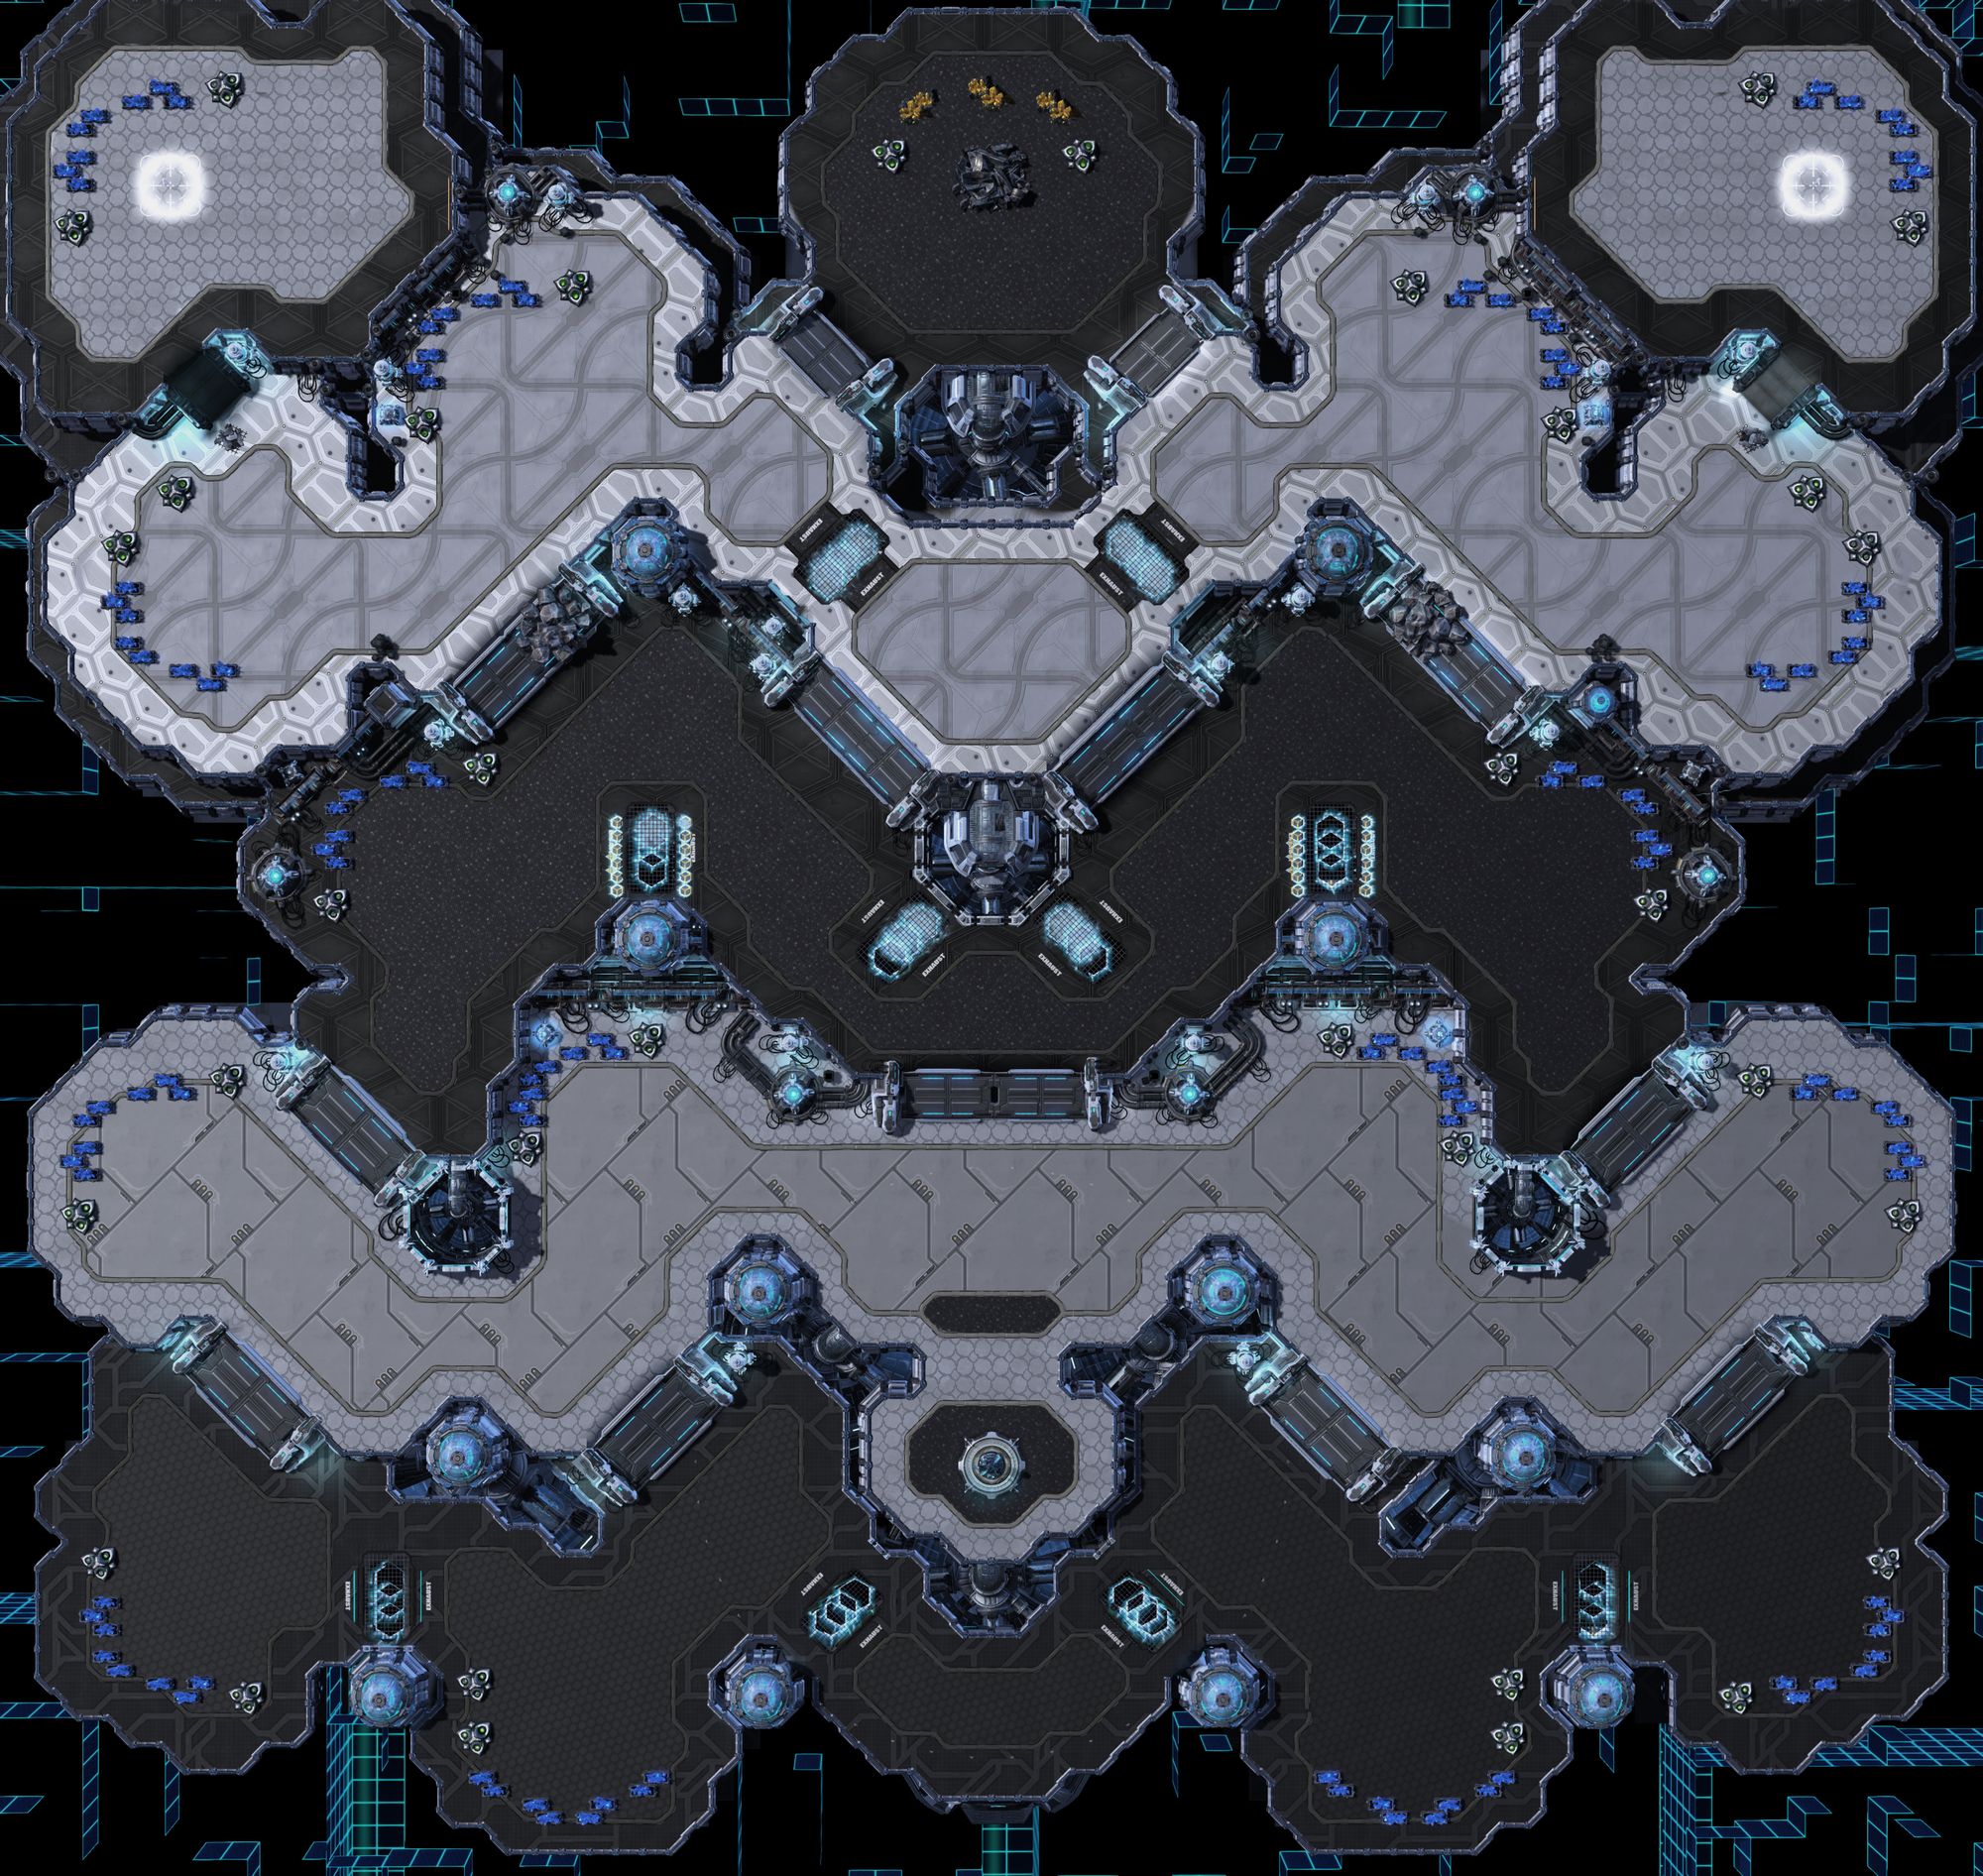 When ground units travel inside the exhaust vents, they block vision of the outside terrain acting as the inverse of line of sight blockers. The map has 5 levels all consecutively going lower down the map. Welcome to The Grid.
Spirit Crusher
By: Timmay A diagonally symmetrical map with many choices for expansion patterns.
Distinctive Features: LoS blockers just outside the main path offer great ambush potential.
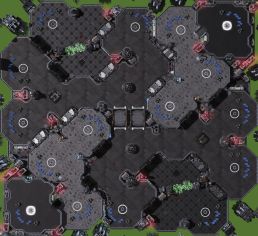
Killswitch
By: volumin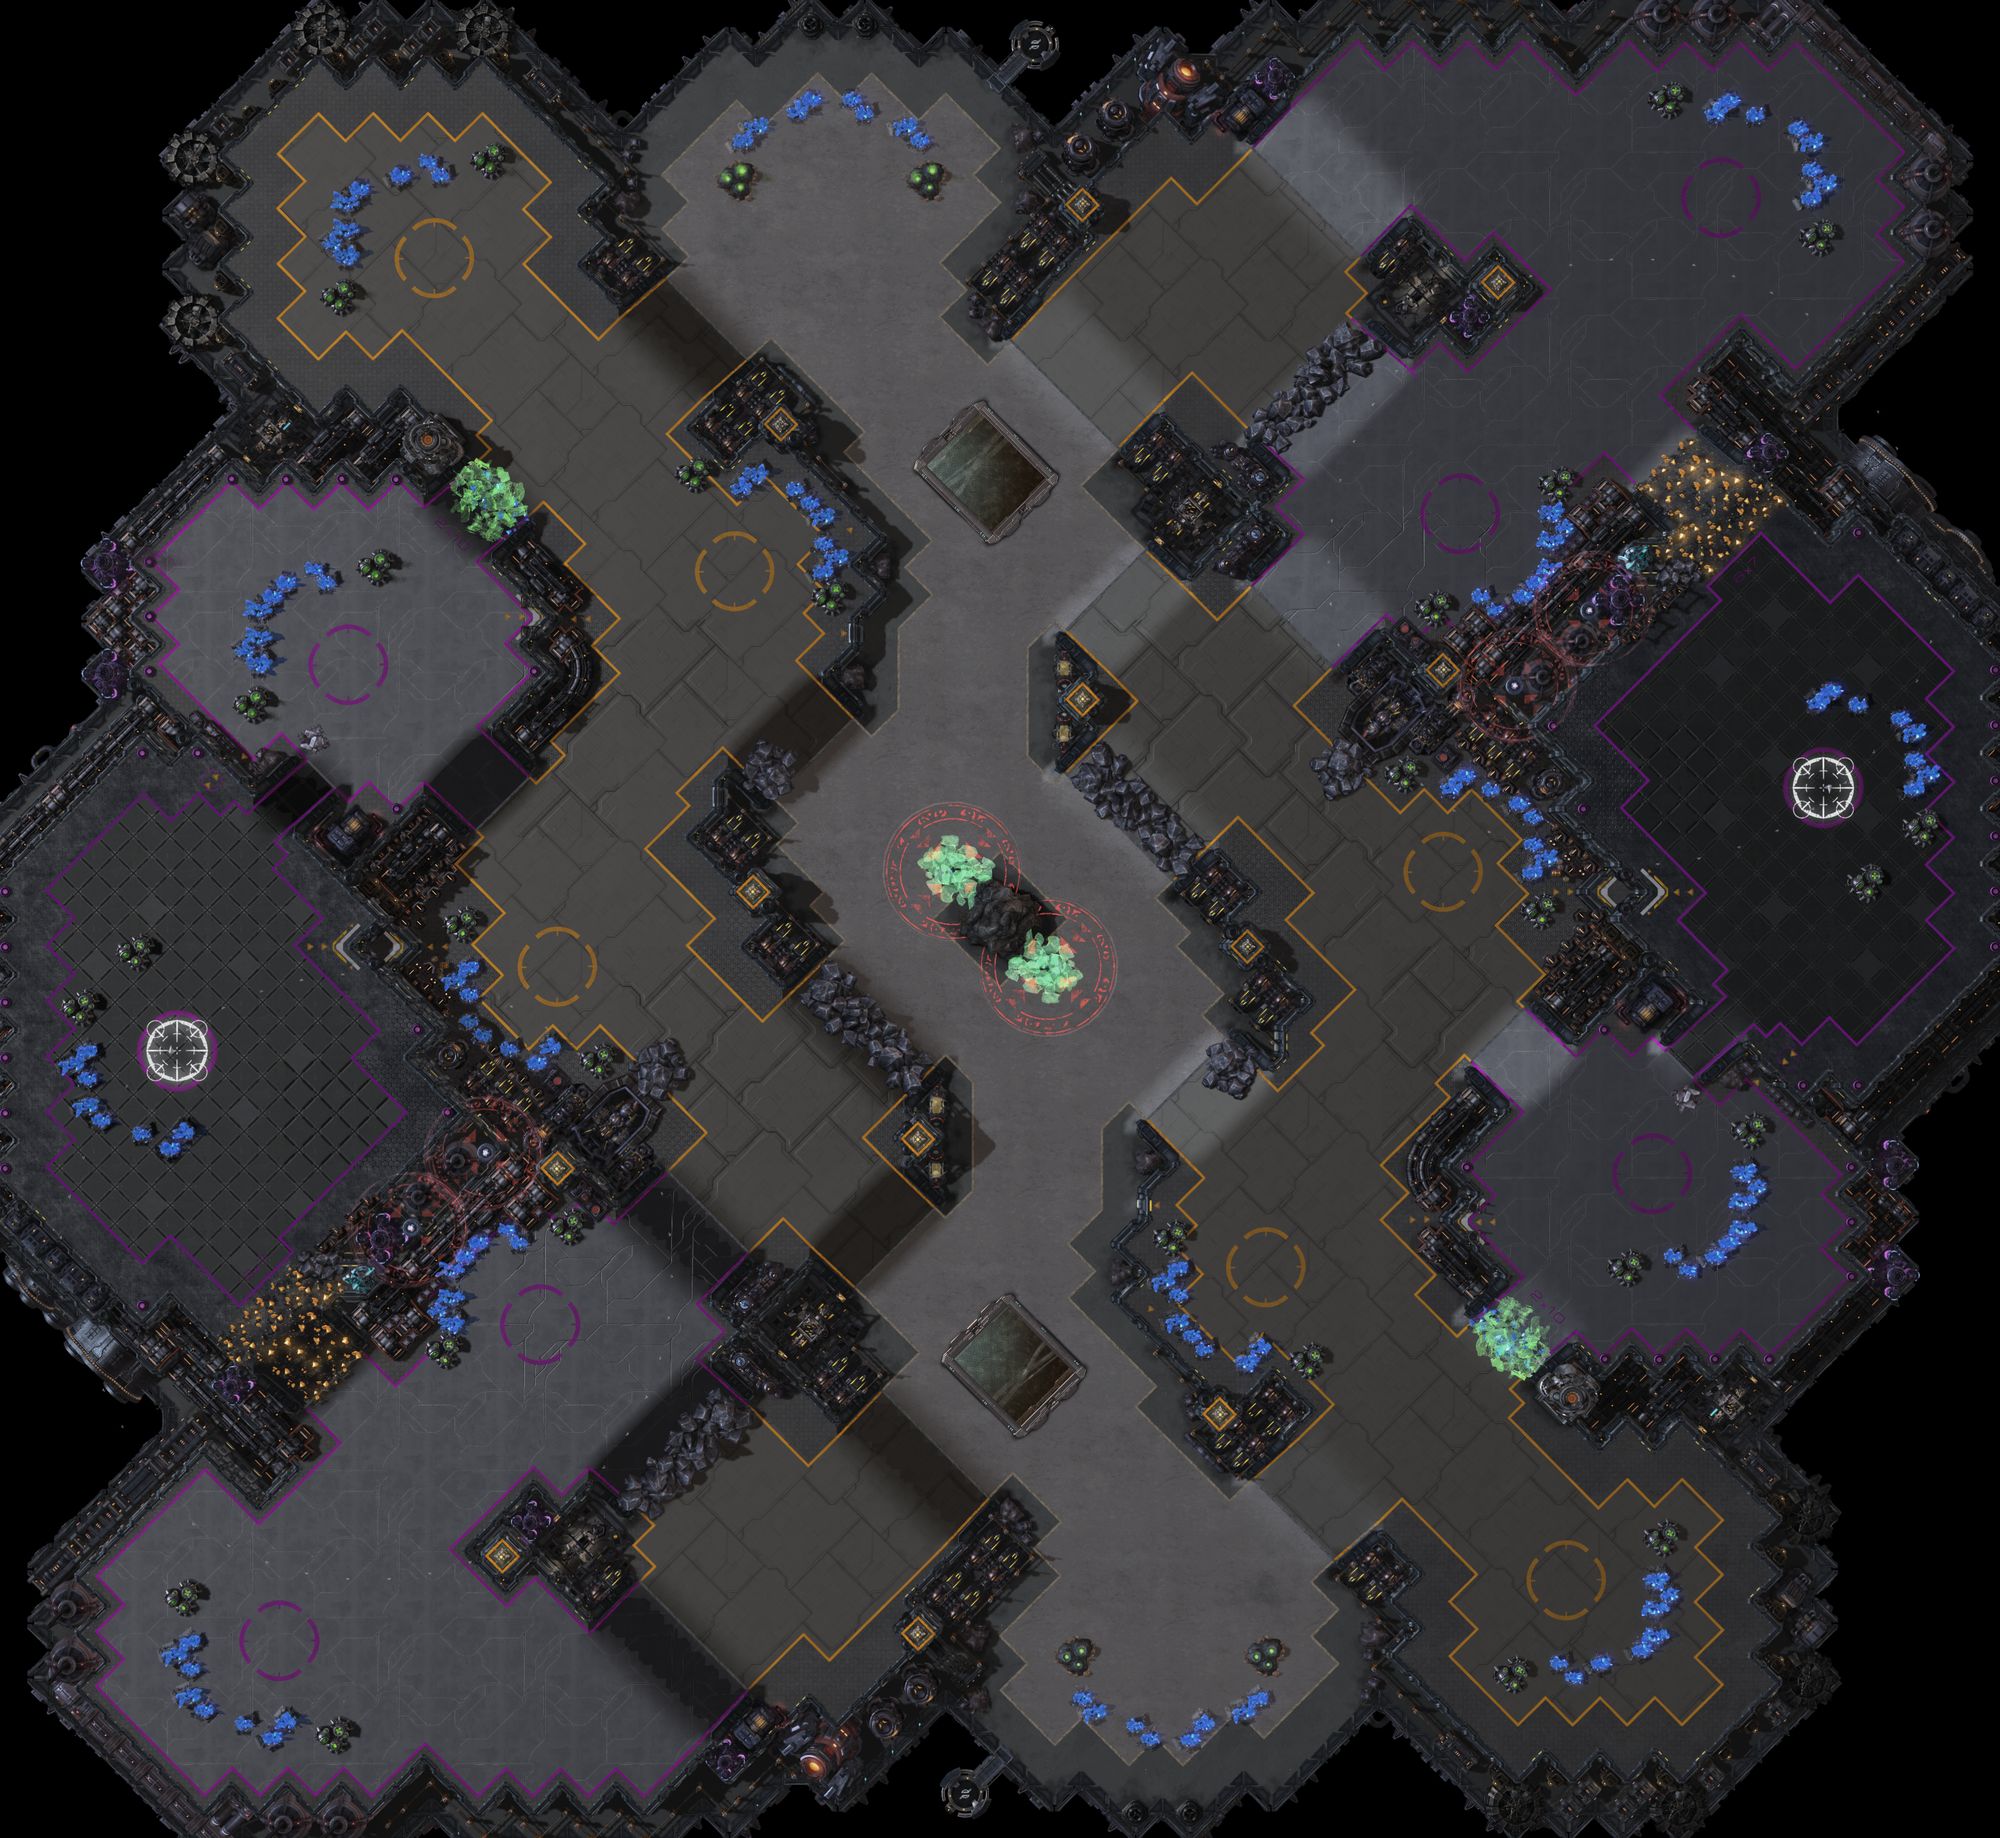 16 base rush/standard map with unique layout. In the main base there's access to a Xel'Naga tower that is blocked by mineral patches and rocks. Next to the tower there's a backdoor to the main blocked by minerals. There's also a second ramp to the natural. Slow zones in the middle can be destroyed.
Voting
TLMC uses a ranked preference voting system where voters assign points to their top five maps in order of preference. Please follow these instructions when voting:- You may only vote for a total of FIVE (5) maps.
- Among your top five maps picks, assign your points/votes as follows:
- Highest rated map: 5 points
- Second highest rated map: 4 points
- Third highest rated map: 3 points
- Fourth highest rated map: 2 points
- Fifth highest rated map: 1 point
- Highest rated map: 5 points
- You may only assign each specific point value once (only one map can be awarded 5 points, etc).
Vote Now!
Voting is open until March 16th (PST).
Time remaining:
Public voting via TL.net determines the final rankings in TLMC #20. All sixteen finalists, as selected by the judges, receive $200 per winning entry. The top five entrants, as determined by public vote, will be awarded additional winnings as follows:
First - $200
Second - $125
Third - $100
Fourth - $75
Fifth - $50
Second - $125
Third - $100
Fourth - $75
Fifth - $50
While the popular vote will be taken into consideration, maps that place high in TLMC #20 are not guaranteed to be added to the competitive ladder. Multiple factors will be considered in order to construct a well-rounded and high quality map pool.
Prize money has been provided by Monster Energy, and we thank them for their support of the map making community and competitive StarCraft II.

![[image loading]](https://i.imgur.com/3UrM9tC.png)
![[image loading]](https://i.imgur.com/mIglRon.jpeg)
![[image loading]](https://i.imgur.com/uQ6biGw.png)
![[image loading]](https://i.imgur.com/mcjdjMi.jpeg)
![[image loading]](https://i.ibb.co/q1KJ90D/Institute-1.png )
![[image loading]](https://i.imgur.com/mVsdfbu.jpeg)
